
Empuls uses role-based access control to govern who can configure programs, manage employees, view reports, or take admin actions. Every user is assigned exactly one access role; the role determines which menus appear and which actions are allowed. Four roles ship with every account and you can create additional custom roles for specialized teams — finance, communications, regional admins — without granting full Super Admin privileges.
Before you start
- You must be a Super Admin to view, create, or edit access roles.
- Changes to an access role take effect the next time an assigned user signs in or refreshes the page.
- Access role names are limited to 25 characters.
Built-in roles
The four built-in roles cannot be deleted or renamed. Super Admin permissions cannot be reduced.
How access control works
1
A role defines a permission matrix
Every menu in the Admin Hub maps to a permission. Each role has one of those permissions enabled or disabled.
2
A user is assigned one role
When you create or edit an employee, you pick their access role. The user inherits every permission of that role.
3
UI adapts to the role
Menus the role doesn’t have access to are hidden. Direct URL access to a restricted page redirects to the home dashboard.
4
Changes propagate on next sign-in
If you change a role’s permissions, assigned users see the new access the next time they reload or sign in.
Review the permission matrix
1
Open Manage Access Roles
Click your profile icon in the top-right and select Manage Access Roles, or navigate to the Manage Access Roles page from Admin Hub.
2
Open Manage Access Roles
Click your profile icon in the top-right and select Manage Access Roles, or navigate to the Manage Access Roles page from Admin Hub.
3
View role columns
The page shows a matrix: rows are menus (Manage Employees, Budgets, Surveys, AI Settings, and so on); columns are access roles. A check in a cell means that role can access that menu.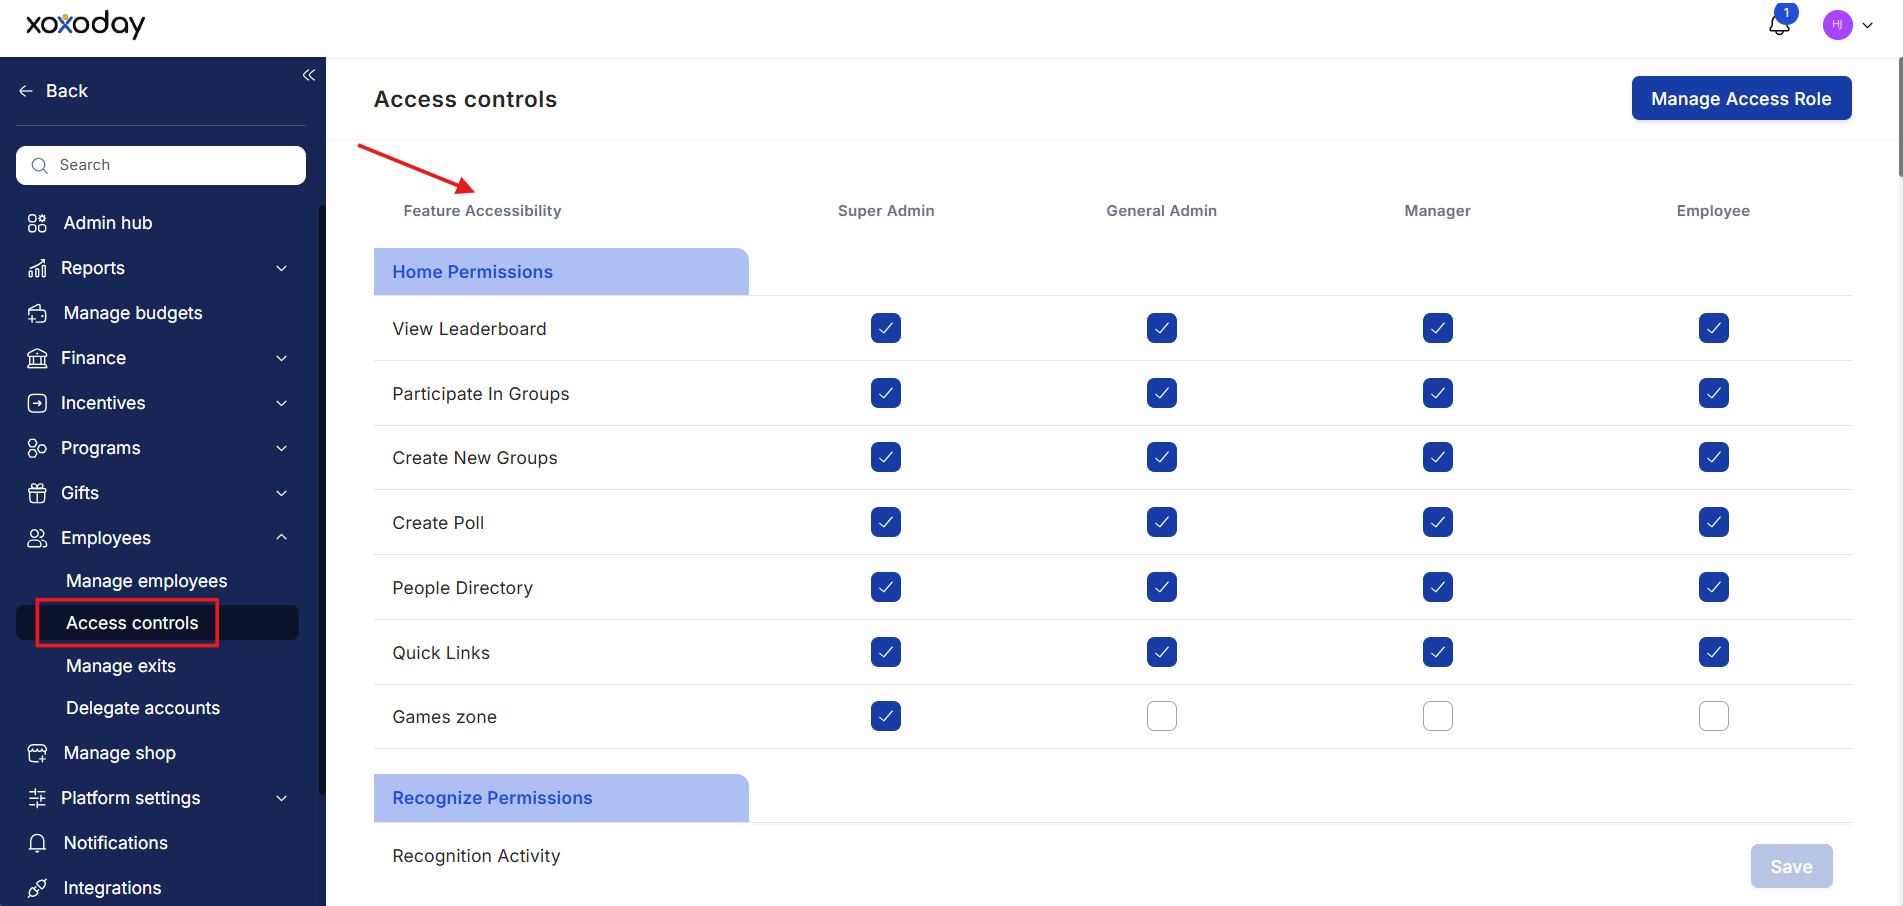
4
View role columns
The page shows a matrix: rows are menus (Manage Employees, Budgets, Surveys, AI Settings, and so on); columns are access roles. A check in a cell means that role can access that menu.
5
Filter or search
For large permission lists, use the search to find a specific menu by name.
Create a custom access role
1
Click Create Access Role
From the Manage Access Roles page, click Create Access Role.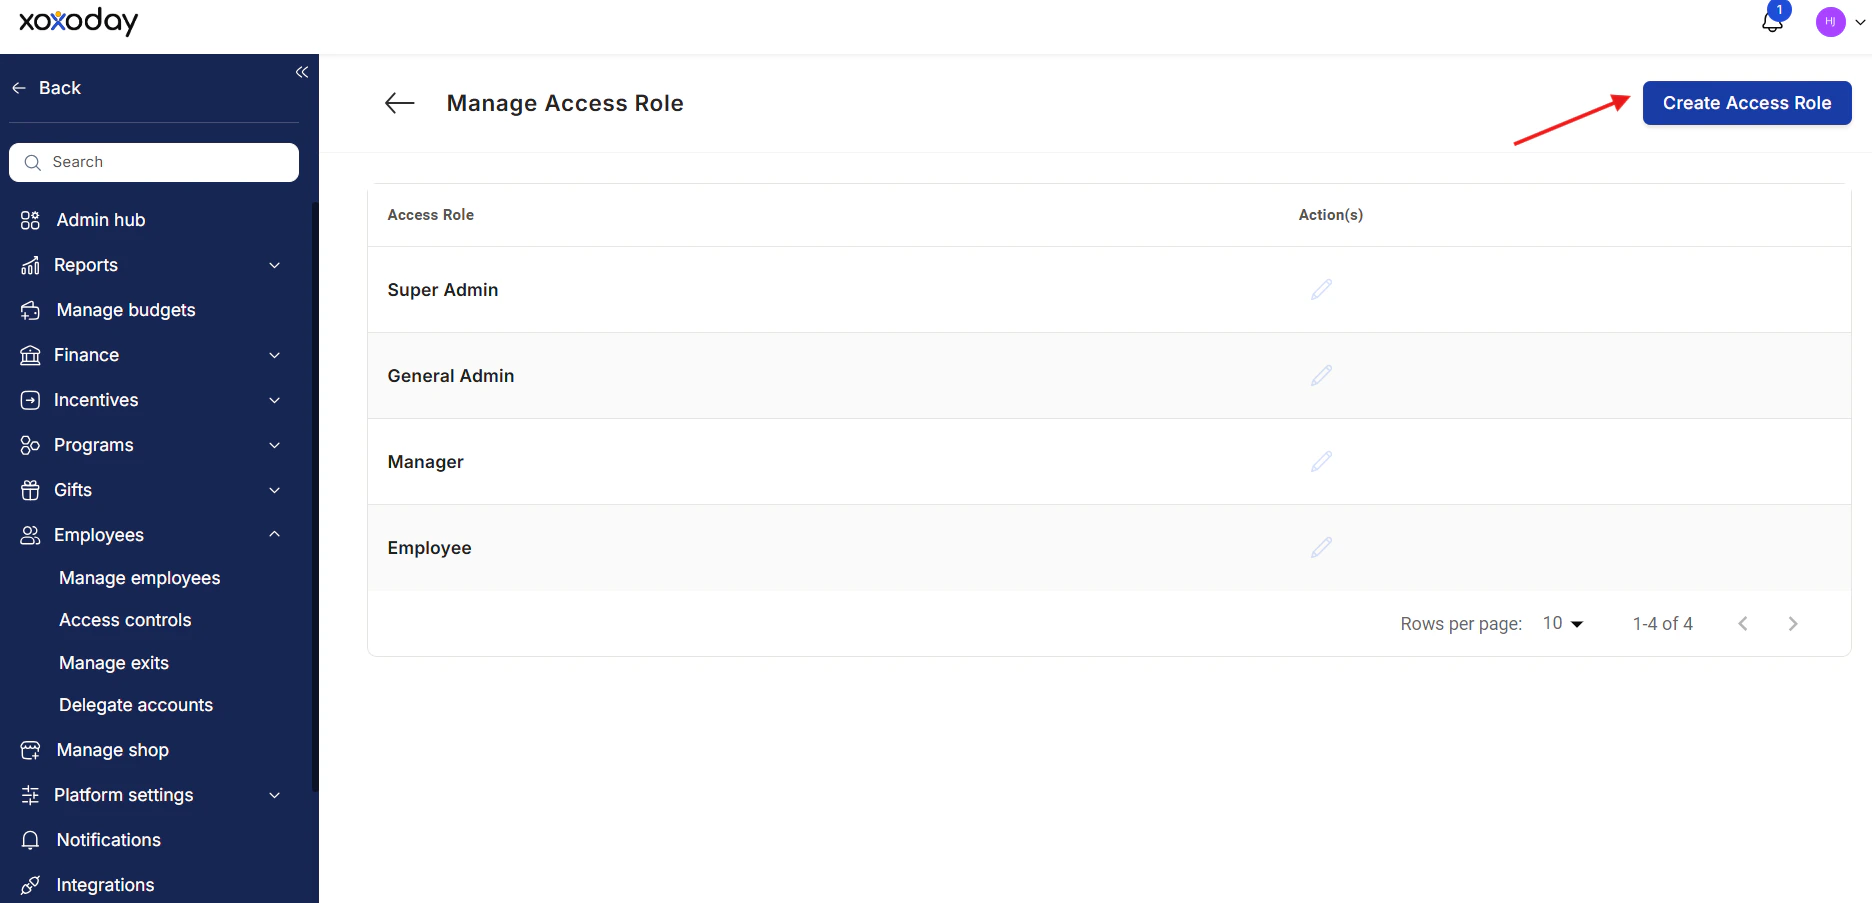
2
Click Create Access Role
From the Manage Access Roles page, click Create Access Role.
3
Name the role
Enter a Role Name (up to 25 characters). Use a descriptive name like “Finance Admin”, “Regional HR”, or “Communications Admin” so the matrix and employee profiles stay readable.
4
Click Submit
The role is created with no menu permissions enabled by default. It now appears as a new column in the matrix.\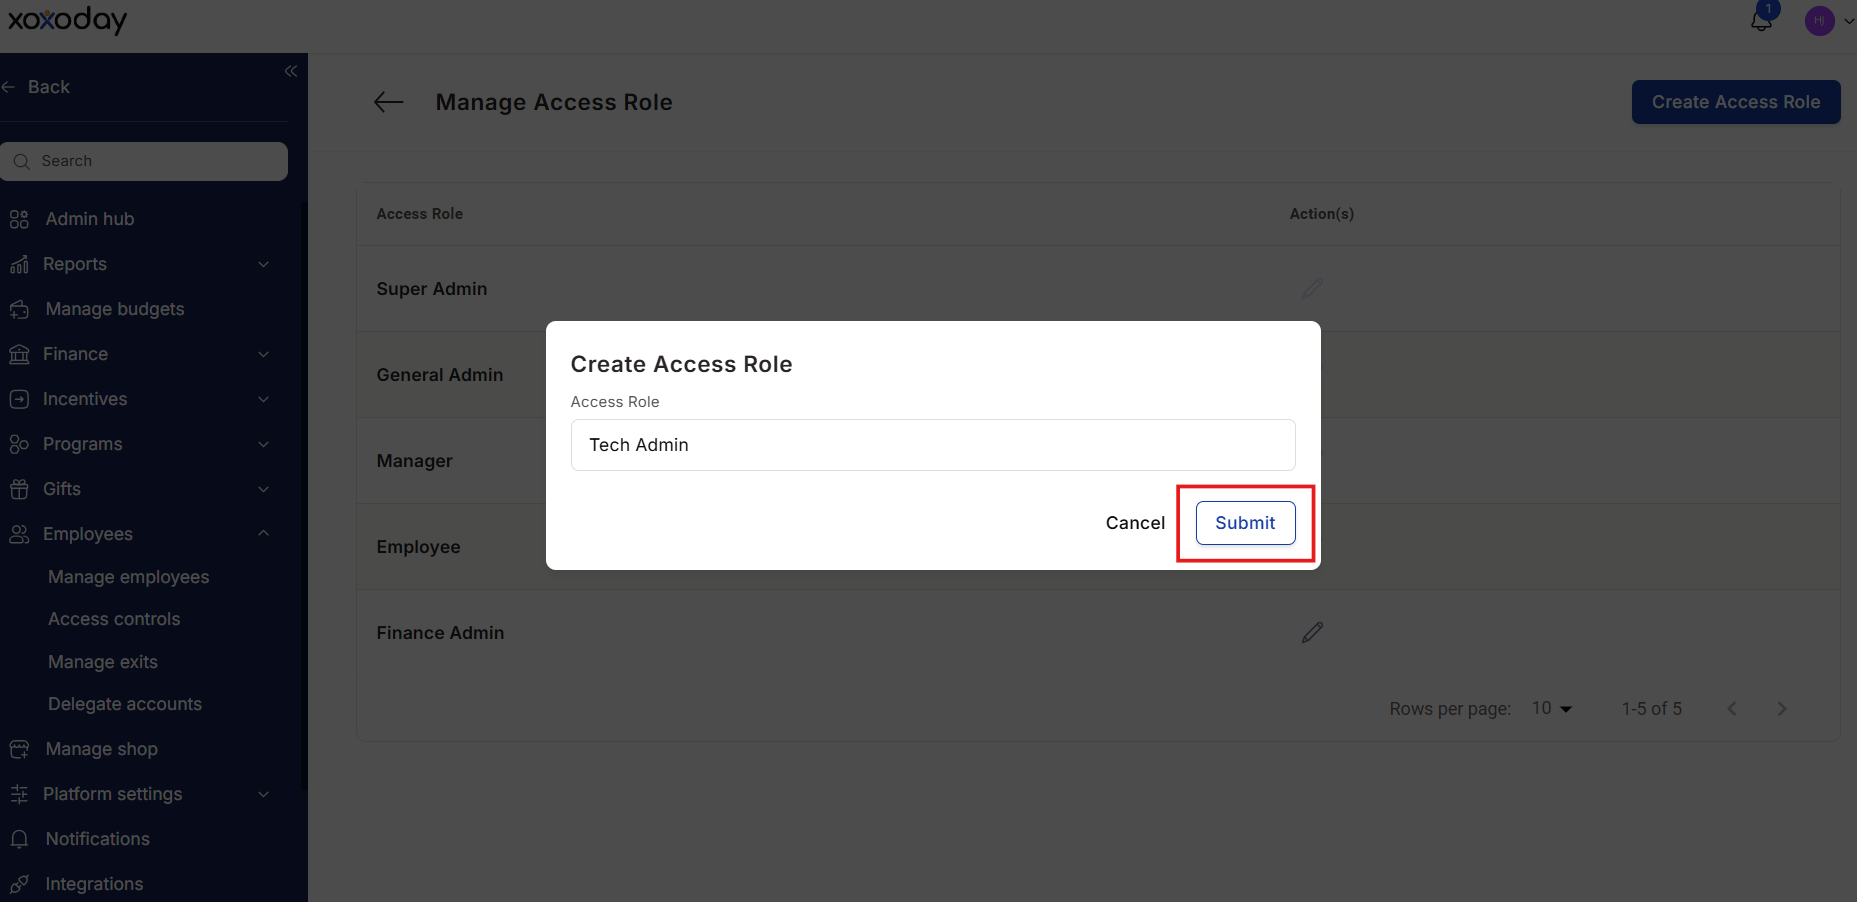
5
Click Submit
The role is created with no menu permissions enabled by default. It now appears as a new column in the matrix.
6
Enable menu permissions
In the new role’s column, check each menu the role should access. Save when complete.
Some menu permissions are “system” permissions that cannot be removed from Super Admin — for example, access role management itself. These cells appear locked in the matrix.
Edit an existing role
1
Find the role
On the Manage Access Roles page, locate the role in the matrix.
2
Edit permissions
Click the pencil icon next to the role. Toggle menu permissions on or off.
3
Submit
Click Submit to save. Users assigned to this role see the updated access on next sign-in.
Assign a role to a user
Role assignment happens on the employee record, not on the access role page.1
Open the employee
Navigate to Admin Hub → Employees → Manage Employees and click the pencil icon next to the user.
2
Update the User Access Role
Pick the new role from the dropdown — built-in or custom.
3
Save
The user’s access updates on their next sign-in.
Separate budget viewing from point distribution
Two permissions in the matrix control budgets:
Use this split when a role needs to see budgets but must not move points out of them. For example, approvers and award givers may need to check budget balances without being able to share points.
For a role that has Budgets but not Distribute Budget:
- Empuls hides the Distribute Points and share budget controls on budget screens.
- In award setup, the option to assign points to users’ personal budgets is disabled.
- Empuls blocks any attempt to distribute points from that role. No points move.
When to use custom roles vs delegation
See User delegation for short-term account access.
Limits and gotchas
- A user can have only one access role at a time. To grant additional menus, edit the role itself or use delegation.
- Deleting a custom role requires first reassigning every user holding that role to a different role.
- Permission changes don’t kick out active sessions; users see new access only after their next sign-in or page reload.
- The Super Admin role cannot be assigned to a brand-new user who hasn’t accepted their invite — they must activate their account first.
Related
Manage employees
Add users and assign access roles.
User delegation
Grant temporary access to another user’s account.
SSO overview
Combine access control with single sign-on for centralized identity.