> ## Documentation Index
> Fetch the complete documentation index at: https://help-empuls.xoxoday.com/llms.txt
> Use this file to discover all available pages before exploring further.
# Create surveys
> Learn how to create surveys on your Empuls platform
Empuls surveys let you collect structured feedback from employees at any point in the employee lifecycle or on any topic your organization cares about. This guide walks through every step of survey creation — from choosing a survey type and building your question set to configuring anonymity, selecting respondents, scheduling delivery, and sending reminders.
You need an **Admin** or **Survey Admin** role to create and manage surveys.
## Survey types overview
Empuls offers four categories of surveys:
| Survey type | Purpose | Recommended cadence |
| --------------------- | ------------------------------------------------ | ------------------- |
| **eNPS** | Measures employee loyalty with a single question | Quarterly |
| **Pulse** | 11–15 questions across engagement drivers | Quarterly |
| **Annual engagement** | Comprehensive 57-question deep-dive | Annually |
| **Lifecycle** | Triggered at specific employee milestones | Event-based |
| **Custom** | Fully flexible — built from scratch or templates | As needed |
## Running an eNPS or pulse survey
Go to **Survey > Pulse and eNPS** and scroll to the **Employee Pulse Surveys** card. Here you'll see the default survey templates and any already-running campaigns.
Choose either an **eNPS Survey** (single loyalty question) or a **Pulse Survey** (multi-question engagement assessment). Click **Get Started** on the template you want to run.
Click **Run Survey** at the top-right. From here you can adjust the survey period using the calendar, then proceed through the configuration steps below (Steps 7–10).
## Creating a custom pulse survey
If the standard templates don't fully meet your needs, you can build a custom pulse survey from scratch or extend an existing template.
Navigate to **Survey > Pulse and eNPS**, then click **Browse Templates** at the top-right.
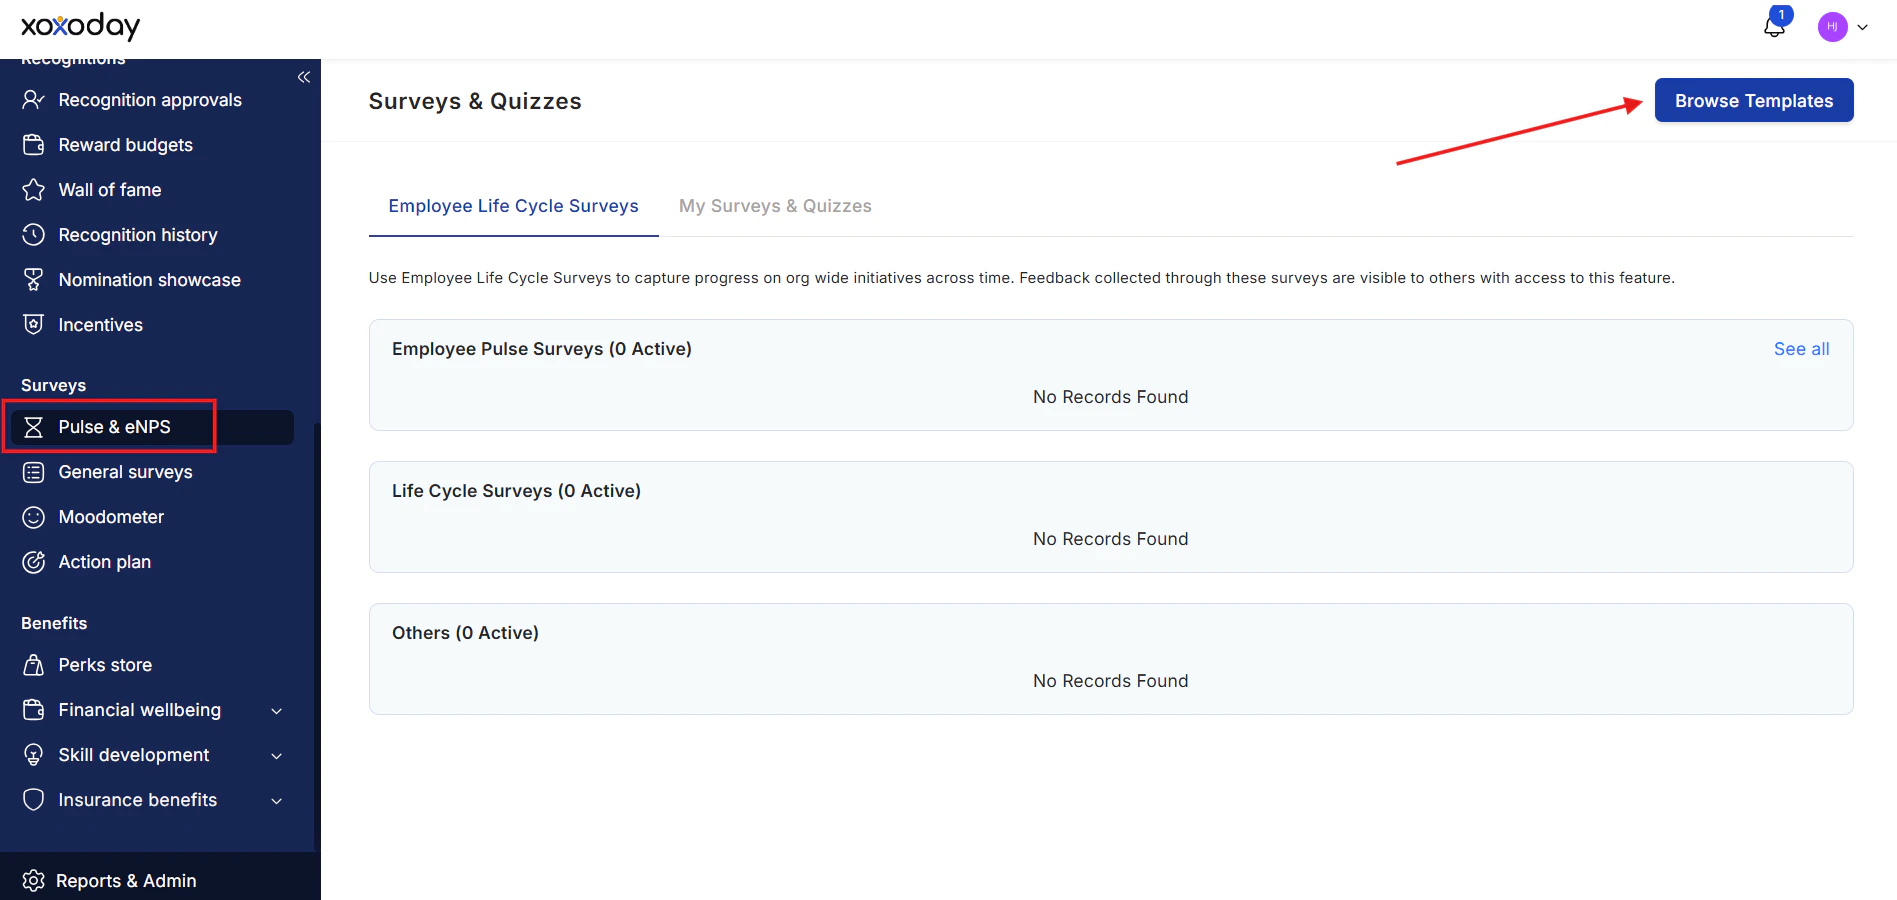 * Select an existing template to customize, or
* Click **Create from Scratch > Create Your Own Pulse Survey**
* Select an existing template to customize, or
* Click **Create from Scratch > Create Your Own Pulse Survey**
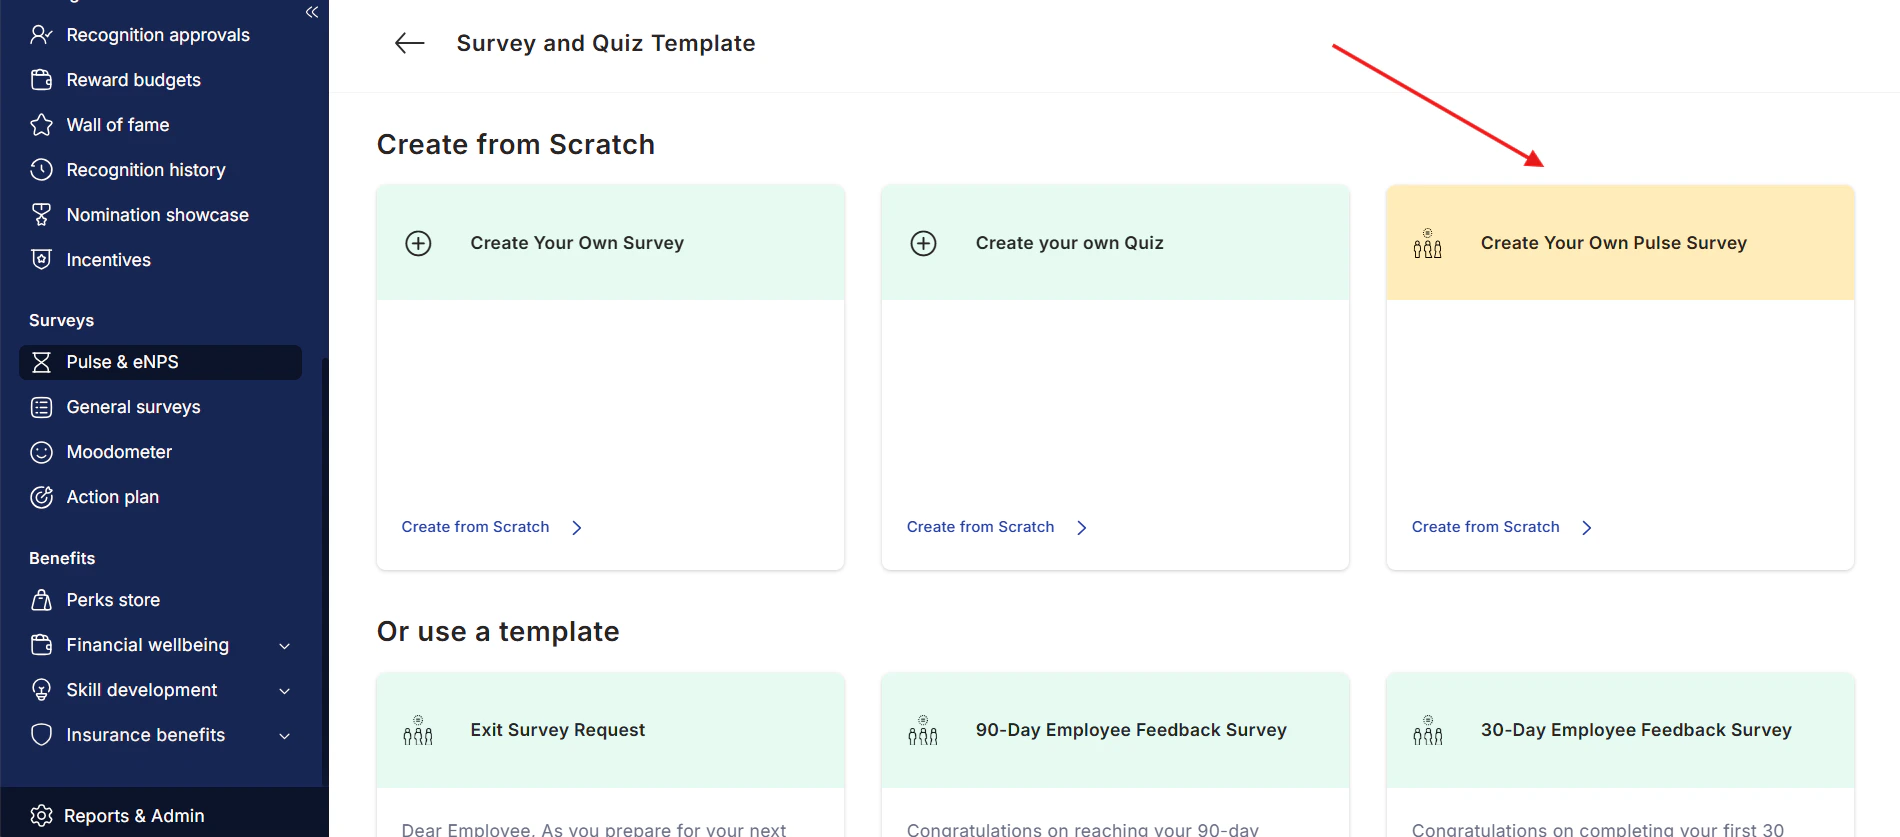 Fill in the survey **name** and **purpose** so respondents understand why they're being asked to participate. Click **Continue**.
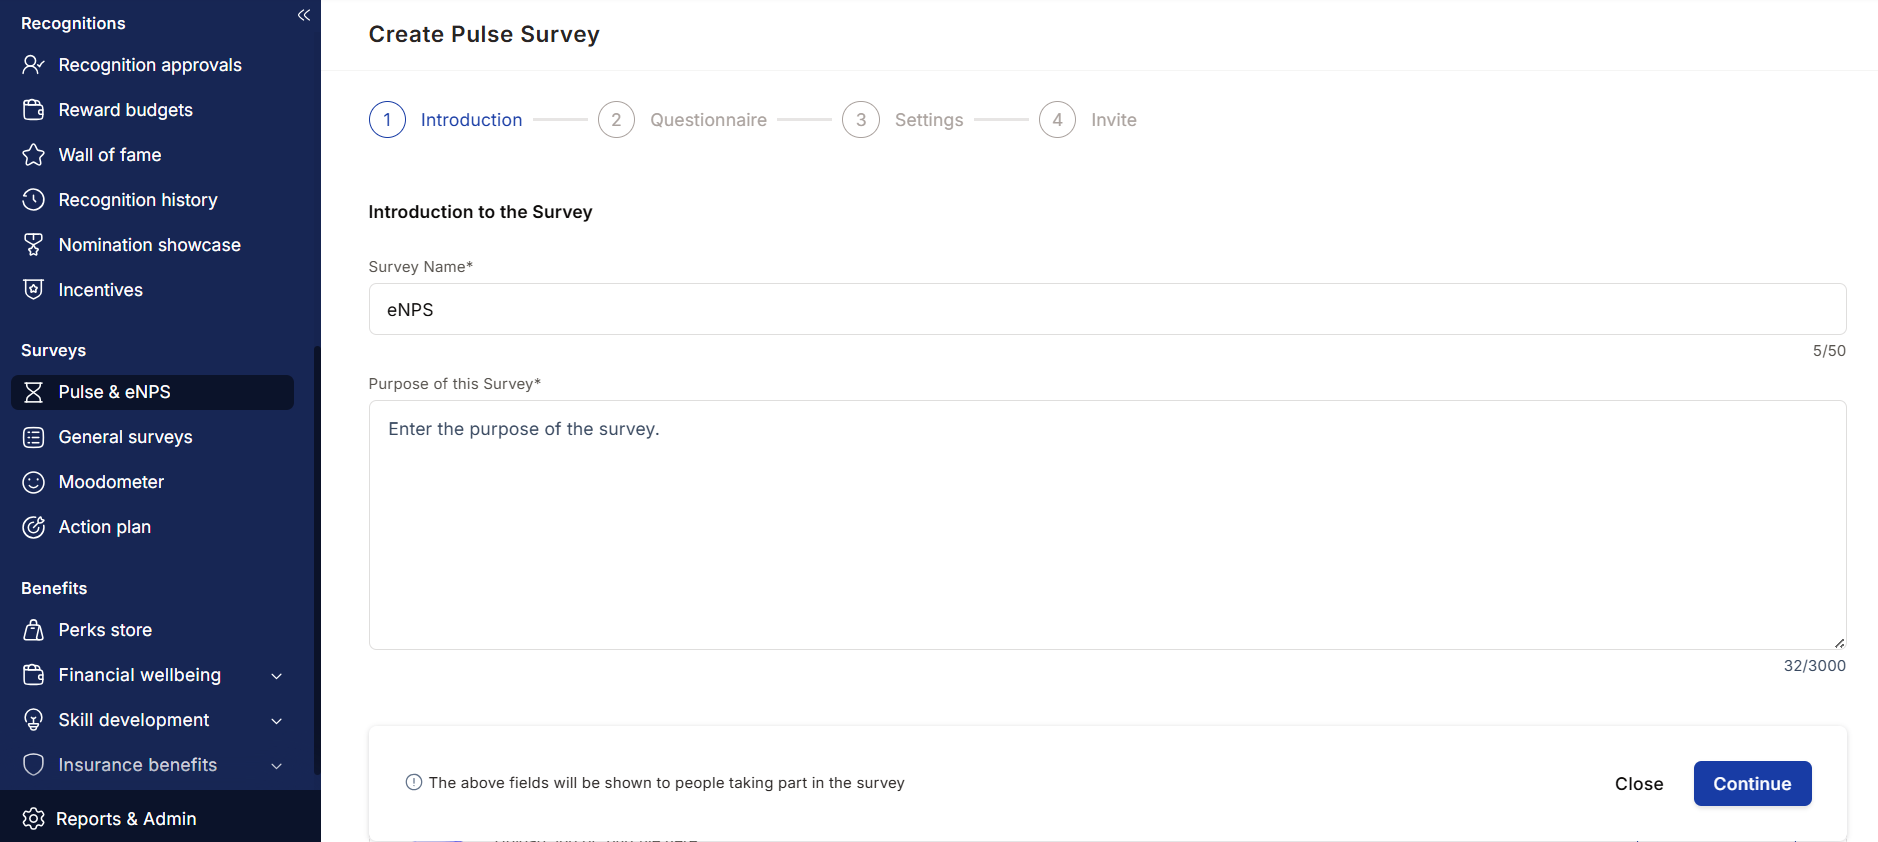 You have two options for building your question set:
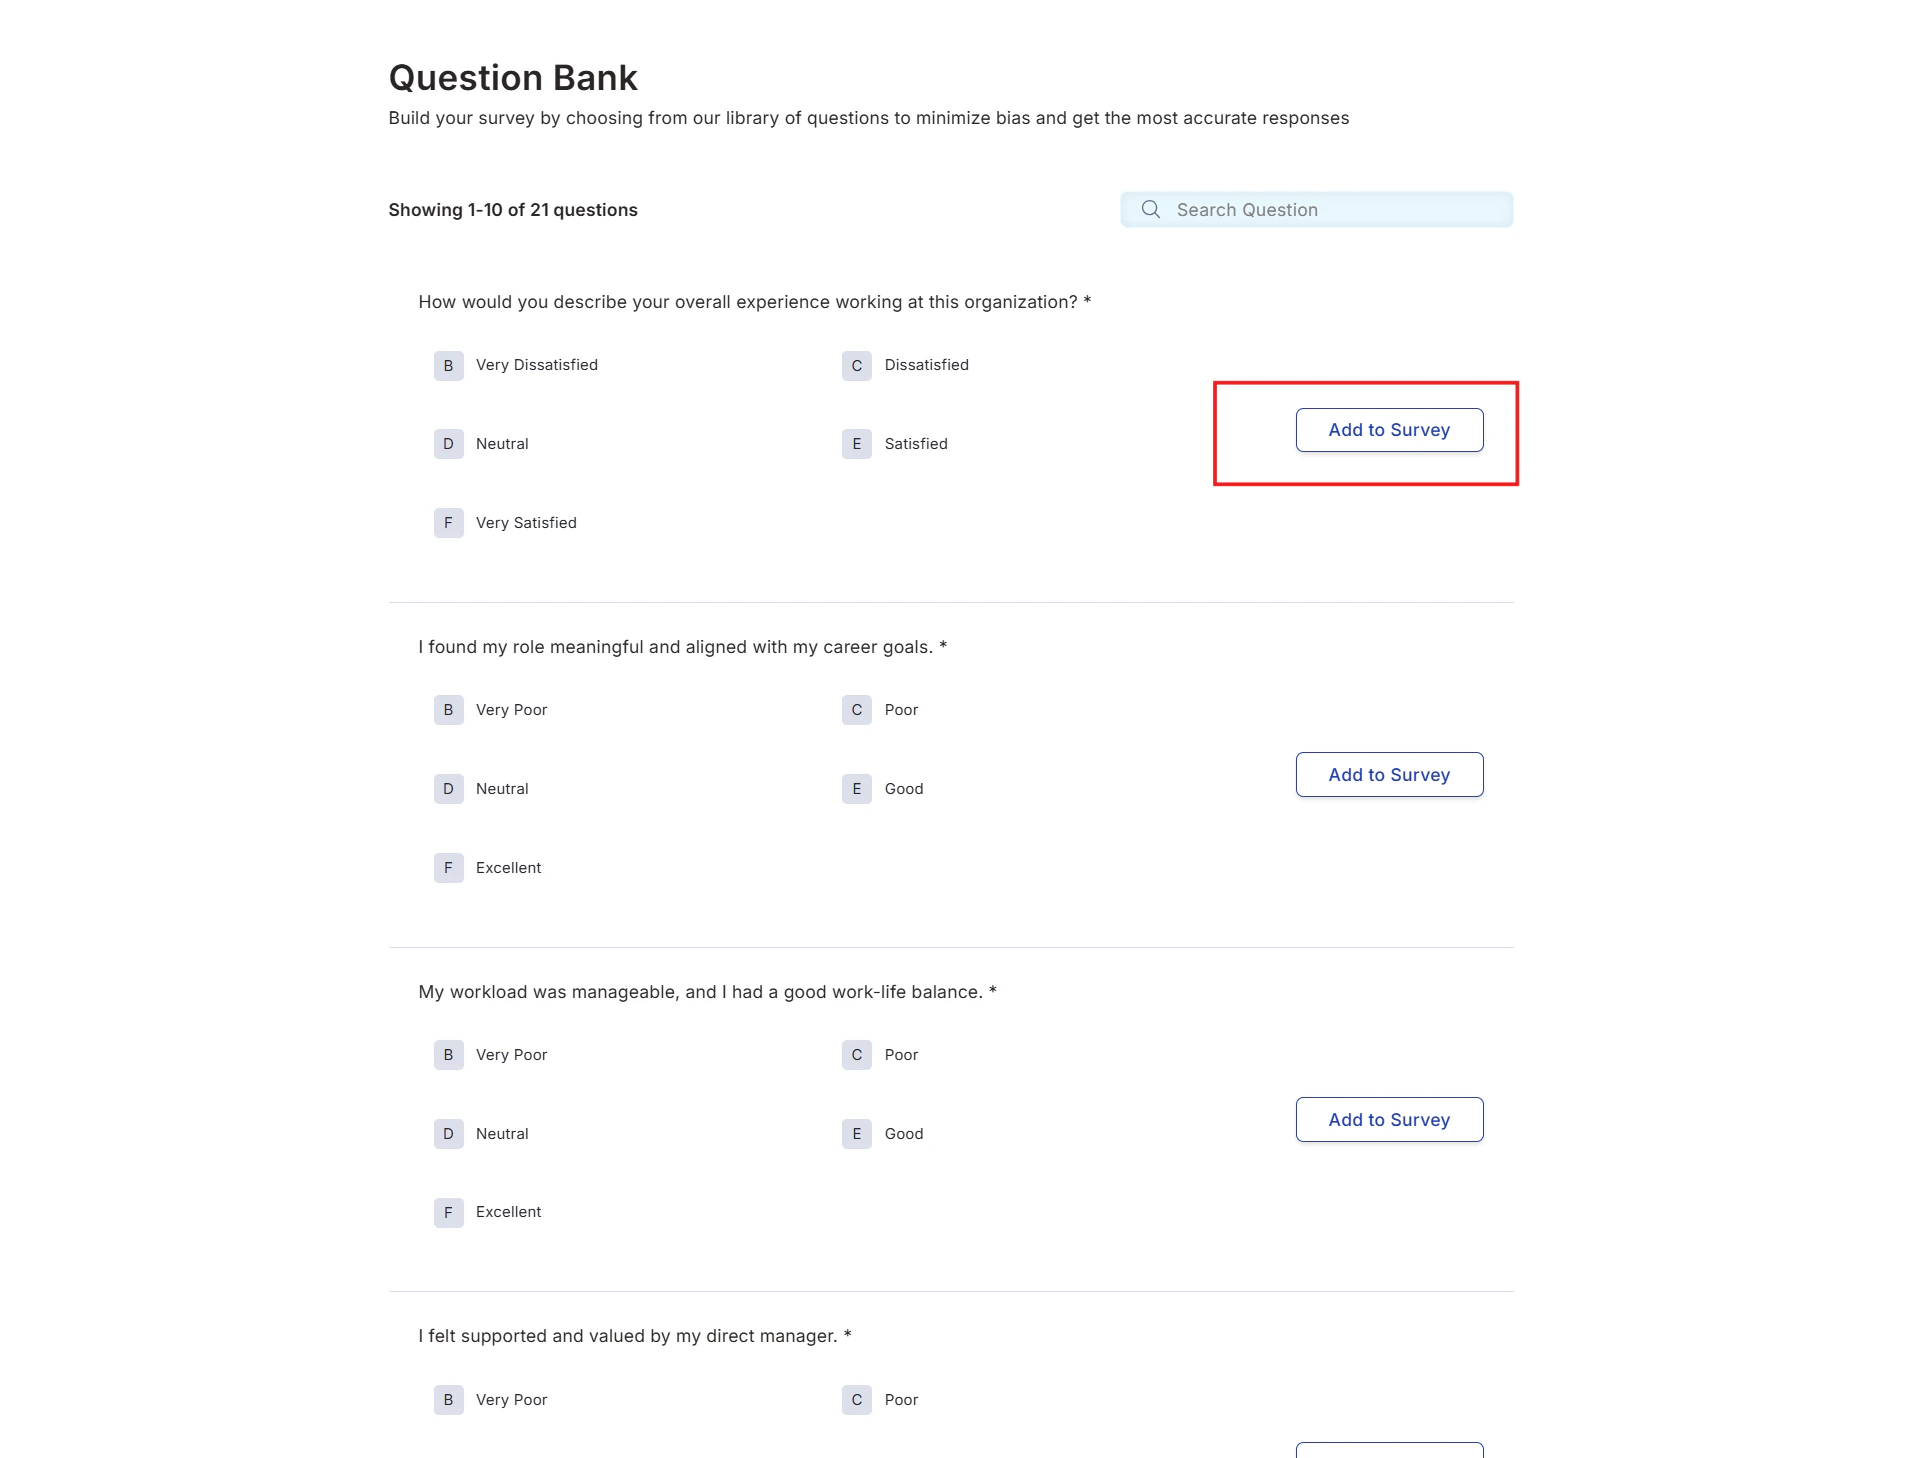
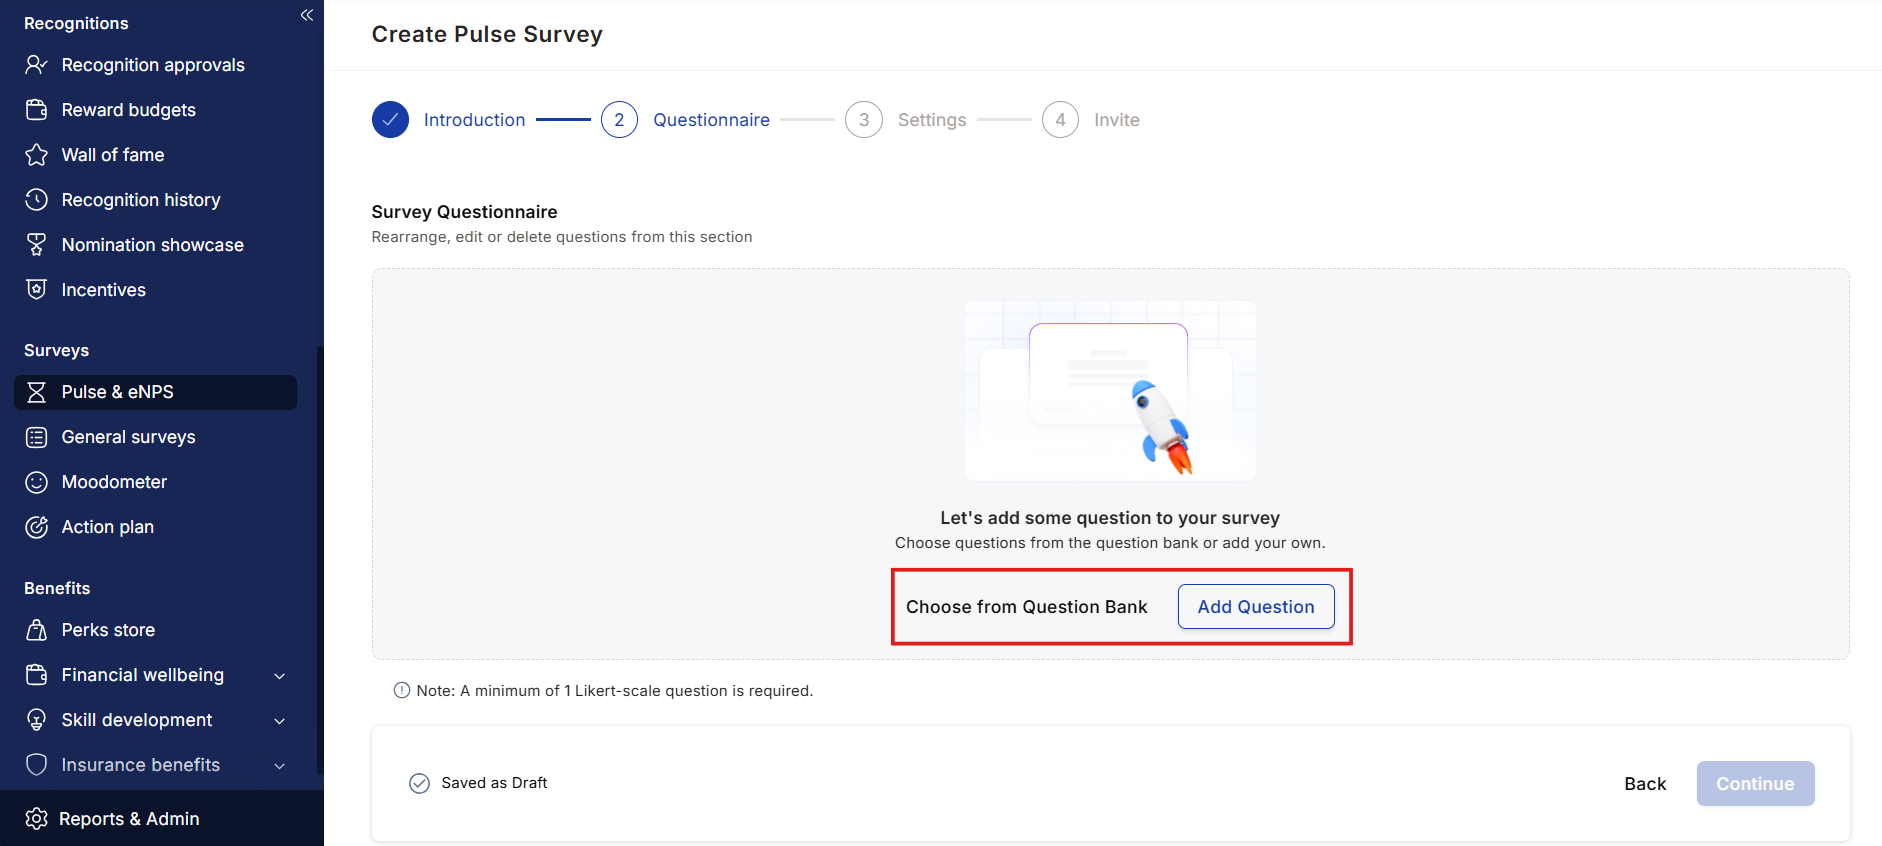 **Option A — Question bank**: Click **Choose from Question Bank**. Browse or search the curated library, then click **Add to Survey** next to each question you want to include. Click **Back to Survey** when done.
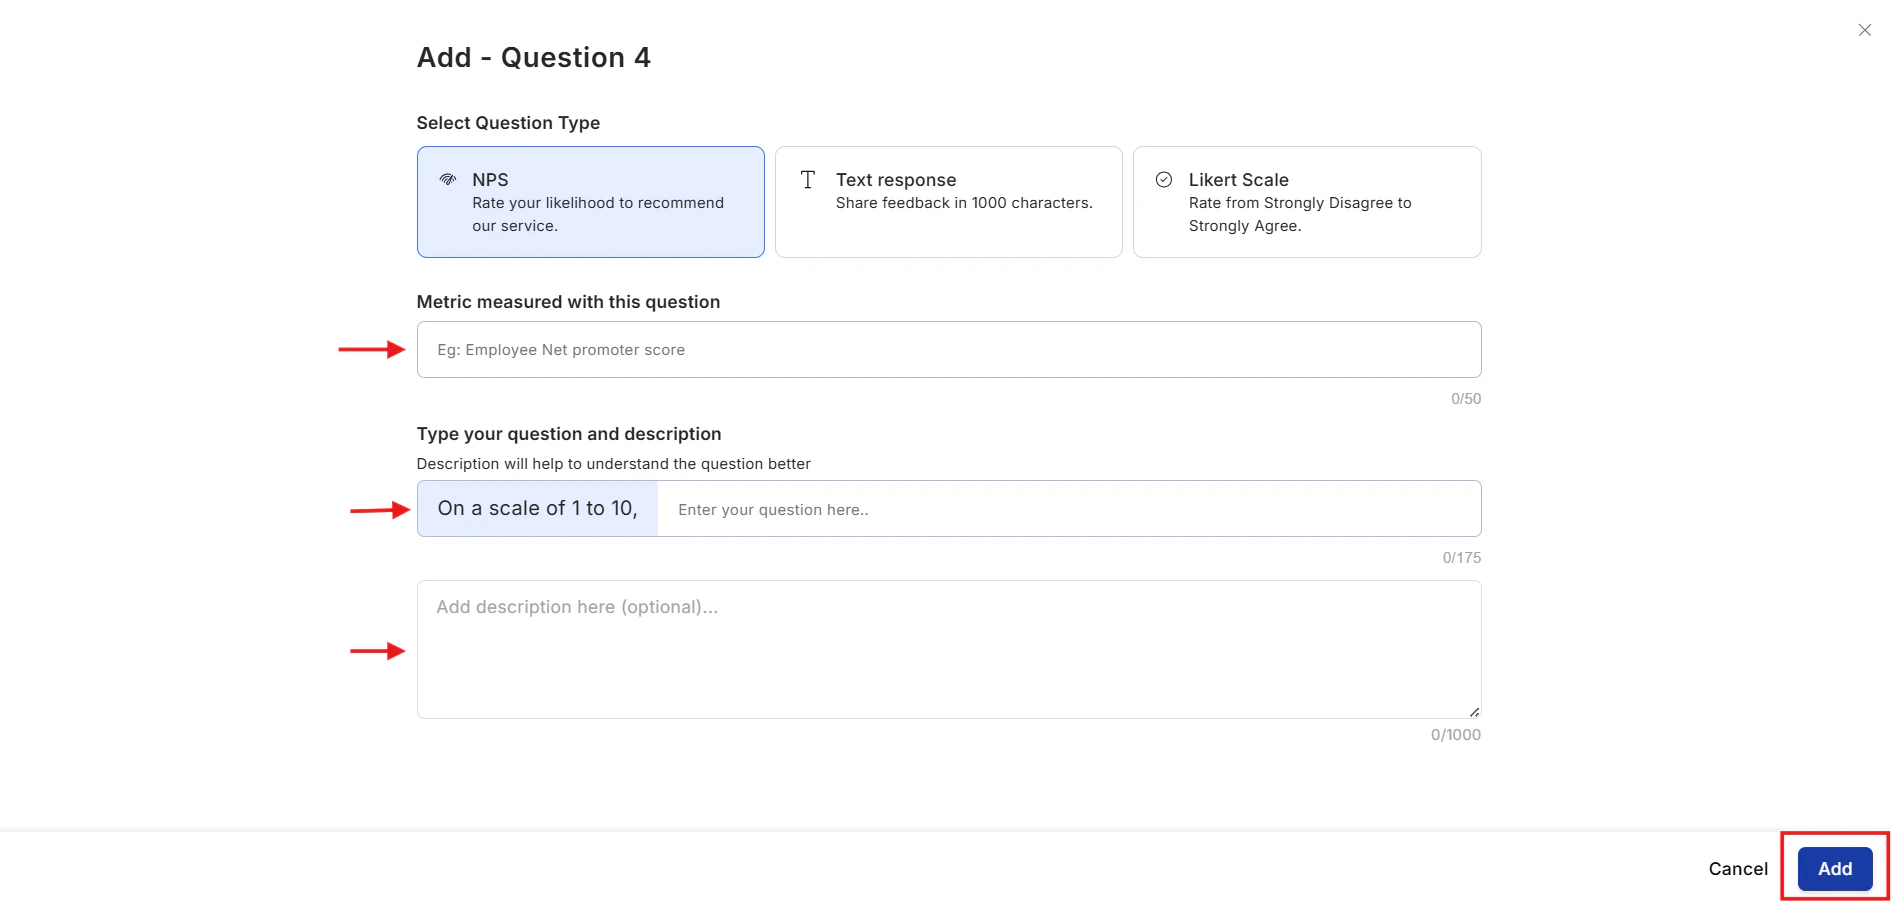
 **Option B — Create custom questions**: Click **Add Question** and select a question type (see below). Fill in the question text, description, and settings, then click **Add**.
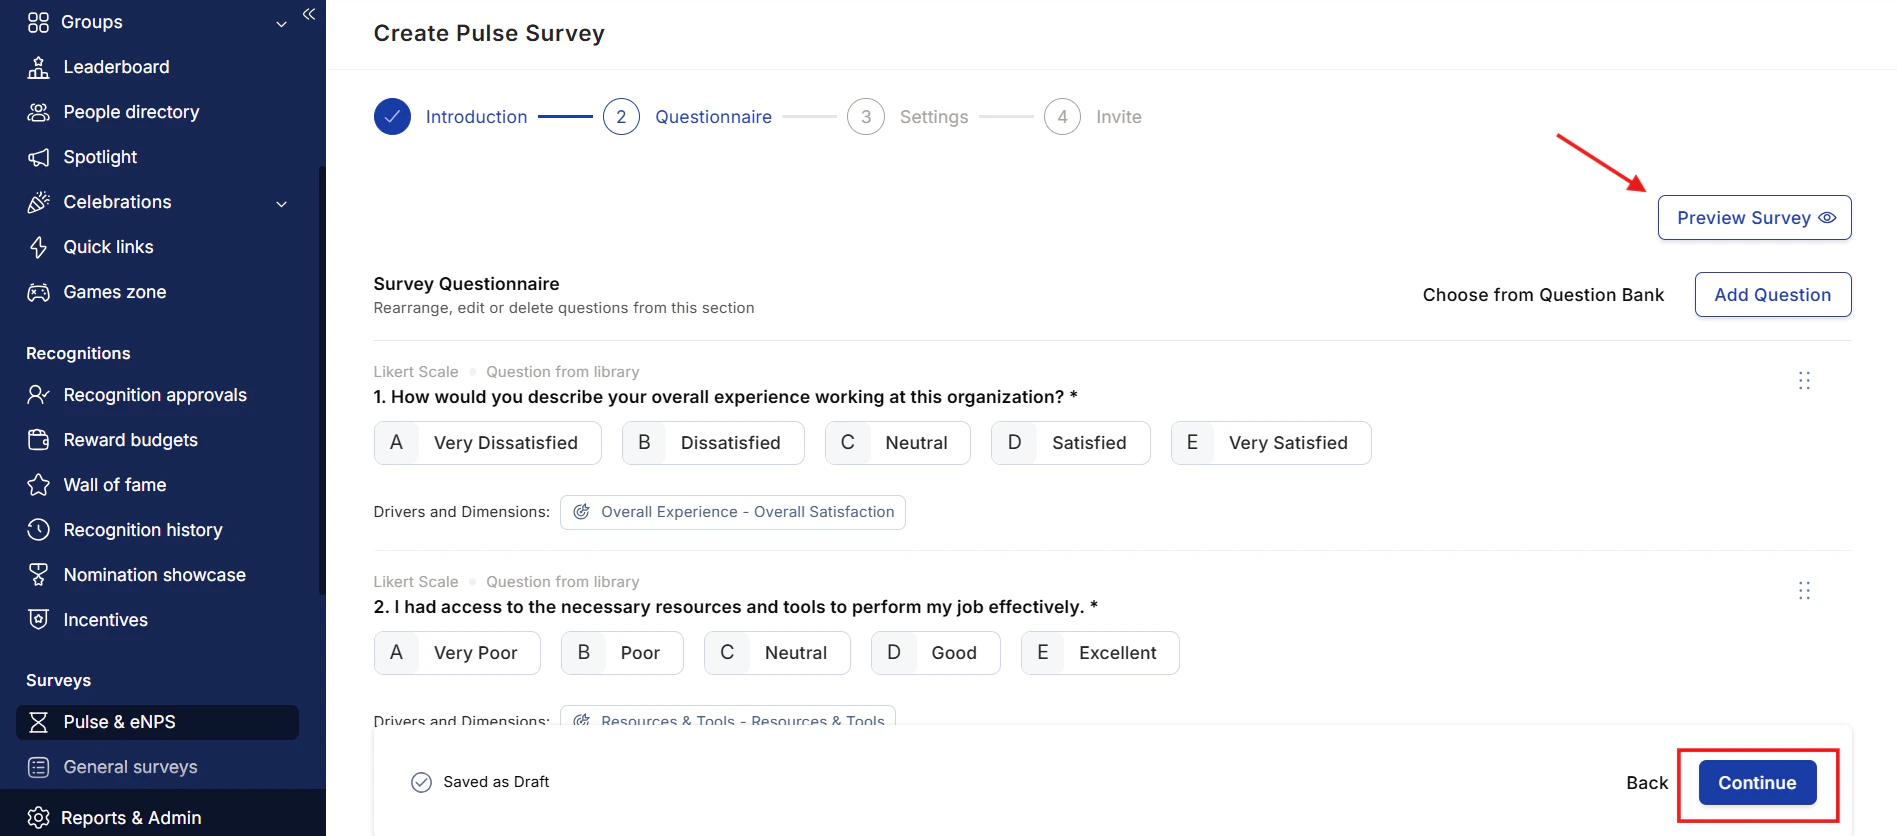
 Click **Preview Survey** at the top of the screen to see how respondents will experience the survey. Review all questions before proceeding.
Once satisfied with your questions, click **Continue** to move to survey settings.
Click **Preview Survey** at the top of the screen to see how respondents will experience the survey. Review all questions before proceeding.
Once satisfied with your questions, click **Continue** to move to survey settings.
 After building your question set, configure the survey-level settings.
**Anonymity** — choose how to handle respondent identity:
* **Keep this survey anonymous** — respondent identities are not collected or displayed in results.
* **Collect user information** — respondent details are linked to their answers.
Anonymous surveys typically produce more honest feedback. Consider using anonymity for pulse and eNPS surveys to increase response accuracy.
**Report and graph display** — choose how survey results are visualized:
* **Percentage of positive responses** — shows the proportion of favorable answers per question
* **Average score given by respondents** — shows the mean rating across questions
You have three options for defining who receives the survey:
* **Invite everyone** — select **Invite Everyone** to send the survey to all active users across the organization. This is the simplest option for company-wide surveys.
* **Custom selection** — use filters or search to target a specific audience:
1. Click the **pen icon** inside the respondent box.
2. Click **Filters** and match a **field** (such as Department, Location, Business Unit, or Grade) to a **value** to define your audience.
3. Optionally, add a condition based on **date of joining** by checking the box and entering the number of days.
* **Specific email addresses** — paste or type the email addresses of the survey participants directly. Click **Save and Continue** when done.
If you use metadata filters with a date-of-joining condition, your scheduling options are limited to **time** and **time zone** only (no specific send date).
**One-time survey** — send the survey once, either immediately or at a scheduled date and time.
* **Send now** — invites go out as soon as you click **Save**.
* **Send later** — specify the **date**, **time**, and **time zone**. Click **Save**.
**Recurring survey** — schedule the survey to run automatically at a defined interval. Select the **frequency**:
| Frequency | Configuration |
| ------------- | ------------------------------------------------------------------- |
| **Weekly** | Choose the day of the week and time |
| **Monthly** | Choose the day of the month and time |
| **Bi-weekly** | Choose the first date; the second date auto-populates 14 days later |
Set the **time zone** for all scheduled sends. Click **Save** to activate the recurring schedule.
For bi-weekly surveys, the first survey run closes automatically before the second one begins. Configure how many days the invite remains open to control the survey window.
**Setting reminders** — under **Set reminders for non-responders**, click the **Choose days for survey reminders** dropdown and select one or more days after the initial invite was sent (from **Day 1** to **Day 7**). Reminders are sent automatically to employees who haven't completed the survey on the days you select.
You can select multiple reminder days — for example, Day 2 and Day 5 will send two reminders.
Once all configuration is complete, click **Send Invites**. Respondents receive an email invitation with a link to complete the survey.
## Question types
Employees rate the likelihood of recommending the organization on a scale of **0 to 10**. Responses are used to calculate your eNPS score.
When adding an NPS question, fill in:
* **Metric measured** — what you're evaluating
* **Question** — the recommendation prompt
* **Description** — optional context for respondents
Employees rate a statement on a customizable scale — typically **Strongly Disagree** to **Strongly Agree**, but you can define your own labels.
* Minimum 2 options, maximum 10 options
* Labels are fully editable — click inside a label to rename it
* Option labels can include images (upload one image per label; if you upload for one, you must upload for all)
* Enable a **"Not Applicable to Me"** option if some questions may not apply to all respondents
* Optionally collect follow-up text feedback when a respondent gives a negative or neutral response
Each Likert question can be linked to an **Engagement Driver** and **Dimension** for analytics reporting.
Employees write a free-text response of up to 1,000 words. Use this for open-ended feedback where you want qualitative detail.
* Question text: up to 175 characters
* Description: up to 1,000 characters
* Mark as mandatory or optional
A shorter free-text input — ideal for quick comments or one-line answers.
* Add the question and description
* Check the box to make the question mandatory
Employees select one answer from a list of defined options. Available in the custom survey builder when creating surveys from scratch.
## Managing surveys
After launching a survey, you can manage it from the survey dashboard.
| Action | How to access |
| ------------------------- | ------------------------------------------------- |
| **Edit survey** | Open the survey, click the **three-dot menu (⋮)** |
| **Share the survey link** | From the survey page, use the share link option |
| **Stop the survey** | Three-dot menu > **Stop the survey** |
| **Duplicate** | Three-dot menu > **Make a copy** |
| **Delete** | Three-dot menu > **Delete the survey** |
| **Change owner** | Three-dot menu > **Change the owner** |
## FAQs
Yes. The eNPS and pulse surveys are separate templates and can be run independently or together.
The standard pulse template has 15–16 questions. Custom pulse surveys can include additional questions from the question bank or your own custom questions.
No. Once a survey has been sent, the question set is locked to preserve data consistency. Duplicate the survey and edit the copy if you need to adjust questions for the next run.
Results with fewer than 5 responses are displayed as "NA" in the analytics dashboard to protect respondent confidentiality.
## Related
Understand how eNPS scores are calculated and how pulse surveys measure engagement drivers.
Configure surveys for onboarding, exit, training, and other employee milestones.
Interpret results, view heatmaps, track trends, and create action plans.
After building your question set, configure the survey-level settings.
**Anonymity** — choose how to handle respondent identity:
* **Keep this survey anonymous** — respondent identities are not collected or displayed in results.
* **Collect user information** — respondent details are linked to their answers.
Anonymous surveys typically produce more honest feedback. Consider using anonymity for pulse and eNPS surveys to increase response accuracy.
**Report and graph display** — choose how survey results are visualized:
* **Percentage of positive responses** — shows the proportion of favorable answers per question
* **Average score given by respondents** — shows the mean rating across questions
You have three options for defining who receives the survey:
* **Invite everyone** — select **Invite Everyone** to send the survey to all active users across the organization. This is the simplest option for company-wide surveys.
* **Custom selection** — use filters or search to target a specific audience:
1. Click the **pen icon** inside the respondent box.
2. Click **Filters** and match a **field** (such as Department, Location, Business Unit, or Grade) to a **value** to define your audience.
3. Optionally, add a condition based on **date of joining** by checking the box and entering the number of days.
* **Specific email addresses** — paste or type the email addresses of the survey participants directly. Click **Save and Continue** when done.
If you use metadata filters with a date-of-joining condition, your scheduling options are limited to **time** and **time zone** only (no specific send date).
**One-time survey** — send the survey once, either immediately or at a scheduled date and time.
* **Send now** — invites go out as soon as you click **Save**.
* **Send later** — specify the **date**, **time**, and **time zone**. Click **Save**.
**Recurring survey** — schedule the survey to run automatically at a defined interval. Select the **frequency**:
| Frequency | Configuration |
| ------------- | ------------------------------------------------------------------- |
| **Weekly** | Choose the day of the week and time |
| **Monthly** | Choose the day of the month and time |
| **Bi-weekly** | Choose the first date; the second date auto-populates 14 days later |
Set the **time zone** for all scheduled sends. Click **Save** to activate the recurring schedule.
For bi-weekly surveys, the first survey run closes automatically before the second one begins. Configure how many days the invite remains open to control the survey window.
**Setting reminders** — under **Set reminders for non-responders**, click the **Choose days for survey reminders** dropdown and select one or more days after the initial invite was sent (from **Day 1** to **Day 7**). Reminders are sent automatically to employees who haven't completed the survey on the days you select.
You can select multiple reminder days — for example, Day 2 and Day 5 will send two reminders.
Once all configuration is complete, click **Send Invites**. Respondents receive an email invitation with a link to complete the survey.
## Question types
Employees rate the likelihood of recommending the organization on a scale of **0 to 10**. Responses are used to calculate your eNPS score.
When adding an NPS question, fill in:
* **Metric measured** — what you're evaluating
* **Question** — the recommendation prompt
* **Description** — optional context for respondents
Employees rate a statement on a customizable scale — typically **Strongly Disagree** to **Strongly Agree**, but you can define your own labels.
* Minimum 2 options, maximum 10 options
* Labels are fully editable — click inside a label to rename it
* Option labels can include images (upload one image per label; if you upload for one, you must upload for all)
* Enable a **"Not Applicable to Me"** option if some questions may not apply to all respondents
* Optionally collect follow-up text feedback when a respondent gives a negative or neutral response
Each Likert question can be linked to an **Engagement Driver** and **Dimension** for analytics reporting.
Employees write a free-text response of up to 1,000 words. Use this for open-ended feedback where you want qualitative detail.
* Question text: up to 175 characters
* Description: up to 1,000 characters
* Mark as mandatory or optional
A shorter free-text input — ideal for quick comments or one-line answers.
* Add the question and description
* Check the box to make the question mandatory
Employees select one answer from a list of defined options. Available in the custom survey builder when creating surveys from scratch.
## Managing surveys
After launching a survey, you can manage it from the survey dashboard.
| Action | How to access |
| ------------------------- | ------------------------------------------------- |
| **Edit survey** | Open the survey, click the **three-dot menu (⋮)** |
| **Share the survey link** | From the survey page, use the share link option |
| **Stop the survey** | Three-dot menu > **Stop the survey** |
| **Duplicate** | Three-dot menu > **Make a copy** |
| **Delete** | Three-dot menu > **Delete the survey** |
| **Change owner** | Three-dot menu > **Change the owner** |
## FAQs
Yes. The eNPS and pulse surveys are separate templates and can be run independently or together.
The standard pulse template has 15–16 questions. Custom pulse surveys can include additional questions from the question bank or your own custom questions.
No. Once a survey has been sent, the question set is locked to preserve data consistency. Duplicate the survey and edit the copy if you need to adjust questions for the next run.
Results with fewer than 5 responses are displayed as "NA" in the analytics dashboard to protect respondent confidentiality.
## Related
Understand how eNPS scores are calculated and how pulse surveys measure engagement drivers.
Configure surveys for onboarding, exit, training, and other employee milestones.
Interpret results, view heatmaps, track trends, and create action plans.