> ## Documentation Index
> Fetch the complete documentation index at: https://help-empuls.xoxoday.com/llms.txt
> Use this file to discover all available pages before exploring further.
# Plan labels
> Learn how to create Plan Labels
## What are Plan Labels?
Plan Labels is a feature that helps classify related Plans into groups and define their shared characteristics. This feature keeps related Plans together while segregating unrelated ones, making Plan management more streamlined and efficient.
**Examples:**
* Grouping Plans by quarter, designations, or any criteria the admin decides upon.
* For instance, Plans for Q1 or Plans for specific job roles like Executives or Managers.
This document outlines the attributes of Plan Labels and their various use cases.
## How to Create a Plan Label
* Go to **Plans** on the sales incentive platform dashboard.
* Click on the **All** **Plans** tab and click inside the box "**All Labels".**
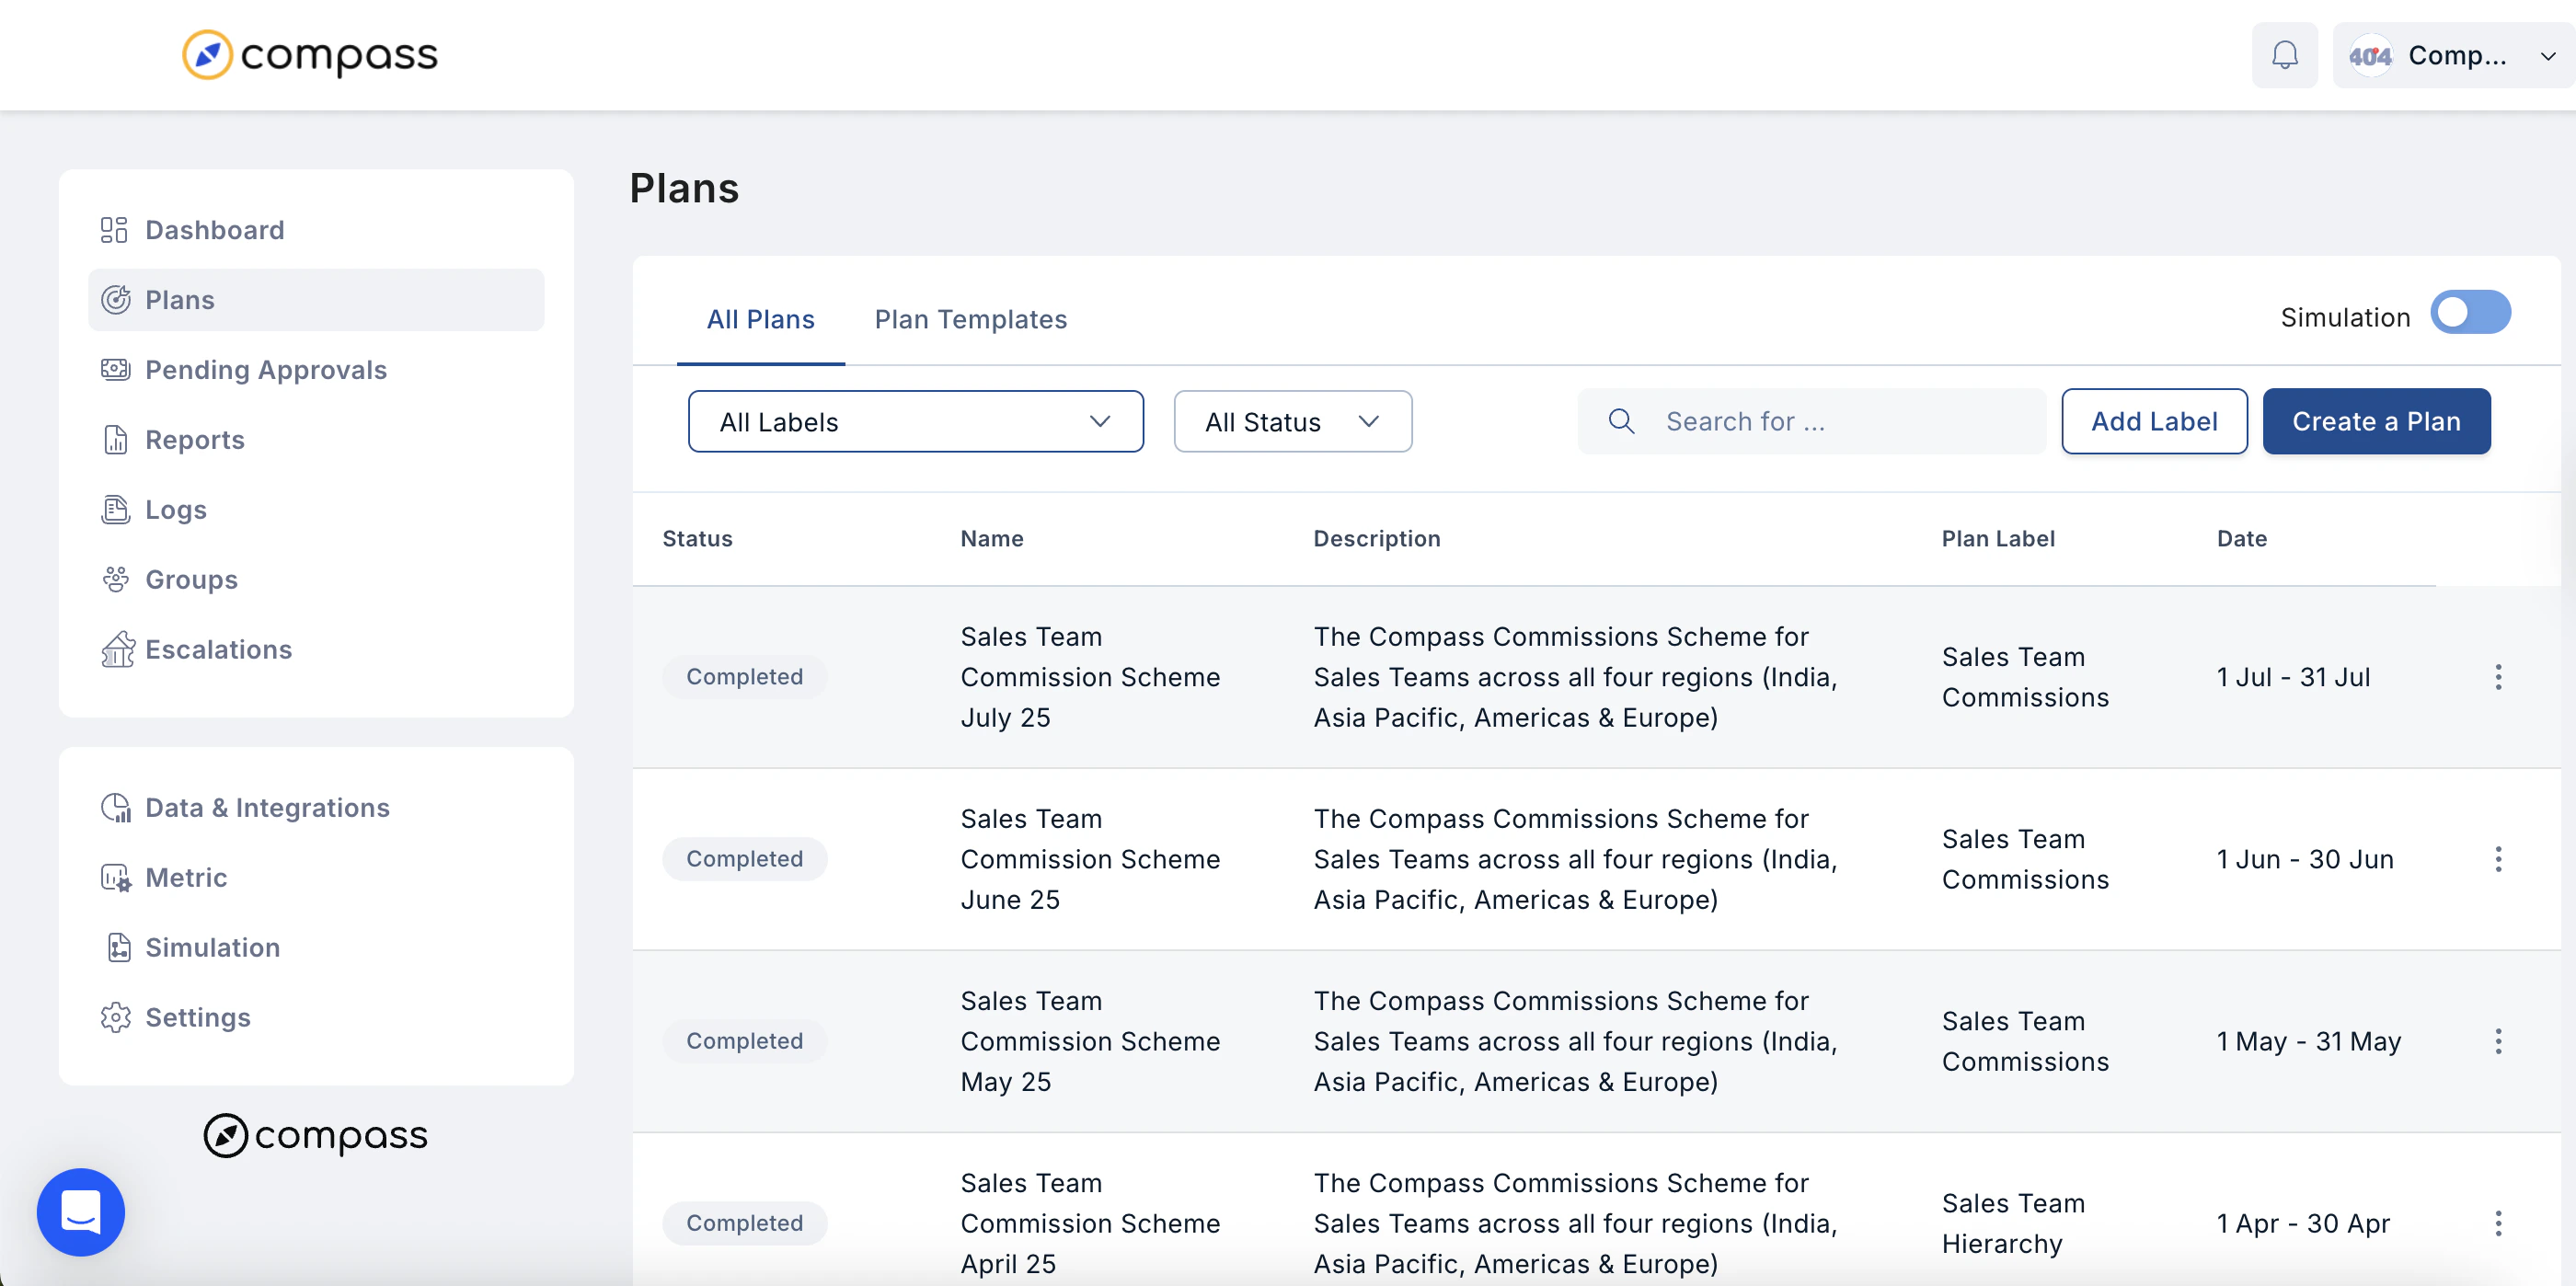 * Use the dropdown and select **Add New** to create a new Plan Label.
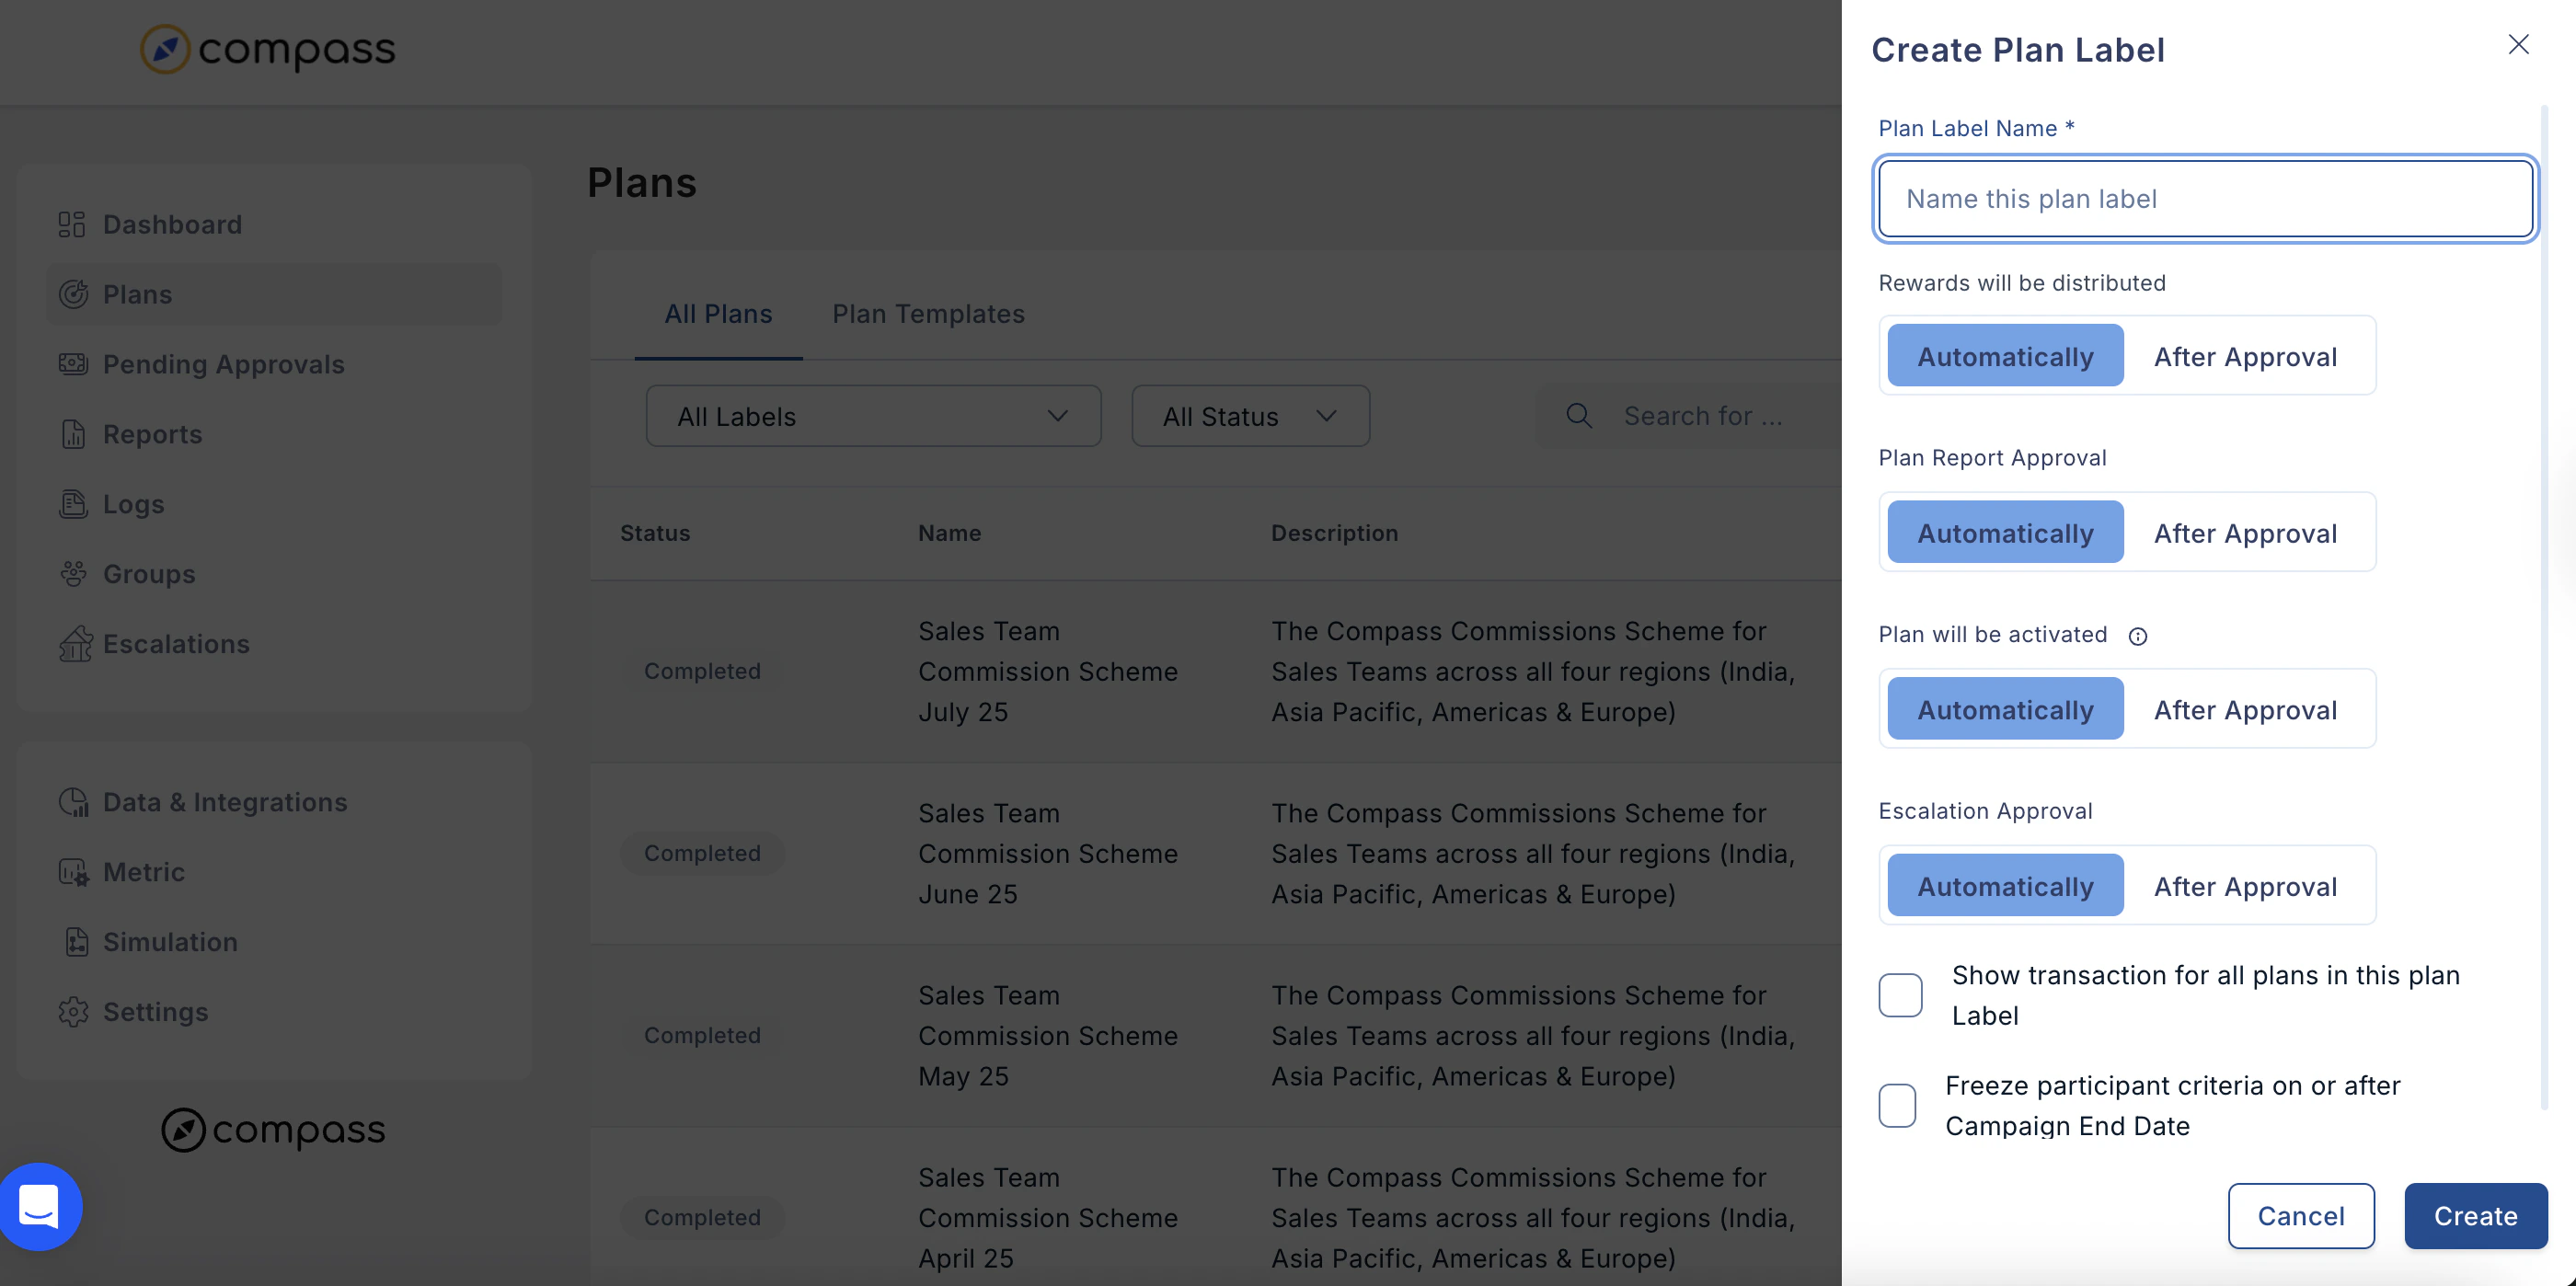 Fill in all the necessary details for the Plan Label, such as its name and approvers.
### Set Approval Workflow
When creating a Plan Label, you must define an **approval workflow** for the group. This determines how rewards will be distributed:
1. **Automatic Approval:**
Incentives are automatically credited to users as soon as the Plans are completed.
Fill in all the necessary details for the Plan Label, such as its name and approvers.
### Set Approval Workflow
When creating a Plan Label, you must define an **approval workflow** for the group. This determines how rewards will be distributed:
1. **Automatic Approval:**
Incentives are automatically credited to users as soon as the Plans are completed.
 **2. After Approval:**
Requires manual intervention. Admin users review and approve incentives before crediting them to a user’s account.
* ### A) Assigning Approvers for
* ### Rewards distribution:
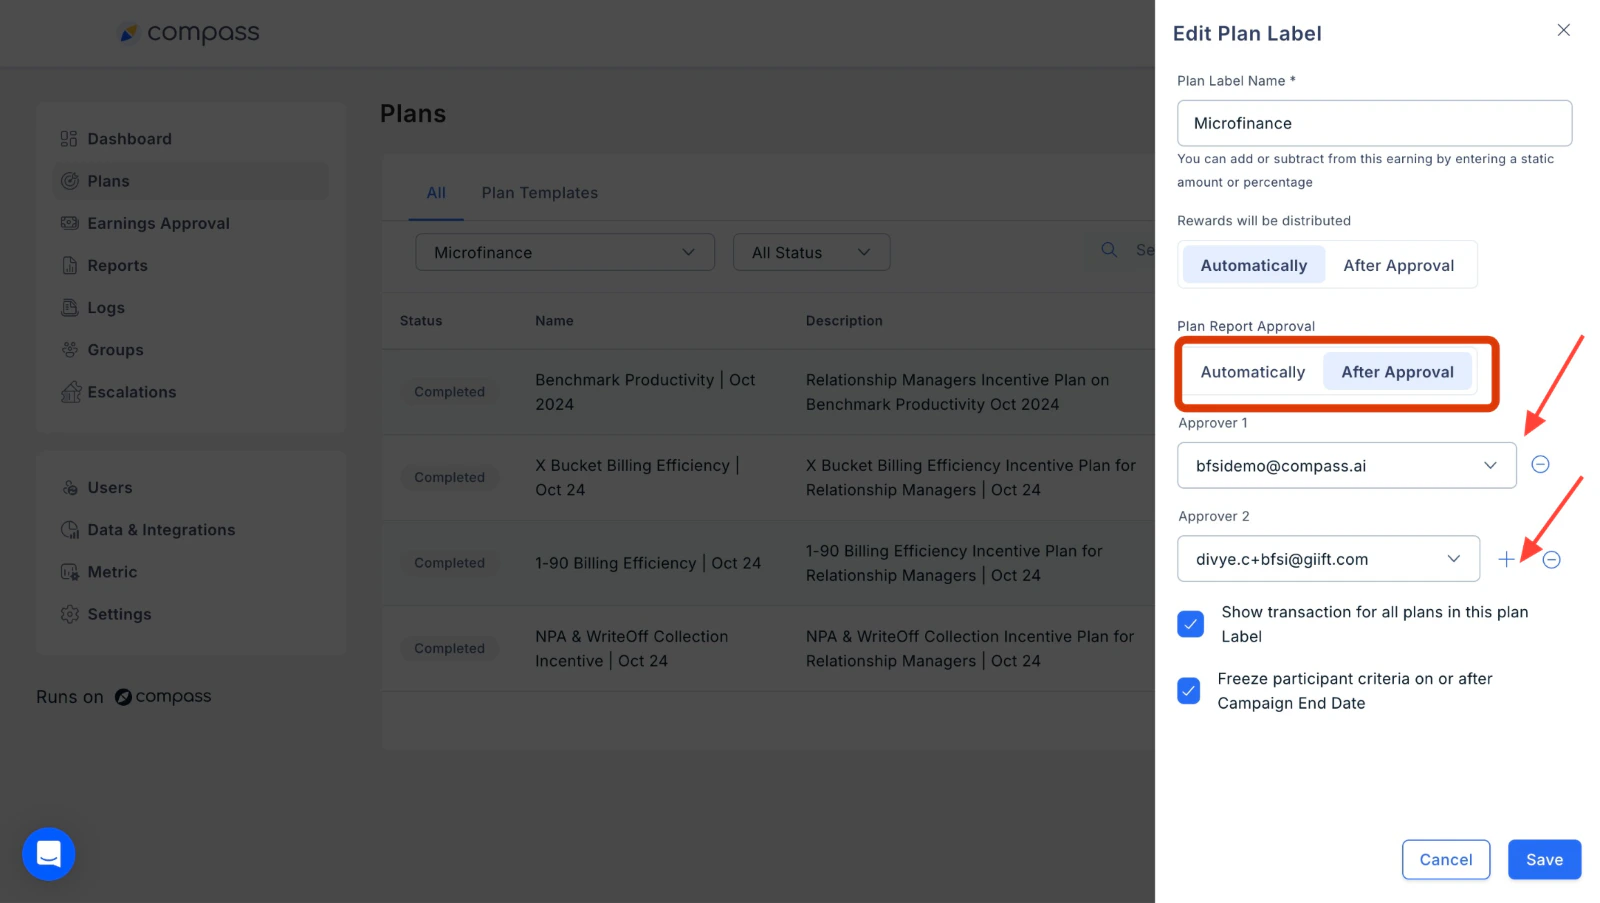
* To select the After Approval option, choose “Rewards will be distributed” and set approvers.
* A dropdown will appear to select **Approver 1** from the list of Super Admins.
* Add multiple approvers by clicking **Add Approver 2** and repeating the steps.
**2. After Approval:**
Requires manual intervention. Admin users review and approve incentives before crediting them to a user’s account.
* ### A) Assigning Approvers for
* ### Rewards distribution:
* To select the After Approval option, choose “Rewards will be distributed” and set approvers.
* A dropdown will appear to select **Approver 1** from the list of Super Admins.
* Add multiple approvers by clicking **Add Approver 2** and repeating the steps.
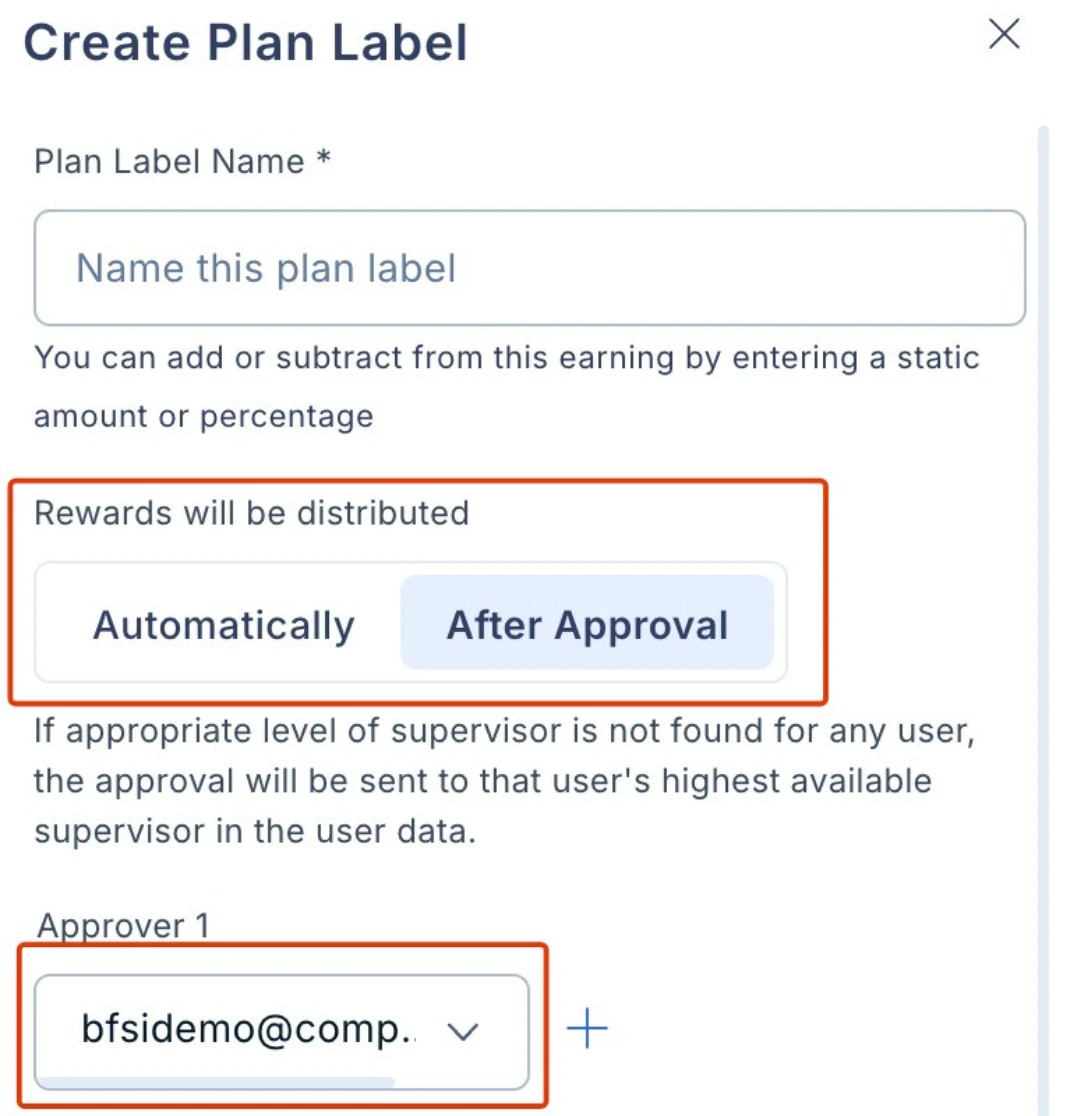 **Note:** Only users with Super Admin privileges can be approvers.
* **B) Adding Approvers for Plan Activation**
Ensure proper oversight by assigning approvers to **Plan Activation**. This helps maintain control and accuracy before a plan goes live.
## Steps to Add Approvers to Plan Activation
* Go to the Plan Label configuration page.
* Click **Edit** next to the Plan Group.
* Assign the necessary approvers for the report.
* Specify the order and levels of approval.
Only Admins can configure this.
**Note:** Only users with Super Admin privileges can be approvers.
* **B) Adding Approvers for Plan Activation**
Ensure proper oversight by assigning approvers to **Plan Activation**. This helps maintain control and accuracy before a plan goes live.
## Steps to Add Approvers to Plan Activation
* Go to the Plan Label configuration page.
* Click **Edit** next to the Plan Group.
* Assign the necessary approvers for the report.
* Specify the order and levels of approval.
Only Admins can configure this.
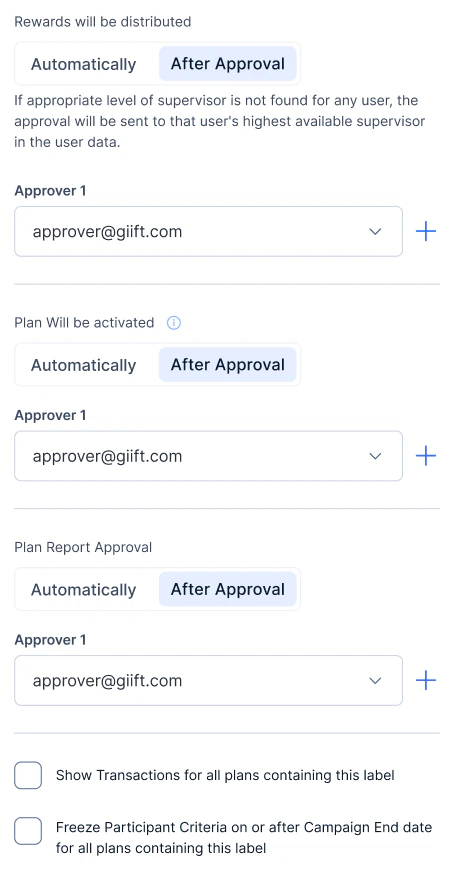 ## C. Adding Approvers to Plan Reports
Ensure data accuracy by assigning approvers to Plan performance reports. This validates earnings and transactions before activation, making reports more reliable.
Steps to Add Approvers to Plan Reports:
* Go to the Plan Label configuration page.
* Click **Edit** next to the Plan Group.
* Assign the necessary approvers for the report.
* Specify the order and levels of approval.
Only Admins can configure this.
## C. Adding Approvers to Plan Reports
Ensure data accuracy by assigning approvers to Plan performance reports. This validates earnings and transactions before activation, making reports more reliable.
Steps to Add Approvers to Plan Reports:
* Go to the Plan Label configuration page.
* Click **Edit** next to the Plan Group.
* Assign the necessary approvers for the report.
* Specify the order and levels of approval.
Only Admins can configure this.
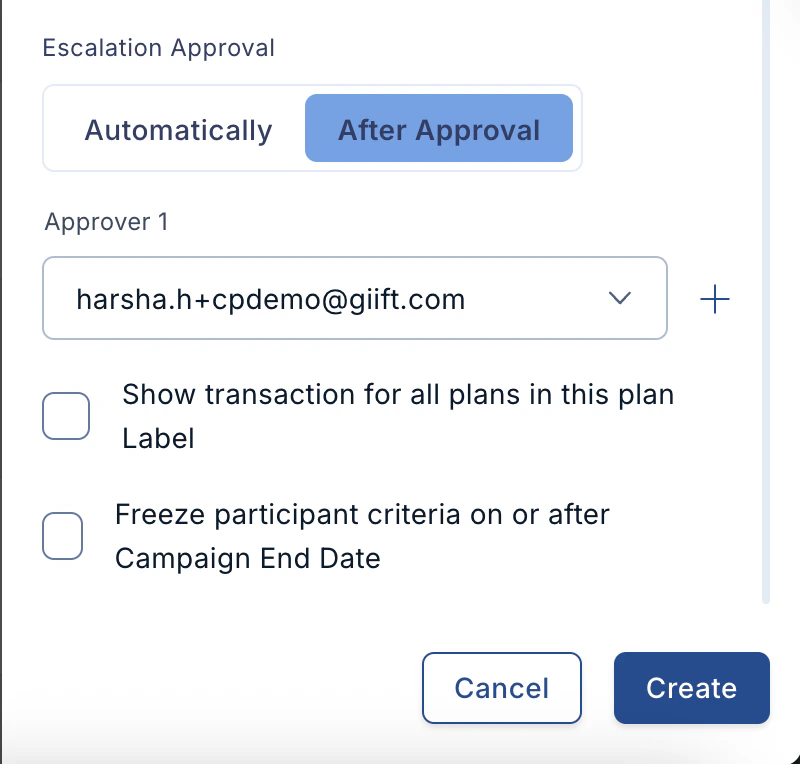
 ## D) Escalation Approval
Escalation approval is managed through the **Plan Label Configuration** page. This enables administrators to define custom approval workflows and hierarchies, ensuring that escalations are processed efficiently through the established workflows, facilitating seamless approval tracking and resolution.
**Steps to Manage Escalation Approval**:
* Navigate to the **Plan Label Configuration** page from the admin dashboard.
* Locate the Plan Group for which you want to configure escalations.
* Click **Edit** next to the respective Plan Group.
* Choose the approvers for the report and define the order in which they will approve the plan.
* Specify the escalation levels in case approvals are delayed or not completed within the required timeframe.
* Enable escalation rules to automatically route unapproved reports to higher-level approvers in the defined hierarchy.
* Once your settings are configured, click **Save** to apply the changes.
## D) Escalation Approval
Escalation approval is managed through the **Plan Label Configuration** page. This enables administrators to define custom approval workflows and hierarchies, ensuring that escalations are processed efficiently through the established workflows, facilitating seamless approval tracking and resolution.
**Steps to Manage Escalation Approval**:
* Navigate to the **Plan Label Configuration** page from the admin dashboard.
* Locate the Plan Group for which you want to configure escalations.
* Click **Edit** next to the respective Plan Group.
* Choose the approvers for the report and define the order in which they will approve the plan.
* Specify the escalation levels in case approvals are delayed or not completed within the required timeframe.
* Enable escalation rules to automatically route unapproved reports to higher-level approvers in the defined hierarchy.
* Once your settings are configured, click **Save** to apply the changes.
 ## Plan Label Tab
* Once you’ve completed the setup, click **Save** to finalize the Plan Label. The new Plan Label will appear under **Plans > All** using the dropdown menu.
* To maintain consistency, plans with the same **approval mechanism** should be grouped together.
* ***Example:***
* All **Plans for Executives** can be grouped together with the same approvers.
* **Plans for Managers or Heads** can be placed in separate groups if they require different approvers.
This structured grouping ensures smoother incentive management and approval workflows.
## Below are the possible status of Plans in a Plan grou**p:**
**‘Active’** menu shows the list of Plans that are currently available to make live.
**‘Published’** menu shows the list of Plans that are currently live.
**‘Completed’** menu shows the list of Plans that are currently completed.
**‘Dropped’** menu shows the list of Plans that have been rejected to be taken live.
**‘Stopped’** menu shows the list of Plans that were stopped.
**‘All’** menu shows the list of all Plans.
Note: When cloning a plan, platform now carries over the designated Plan Label - not the system default. No more manually re-searching and re-attaching labels after every clone operation.
Need help? Reach out to your support team or [cs@xoxoday.com](mailto:cs@xoxoday.com).
## Plan Label Tab
* Once you’ve completed the setup, click **Save** to finalize the Plan Label. The new Plan Label will appear under **Plans > All** using the dropdown menu.
* To maintain consistency, plans with the same **approval mechanism** should be grouped together.
* ***Example:***
* All **Plans for Executives** can be grouped together with the same approvers.
* **Plans for Managers or Heads** can be placed in separate groups if they require different approvers.
This structured grouping ensures smoother incentive management and approval workflows.
## Below are the possible status of Plans in a Plan grou**p:**
**‘Active’** menu shows the list of Plans that are currently available to make live.
**‘Published’** menu shows the list of Plans that are currently live.
**‘Completed’** menu shows the list of Plans that are currently completed.
**‘Dropped’** menu shows the list of Plans that have been rejected to be taken live.
**‘Stopped’** menu shows the list of Plans that were stopped.
**‘All’** menu shows the list of all Plans.
Note: When cloning a plan, platform now carries over the designated Plan Label - not the system default. No more manually re-searching and re-attaching labels after every clone operation.
Need help? Reach out to your support team or [cs@xoxoday.com](mailto:cs@xoxoday.com).