> ## Documentation Index
> Fetch the complete documentation index at: https://help-empuls.xoxoday.com/llms.txt
> Use this file to discover all available pages before exploring further.
# Manage users
> Learn how to manage users
The User Management module helps you add, edit, organize, and control user access. It also allows you to manage approval workflows and user roles from one place.
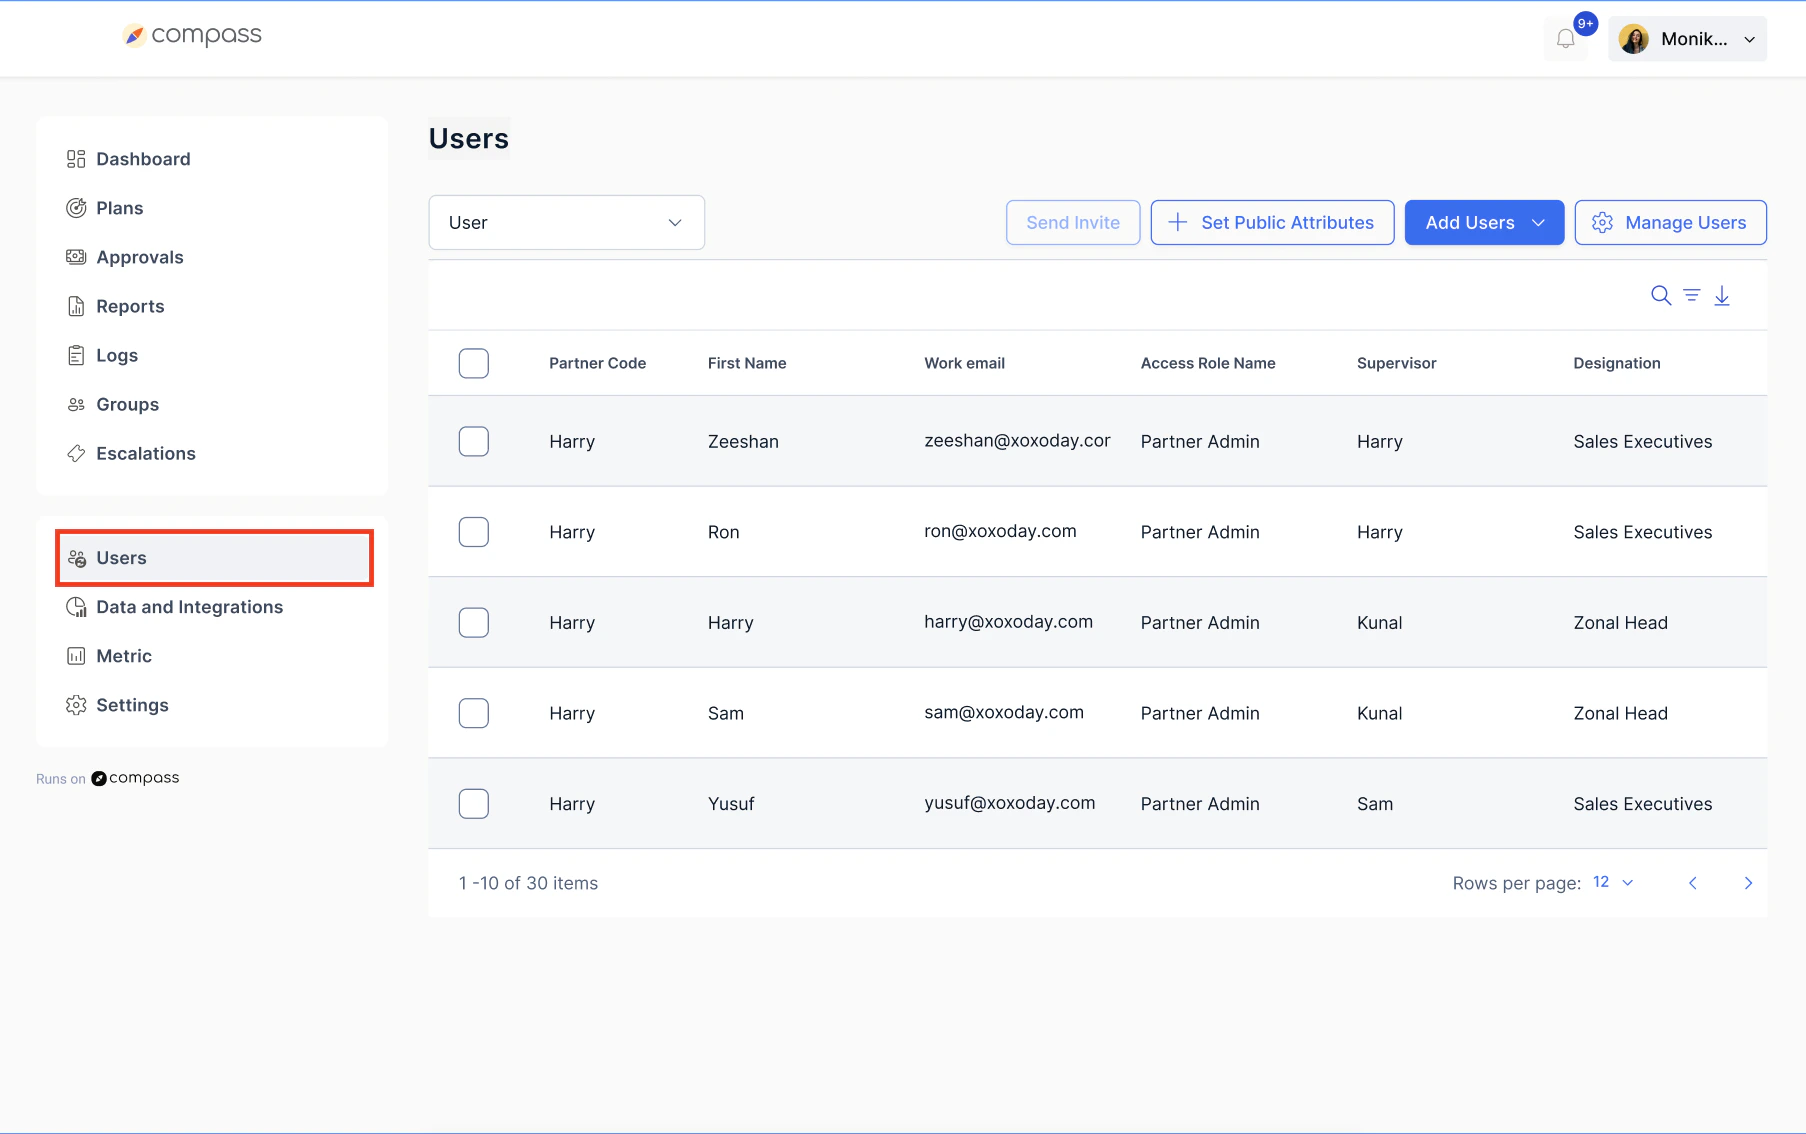
## Step 1: Navigate to User Management
* Log in to the platform
* Click on **Users**
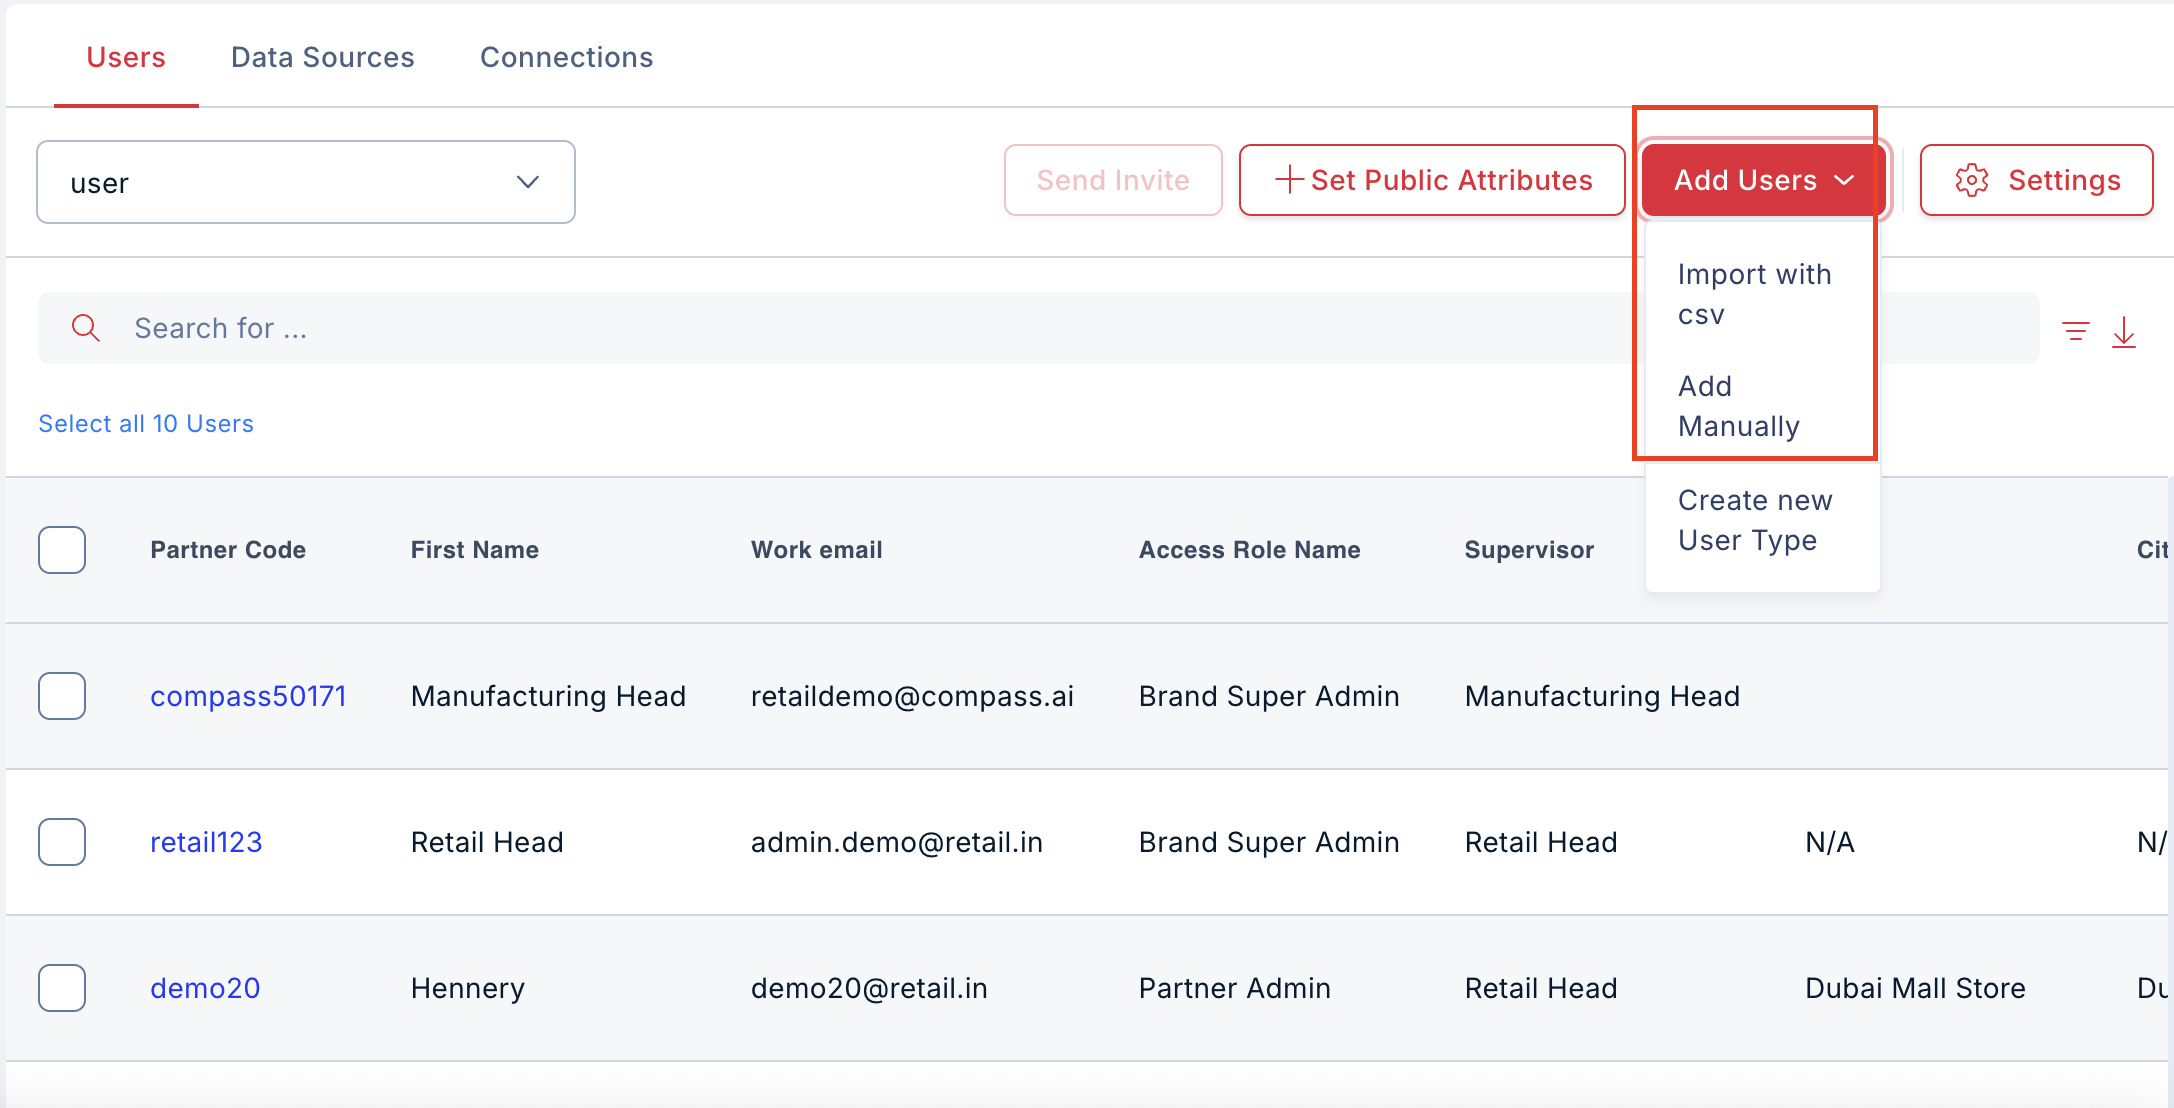
 ## Step 2: Add Users
You can add users in two ways:
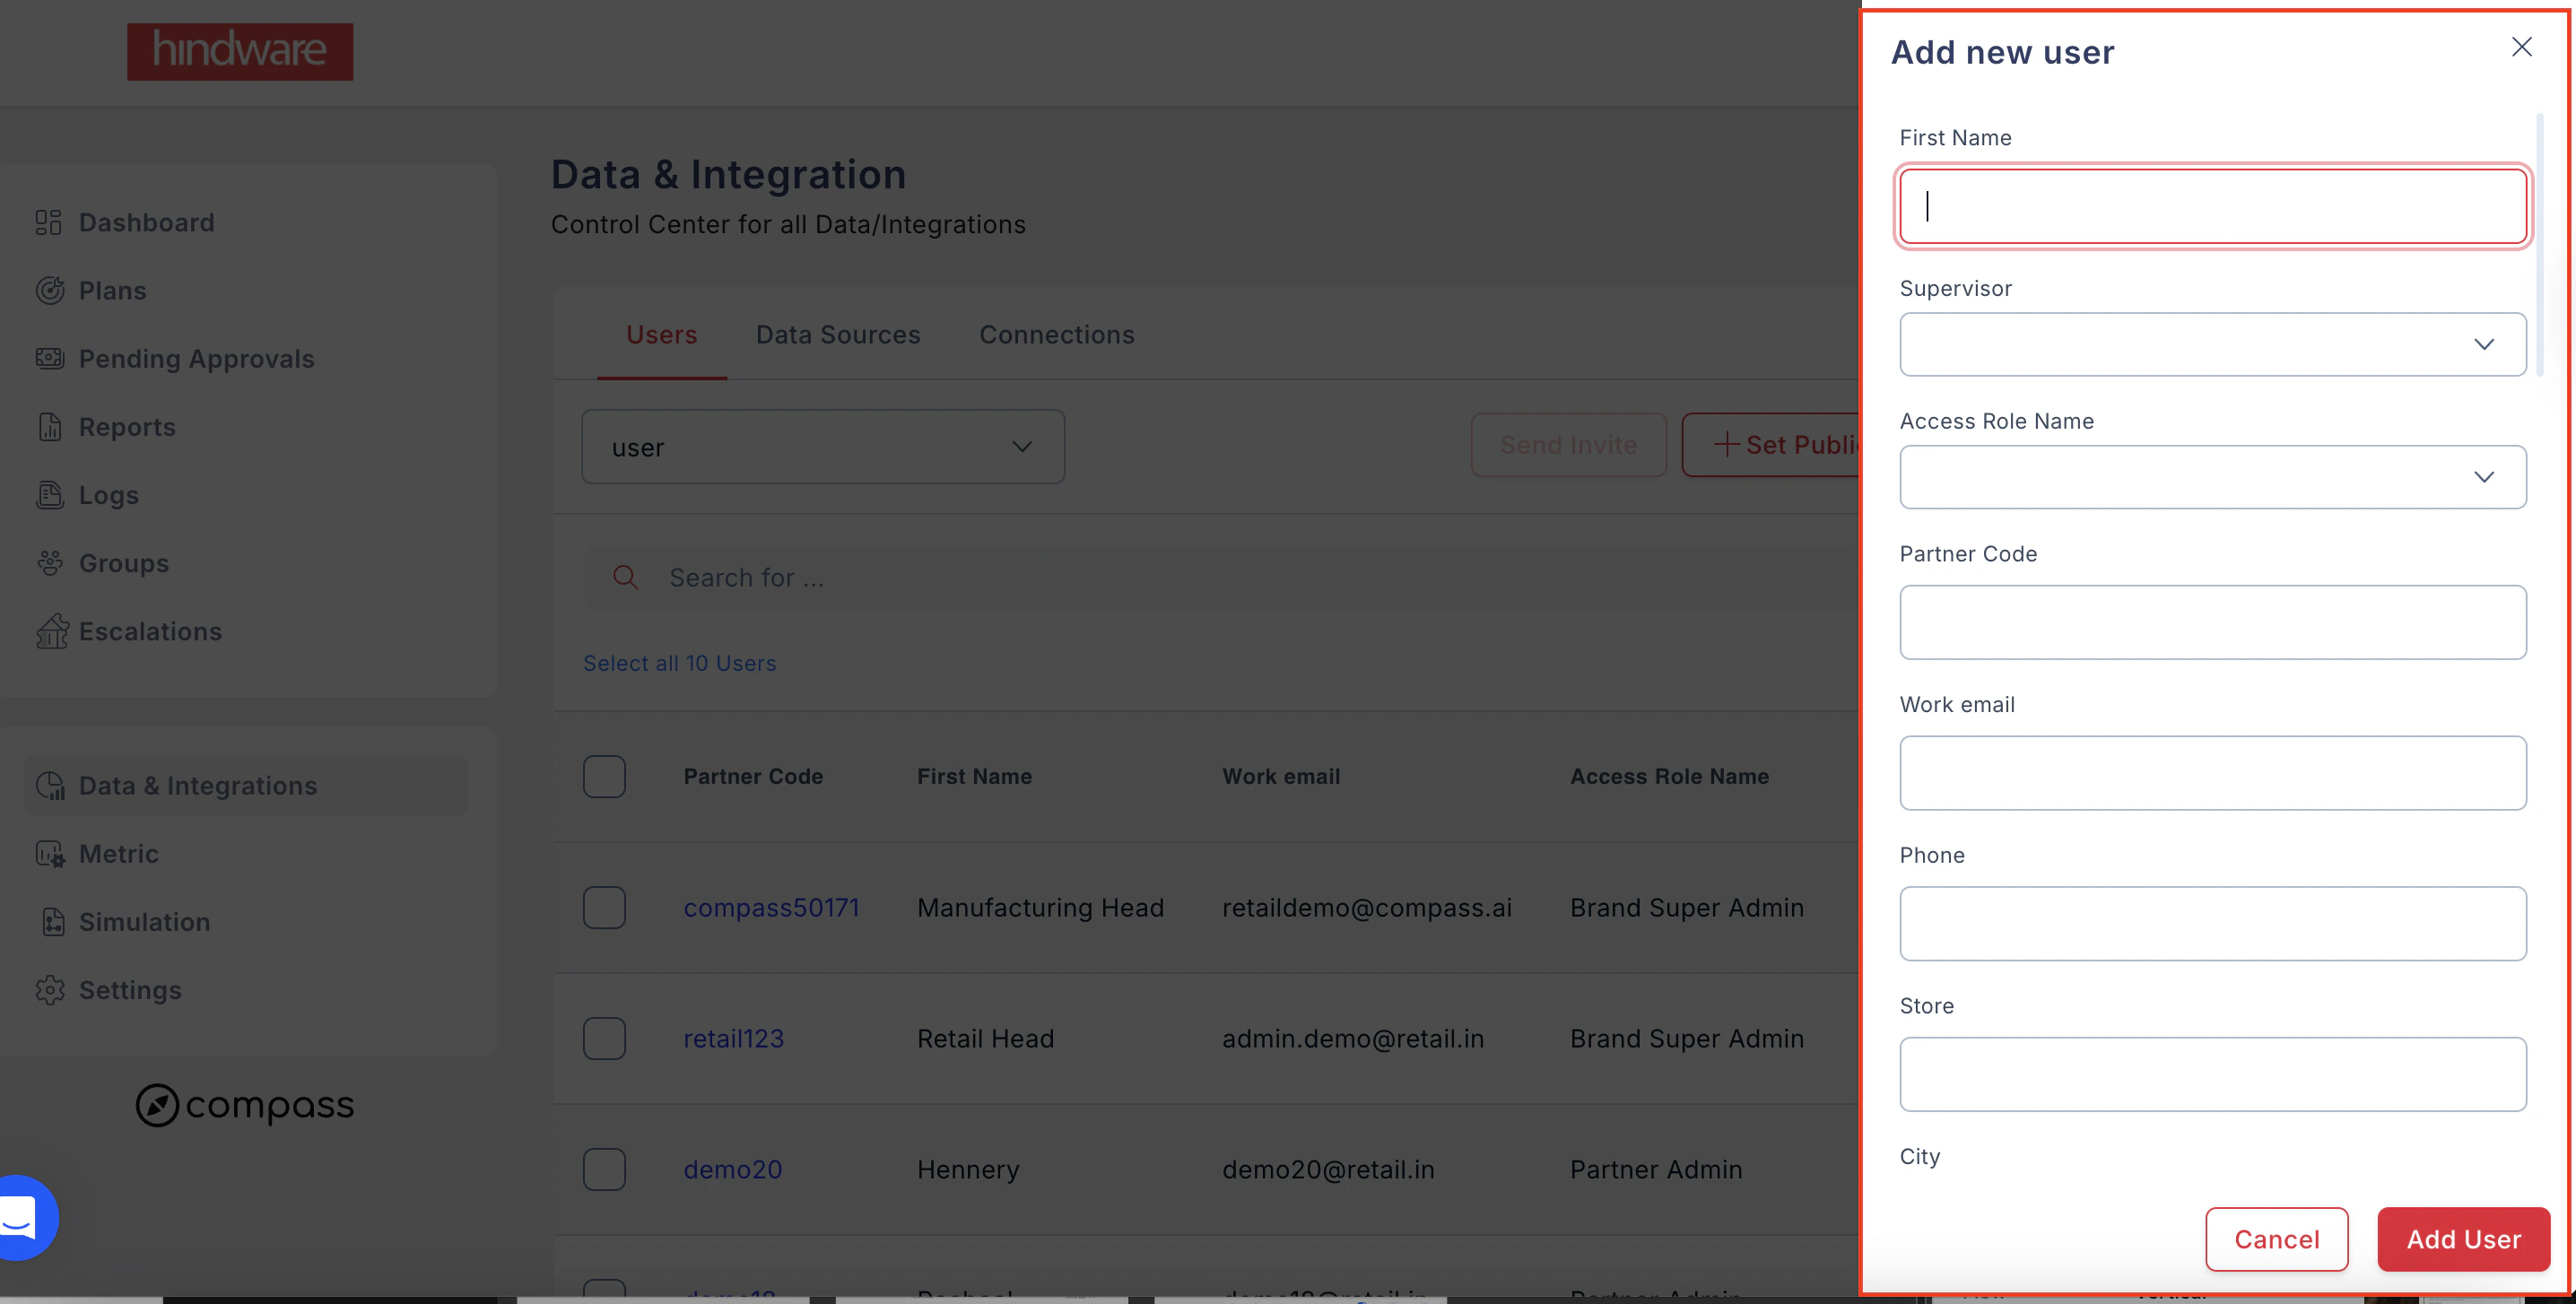
## Option A: Add Manually
* Click on **Add User**.
* Fill in user details like first name, phone number, work email, etc.
* Click **Save**.
## Step 2: Add Users
You can add users in two ways:
## Option A: Add Manually
* Click on **Add User**.
* Fill in user details like first name, phone number, work email, etc.
* Click **Save**.
 ## Option B: Bulk Upload (CSV)
* Click on **Add User**.
* Select **Upload CSV**.
* Download the sample CSV template if needed.
* Fill in the user details in the CSV file.
* Upload the file to add multiple users at once.
## Option B: Bulk Upload (CSV)
* Click on **Add User**.
* Select **Upload CSV**.
* Download the sample CSV template if needed.
* Fill in the user details in the CSV file.
* Upload the file to add multiple users at once.
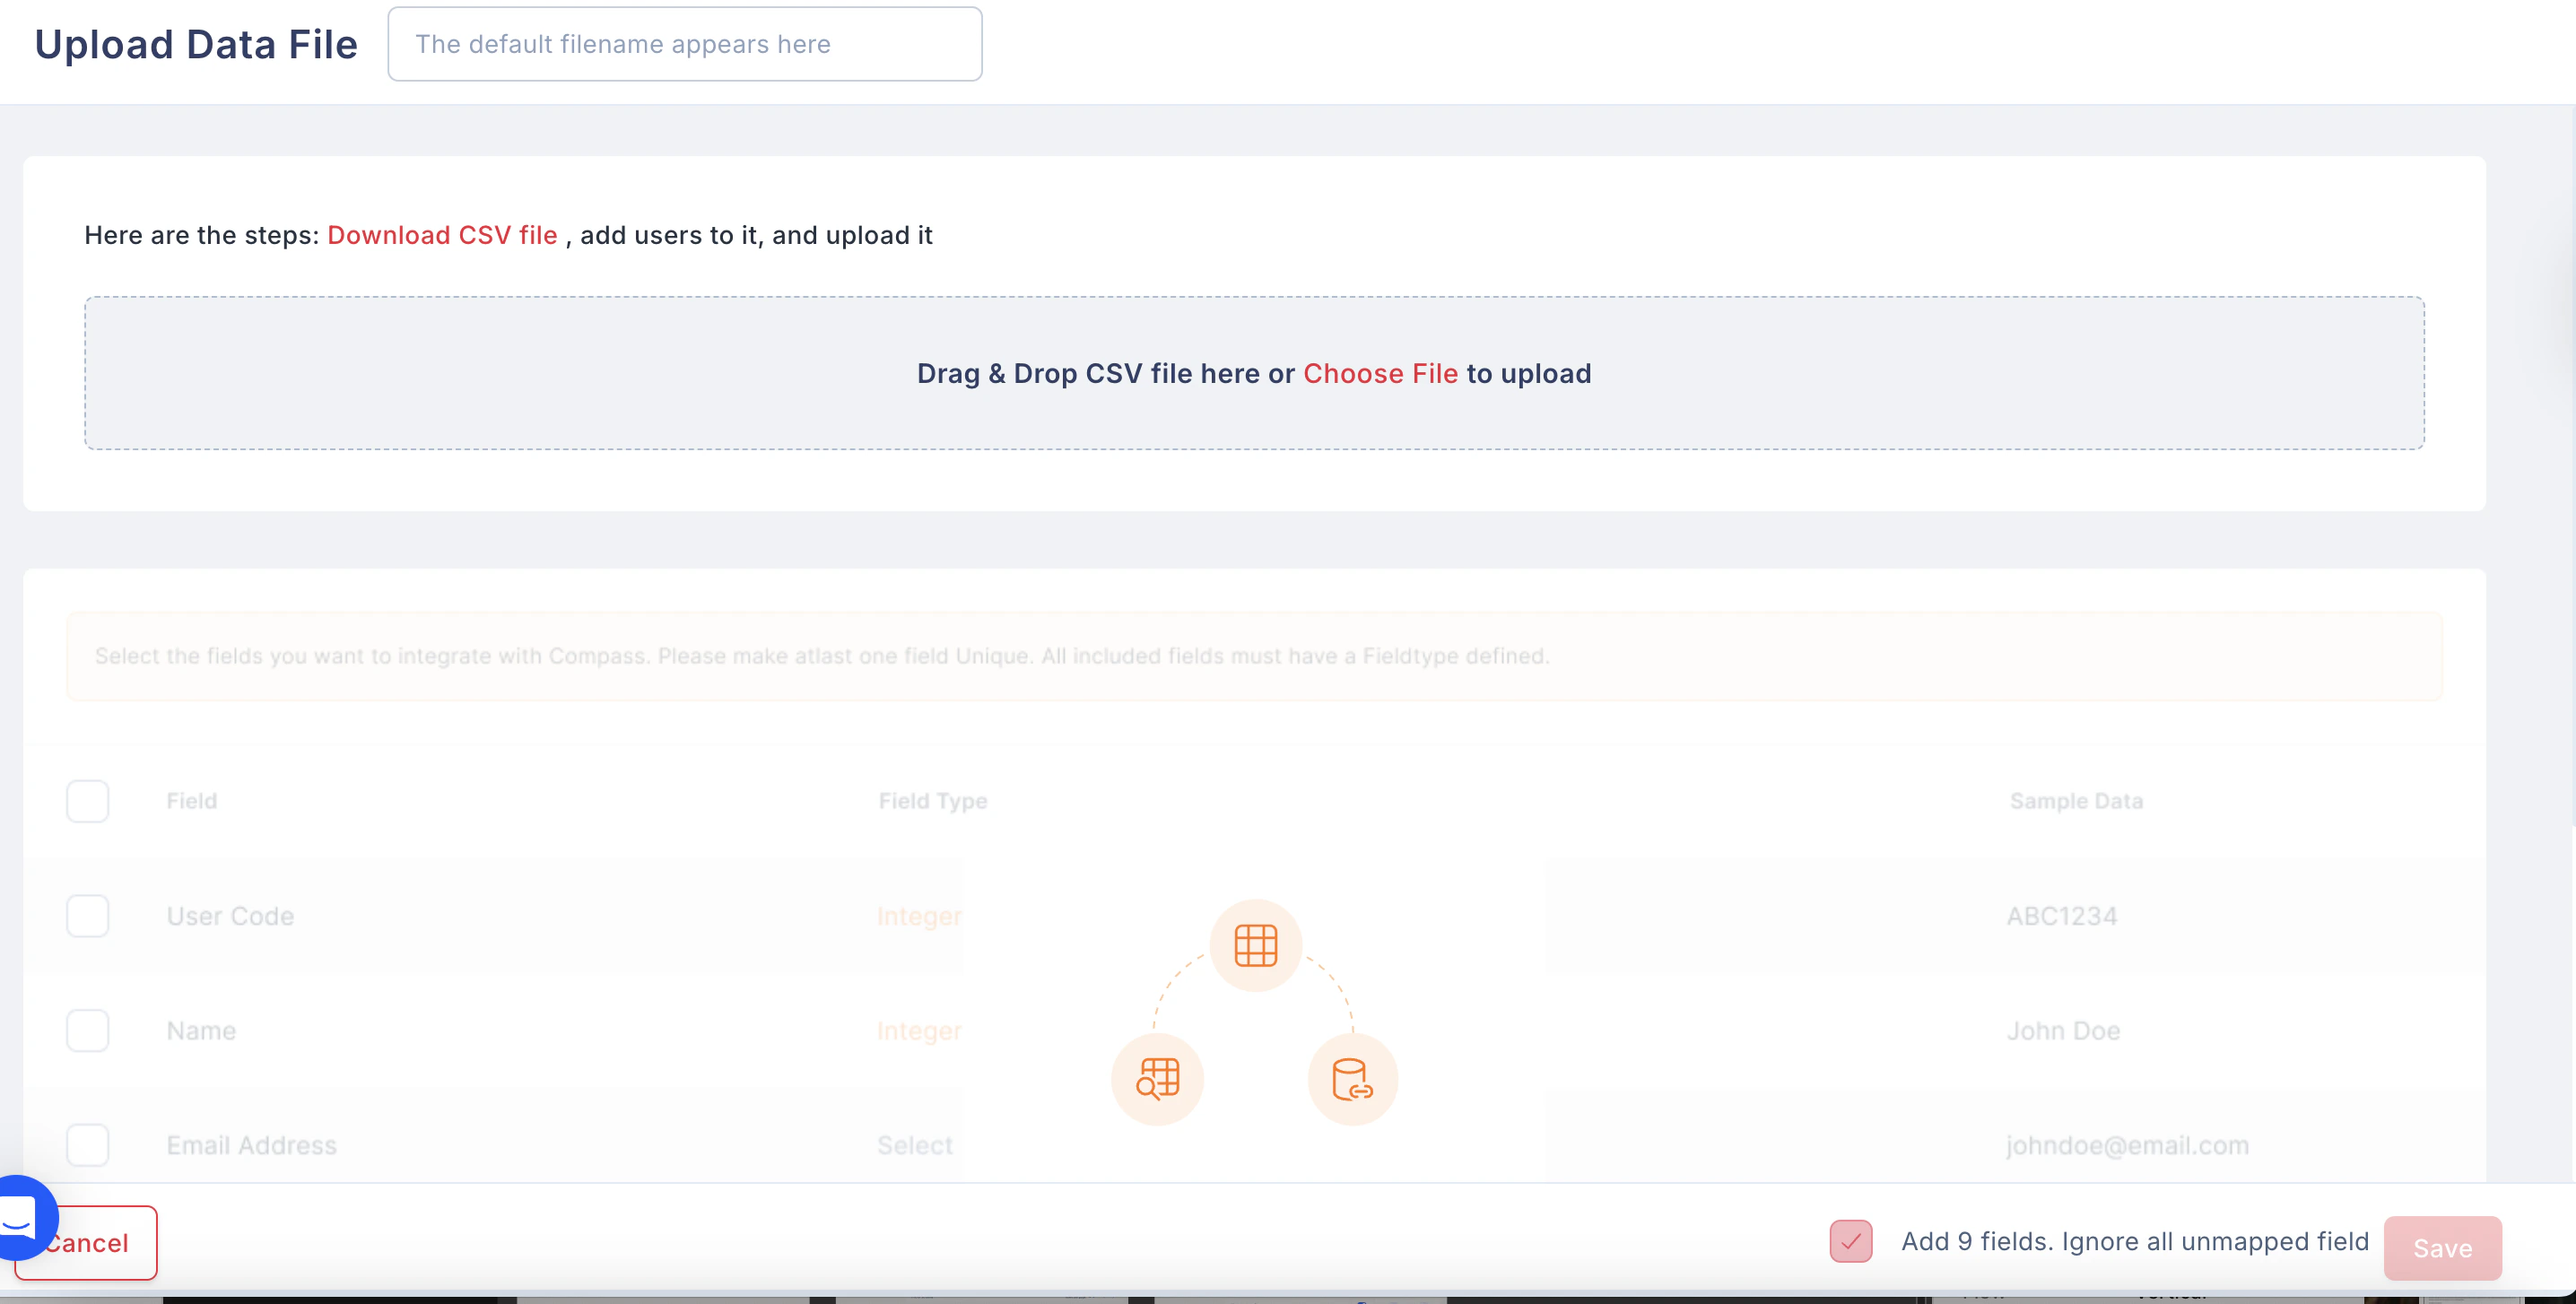 **Tip:** You can also create a new user type during the CSV upload process.
## Step 3: View User Groups
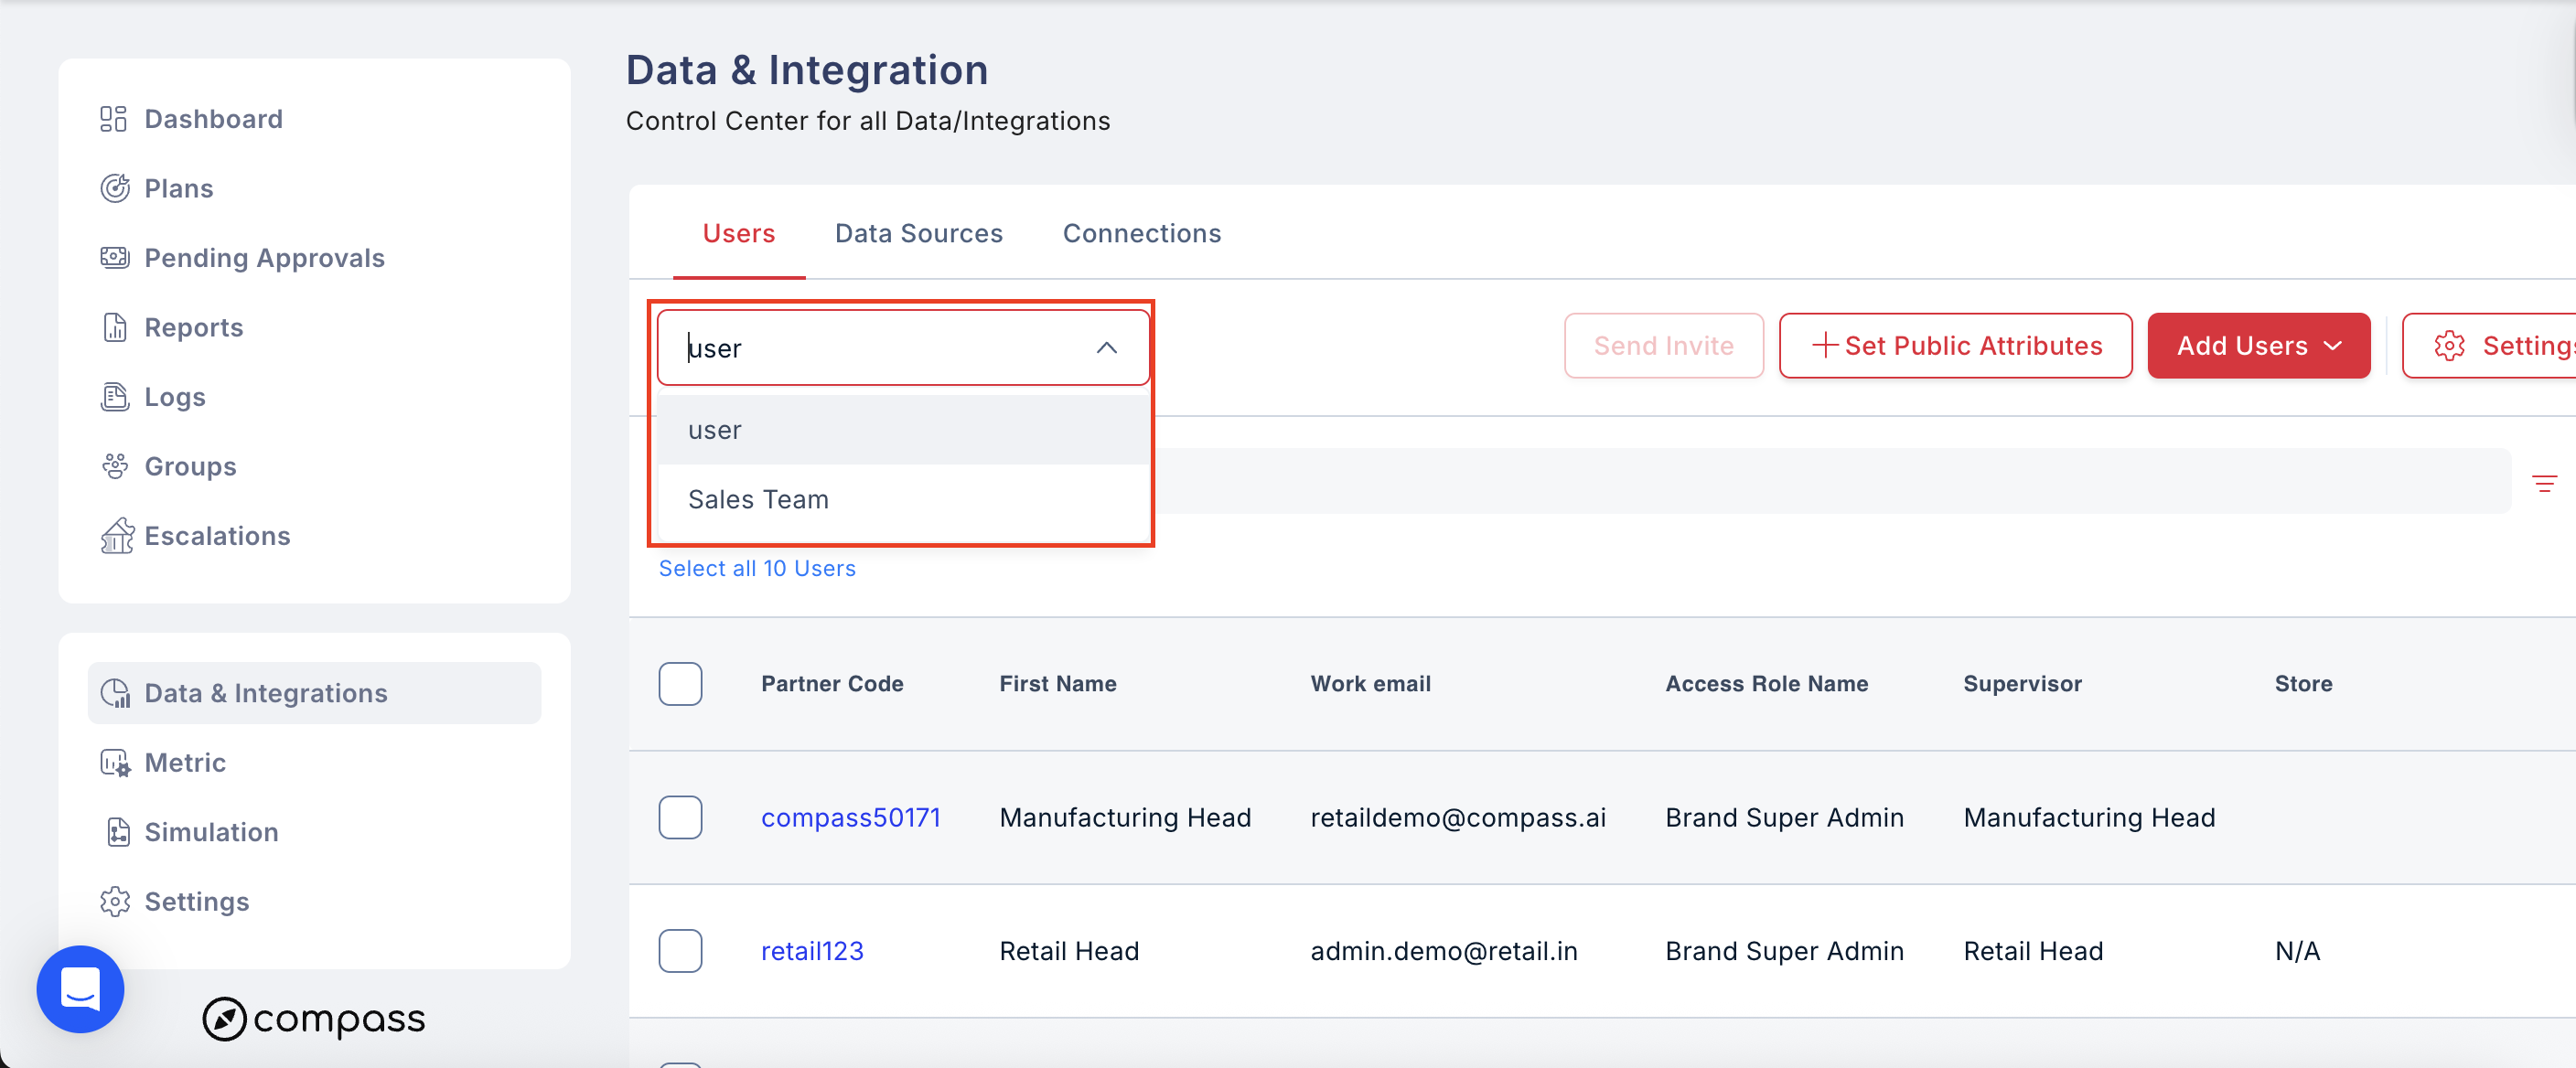
* In the Users section, use the dropdown menu to select a user group.
* Once selected, the list of users in that group will be displayed below.
**Tip:** You can also create a new user type during the CSV upload process.
## Step 3: View User Groups
* In the Users section, use the dropdown menu to select a user group.
* Once selected, the list of users in that group will be displayed below.
 ## Step 4: Edit User Details
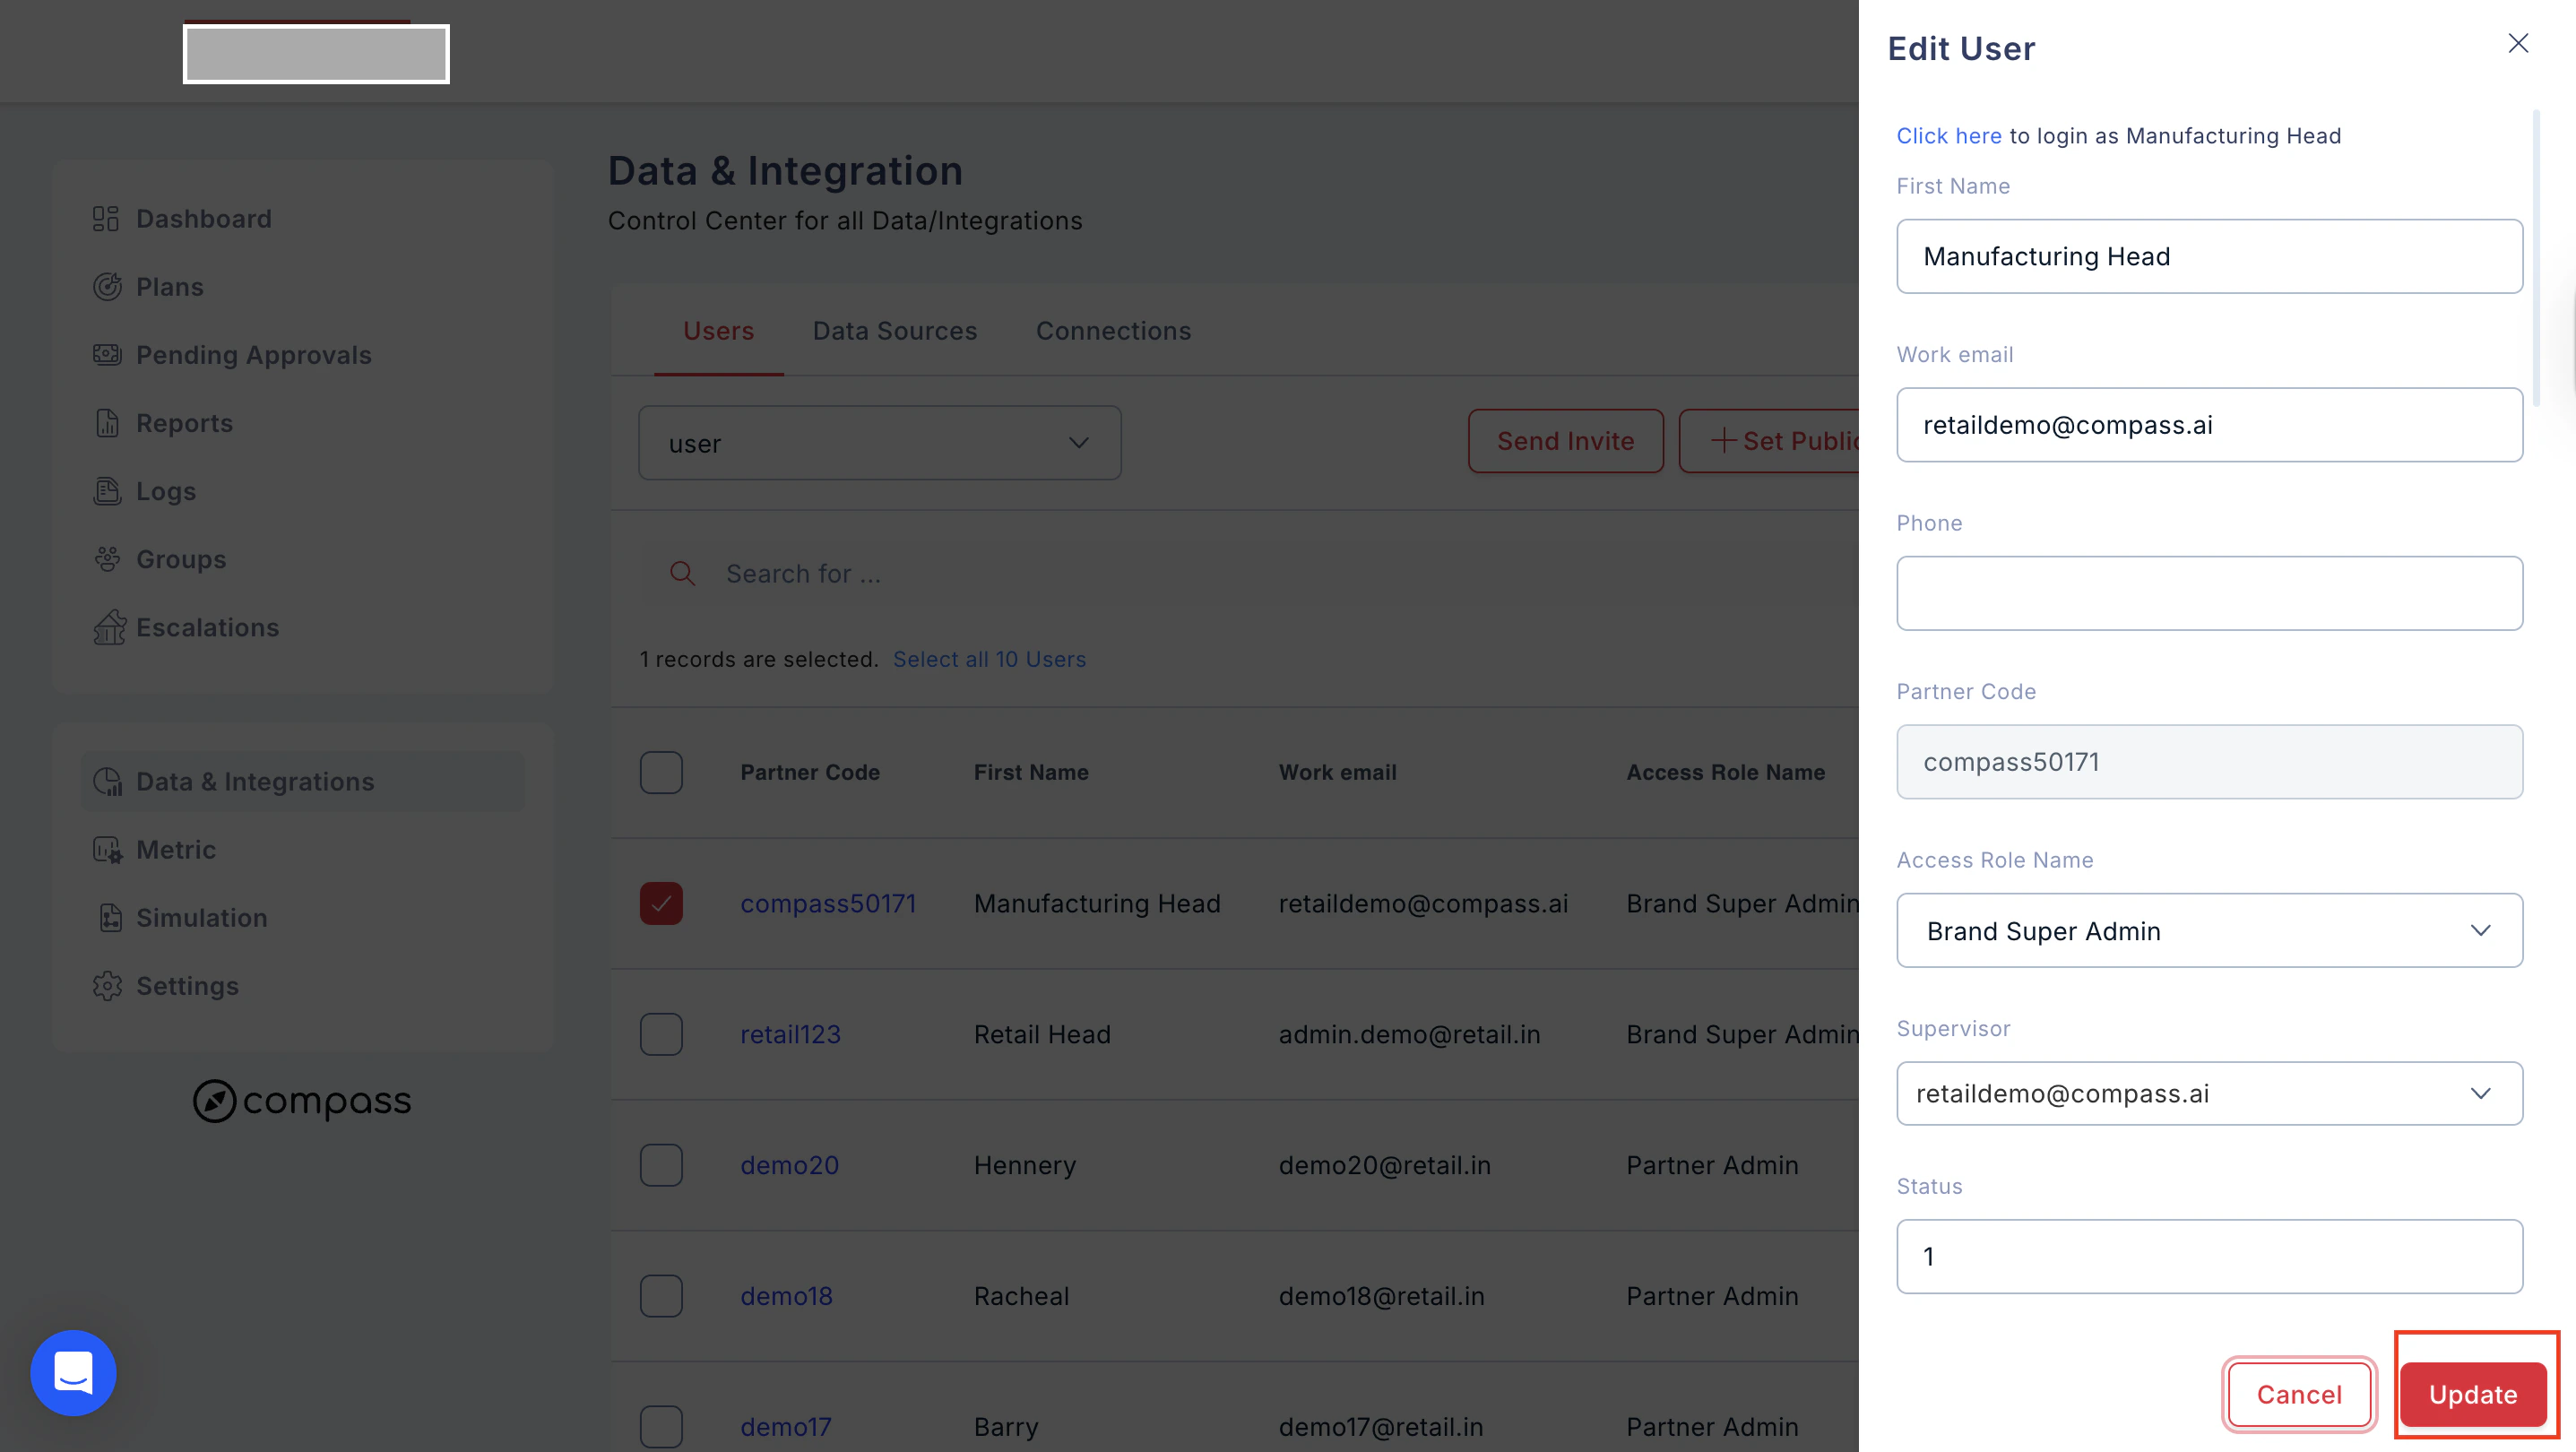
* Click on a specific user name from the list.
* You’ll be taken to the **User Details** page.
* You can:
* Update **first name**, **phone number**, or **work email**.
* **Partner code** cannot be edited.
* Change **Access Role** using the dropdown.
* Select **Supervisor** and add other details as needed.
* Use the **status toggle** at the bottom to mark the user as **Active** or **Inactive**.
* Click **Update** to save changes.
## Step 4: Edit User Details
* Click on a specific user name from the list.
* You’ll be taken to the **User Details** page.
* You can:
* Update **first name**, **phone number**, or **work email**.
* **Partner code** cannot be edited.
* Change **Access Role** using the dropdown.
* Select **Supervisor** and add other details as needed.
* Use the **status toggle** at the bottom to mark the user as **Active** or **Inactive**.
* Click **Update** to save changes.
 ## Step 5: Set Public Attributes
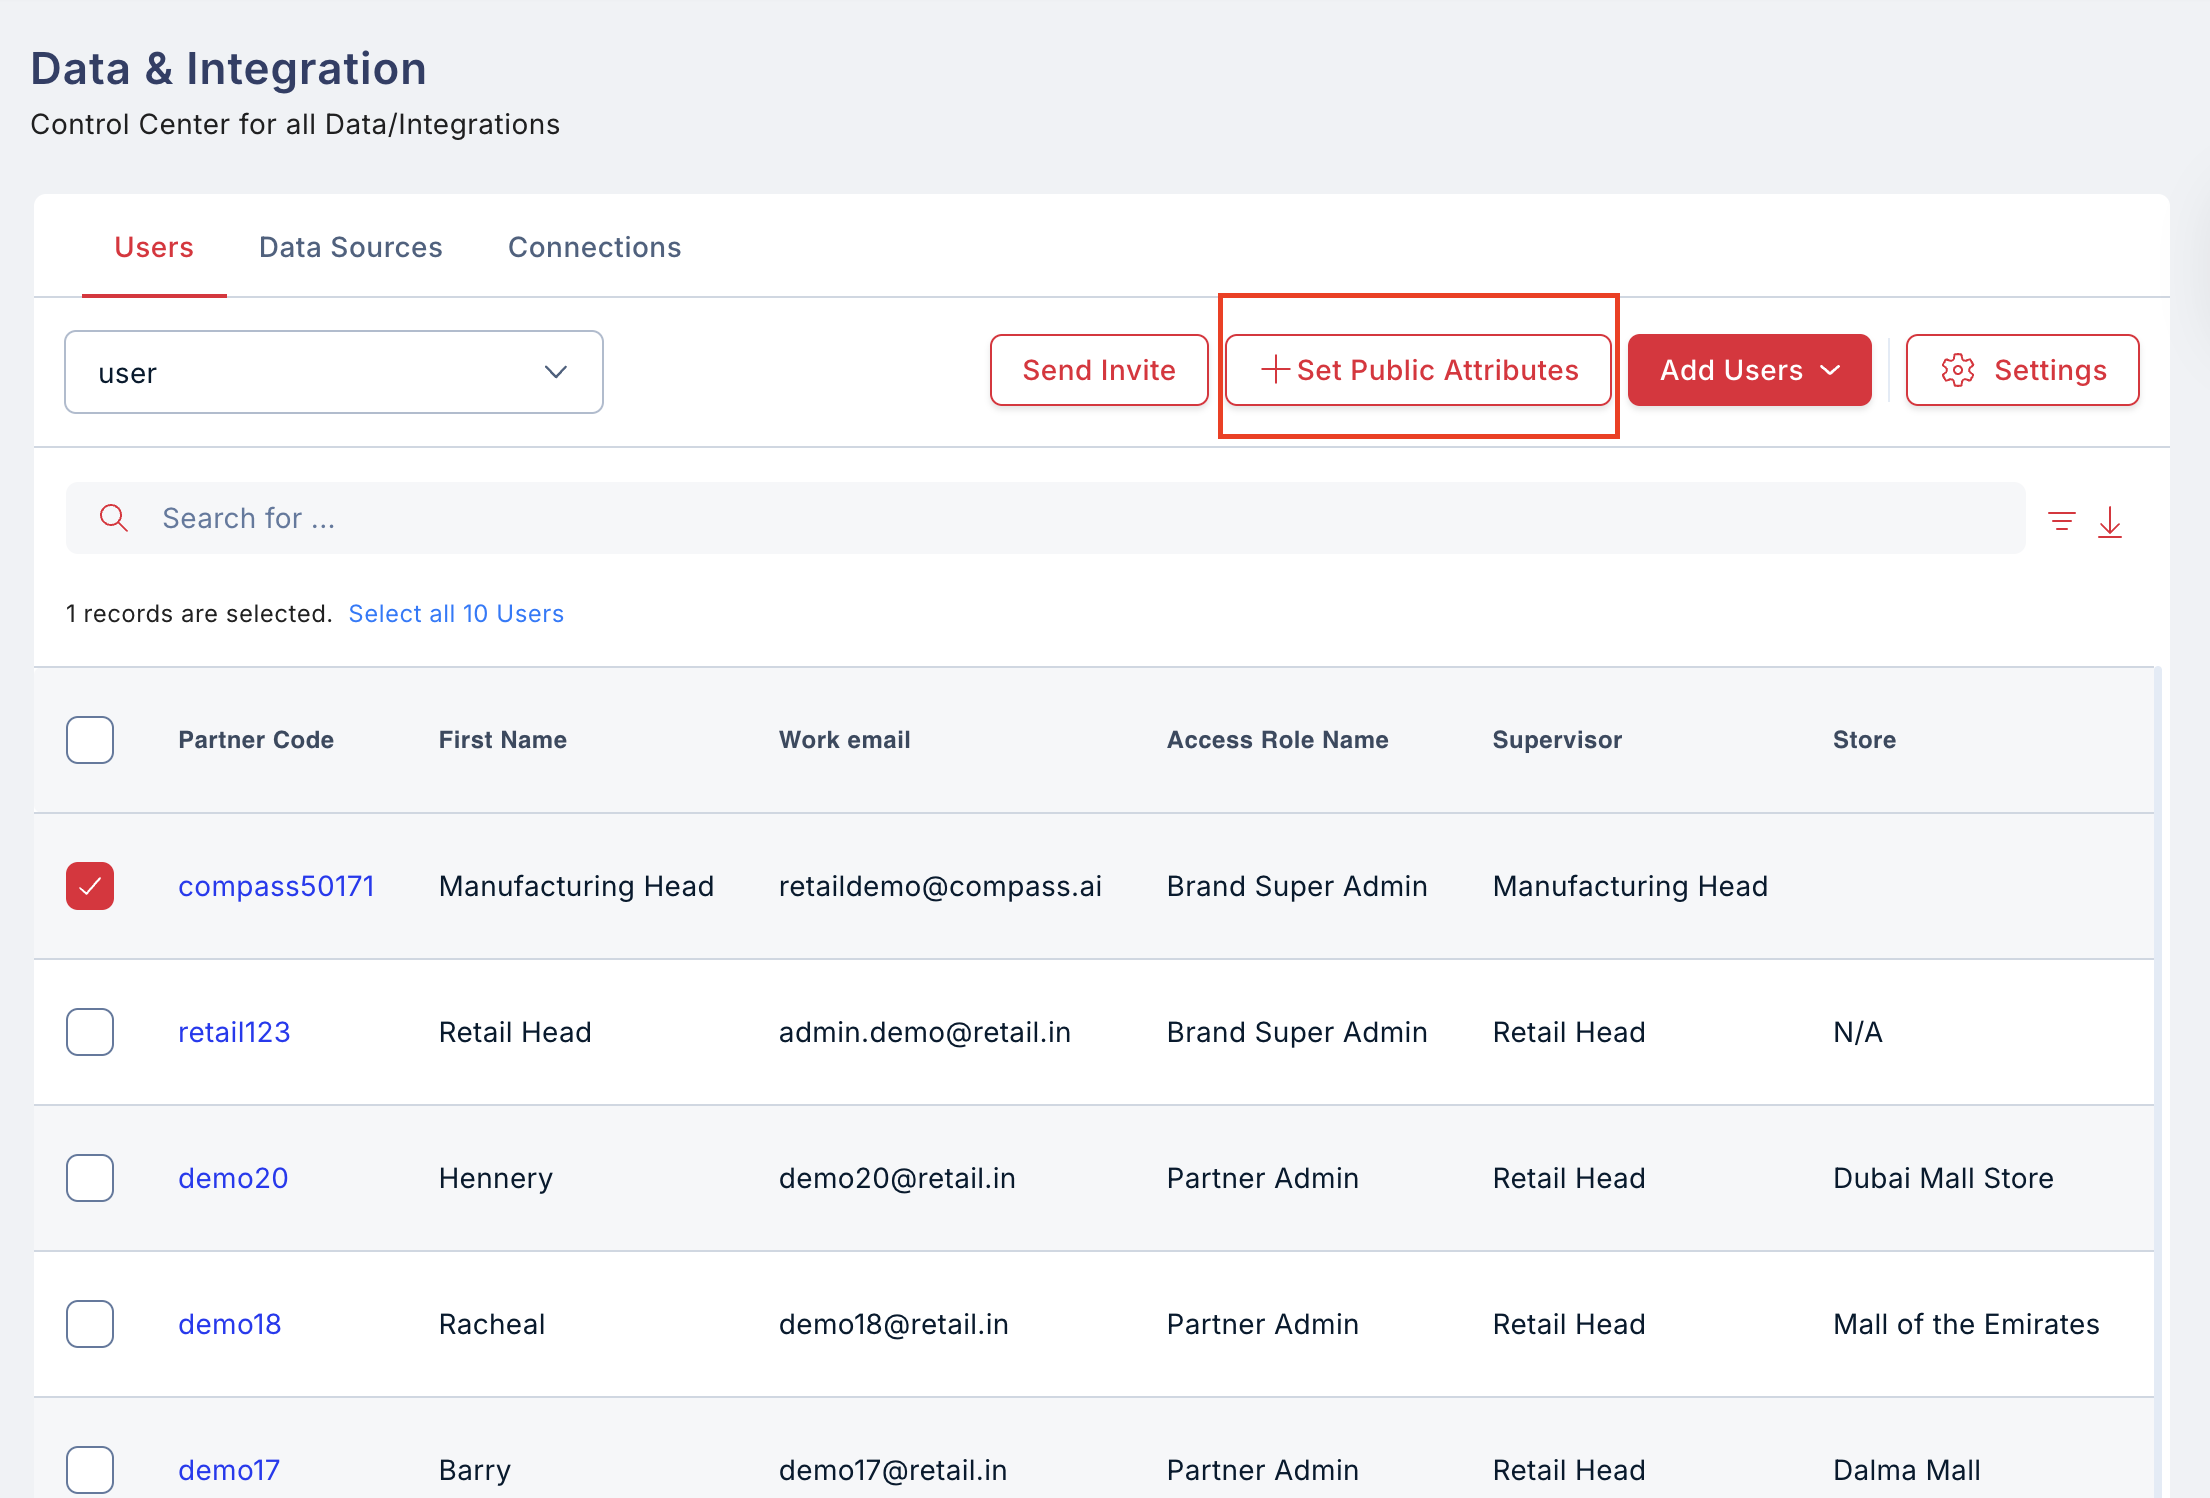
Public attributes are extra information visible to everyone about a user (on both Web and Mobile).
* On the User Details page, click **Public Attributes** at the top right.
## Step 5: Set Public Attributes
Public attributes are extra information visible to everyone about a user (on both Web and Mobile).
* On the User Details page, click **Public Attributes** at the top right.
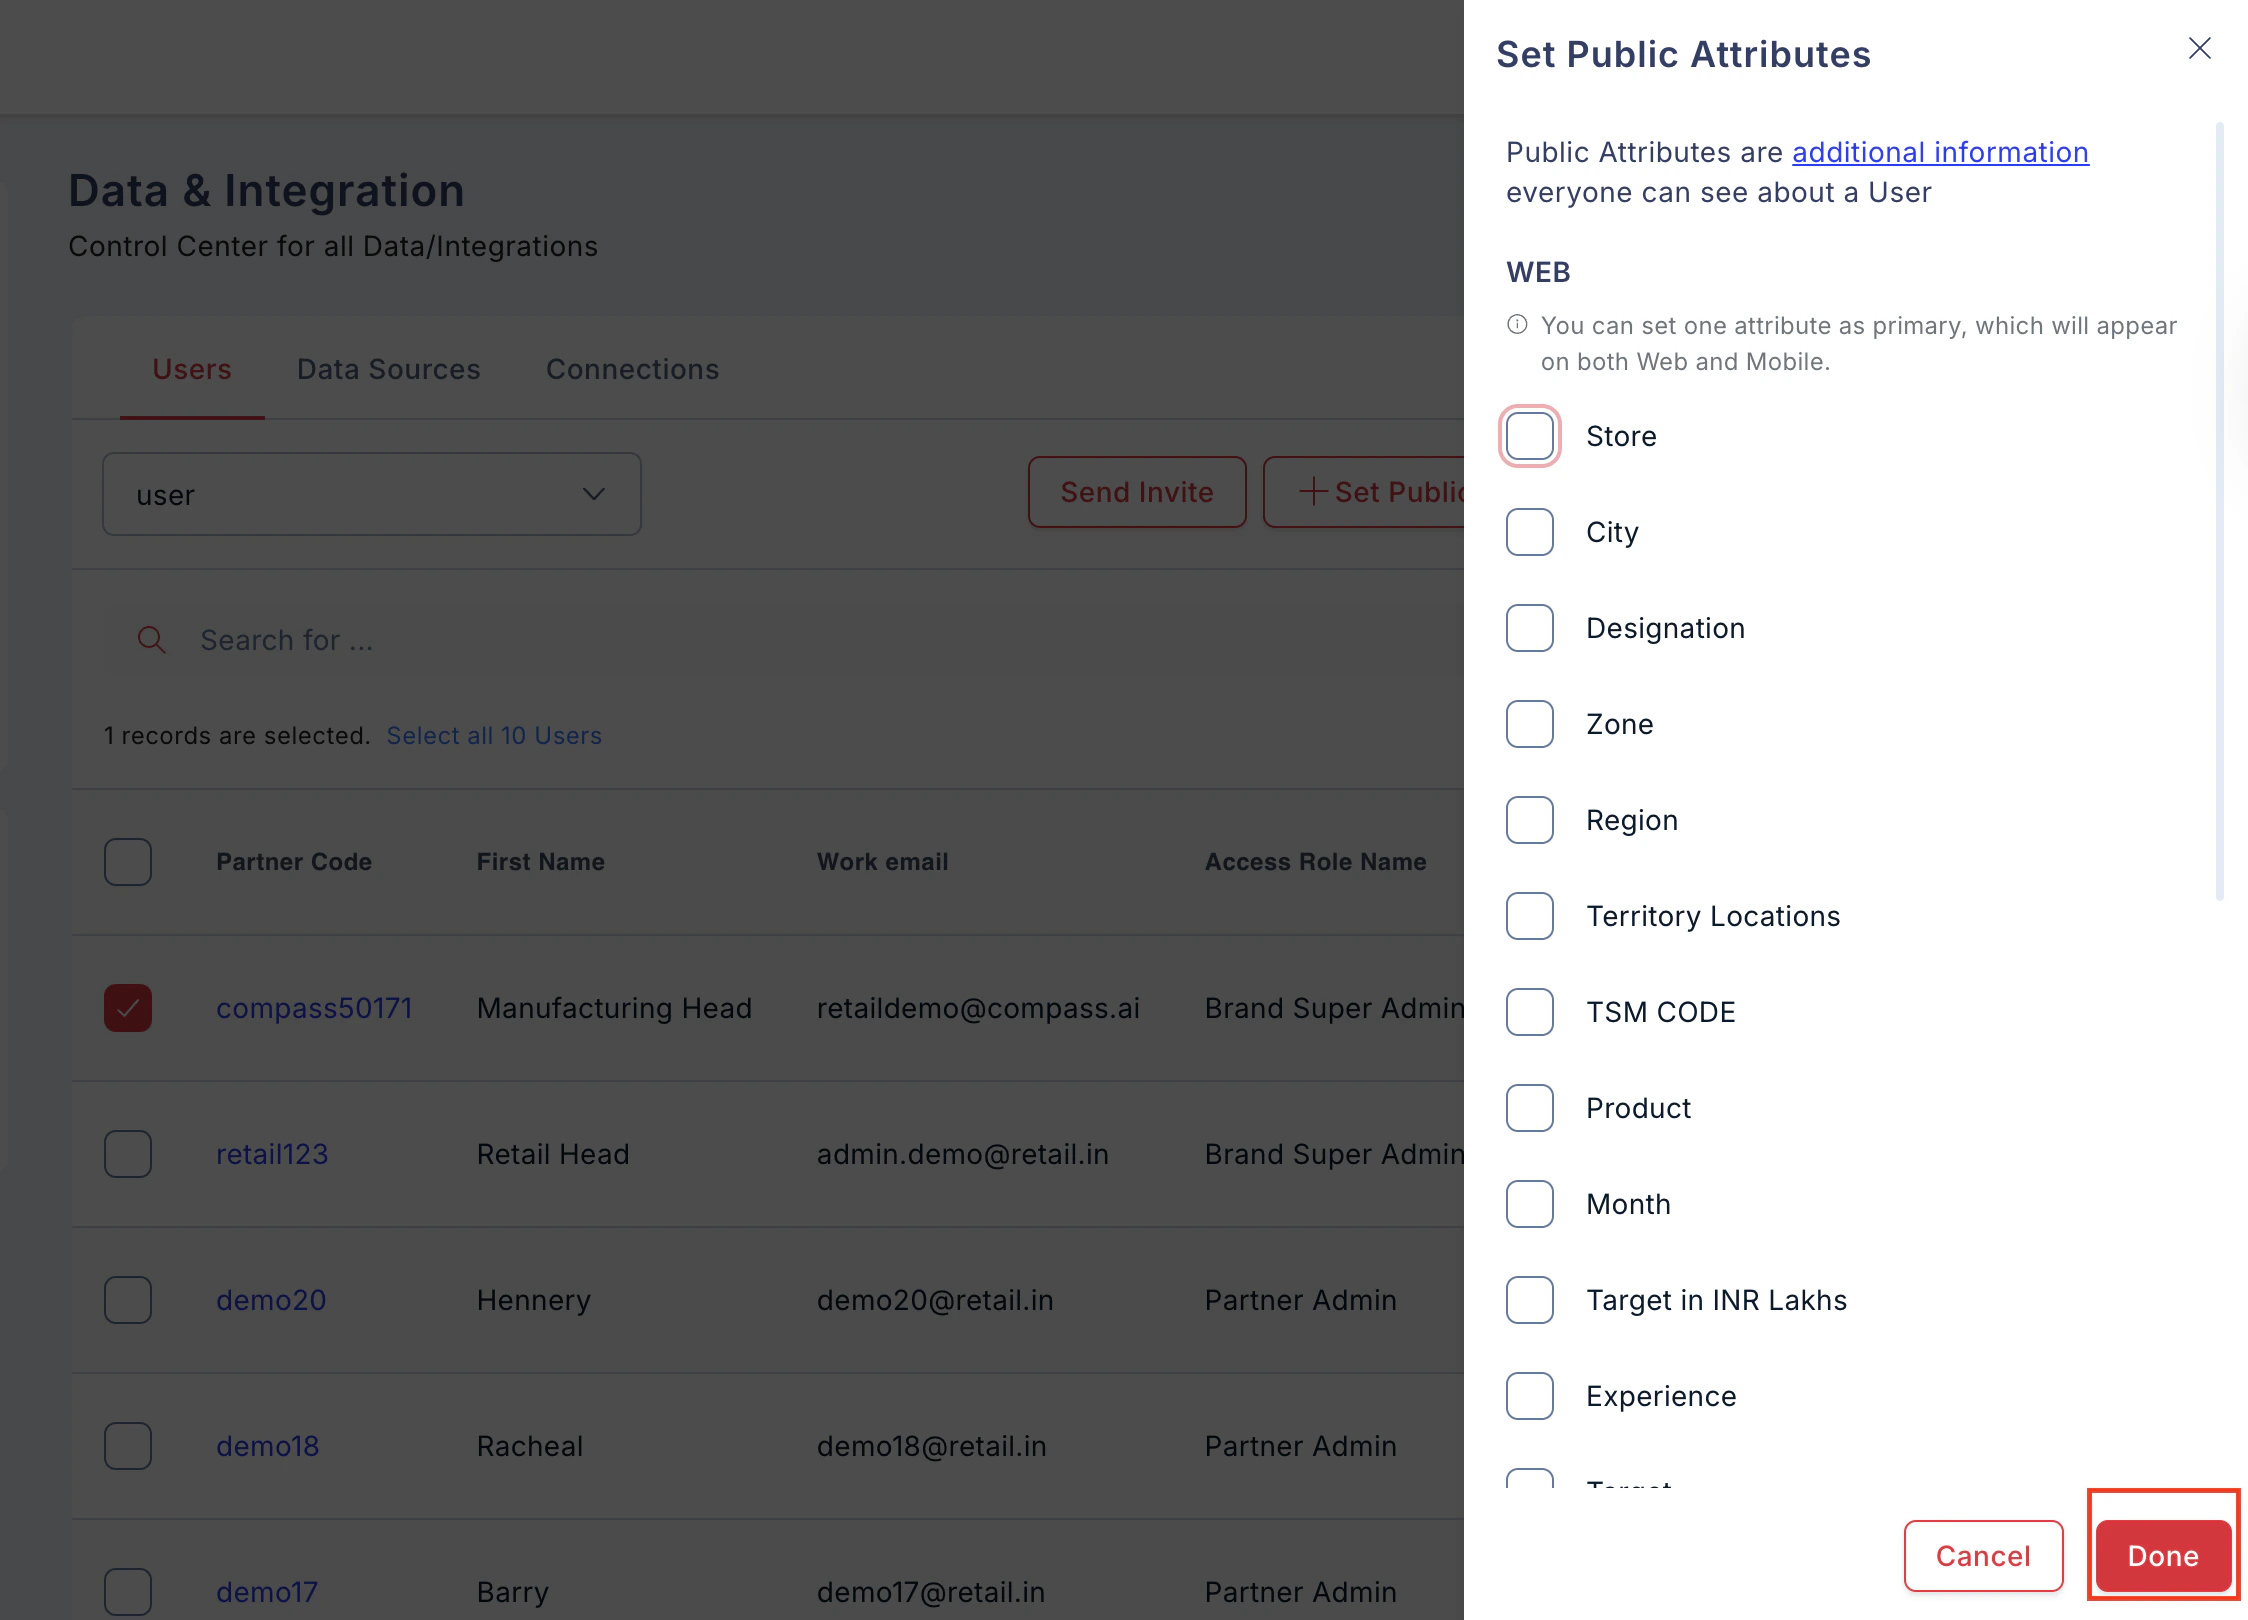
 * Select the attributes you want to display.
* Mark one attribute as Primary — this will be shown on both Web and Mobile.
* Click **Update** to save.
* Select the attributes you want to display.
* Mark one attribute as Primary — this will be shown on both Web and Mobile.
* Click **Update** to save.
 ## Step 6: Manage User Workflows and Roles
* Go to **Manage Users**.
* Click **Settings** at the top right corner.
* You’ll find two sections:
* **User Approval Workflows**
* **User Roles**
### 6.1 User Approval Workflows
Approval workflows define **who approves what** and can be **mapped to plans** later.
* Click Manage Users
## Step 6: Manage User Workflows and Roles
* Go to **Manage Users**.
* Click **Settings** at the top right corner.
* You’ll find two sections:
* **User Approval Workflows**
* **User Roles**
### 6.1 User Approval Workflows
Approval workflows define **who approves what** and can be **mapped to plans** later.
* Click Manage Users
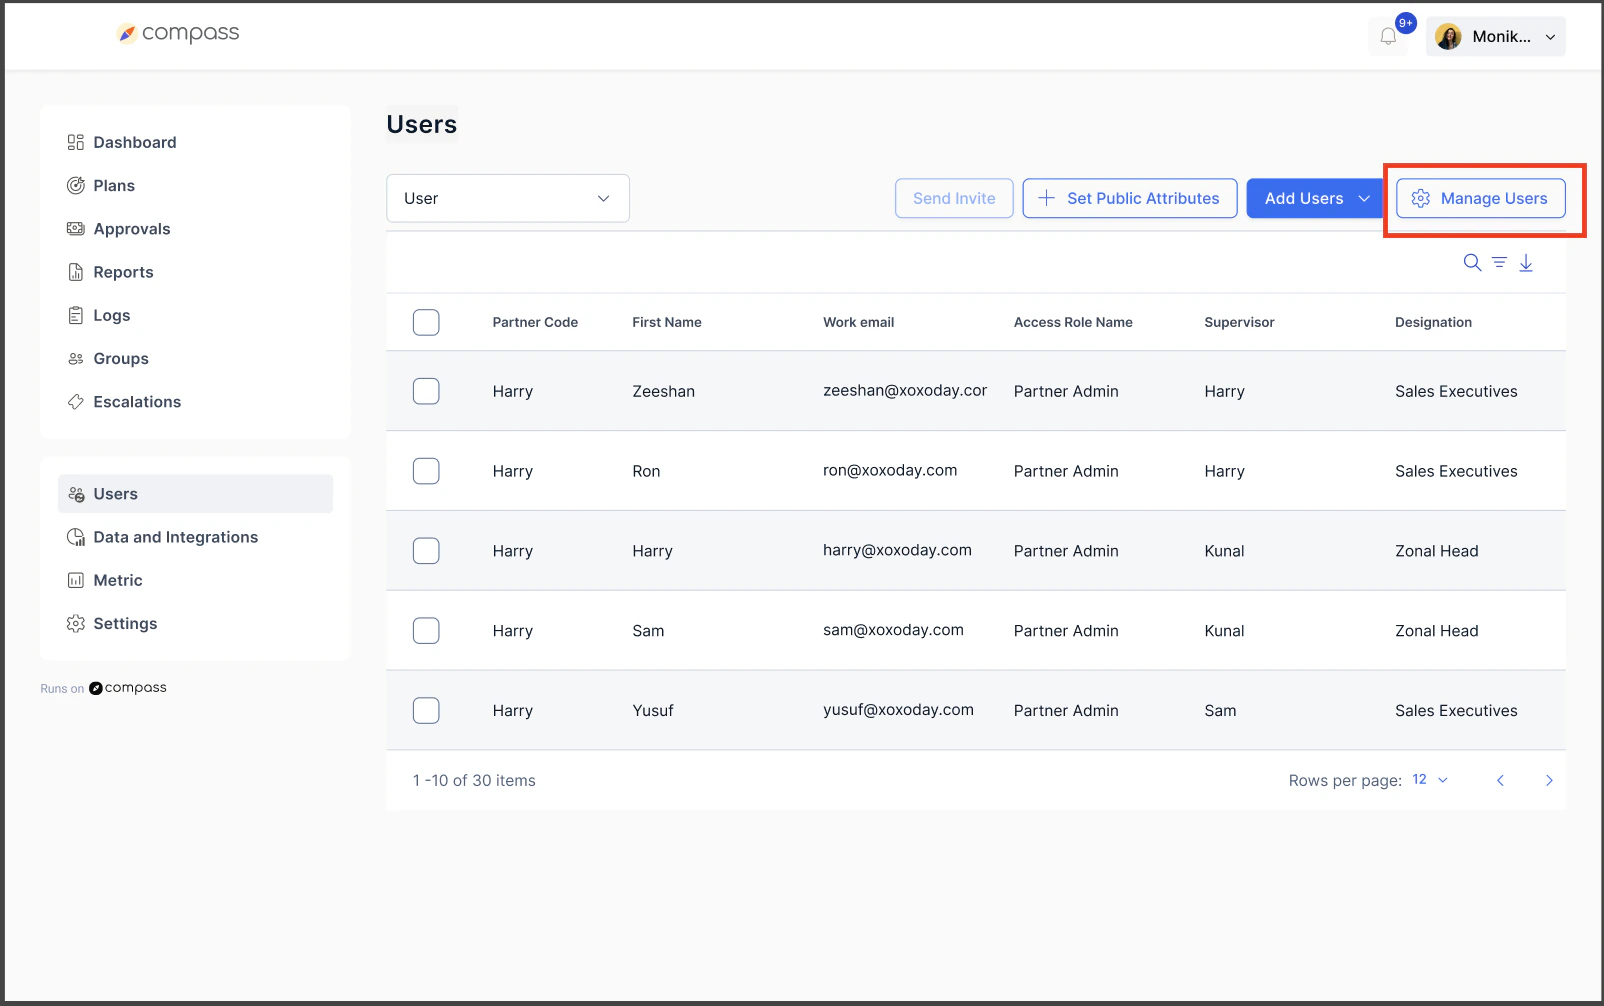 * Click on **Add User Approval Workflow**
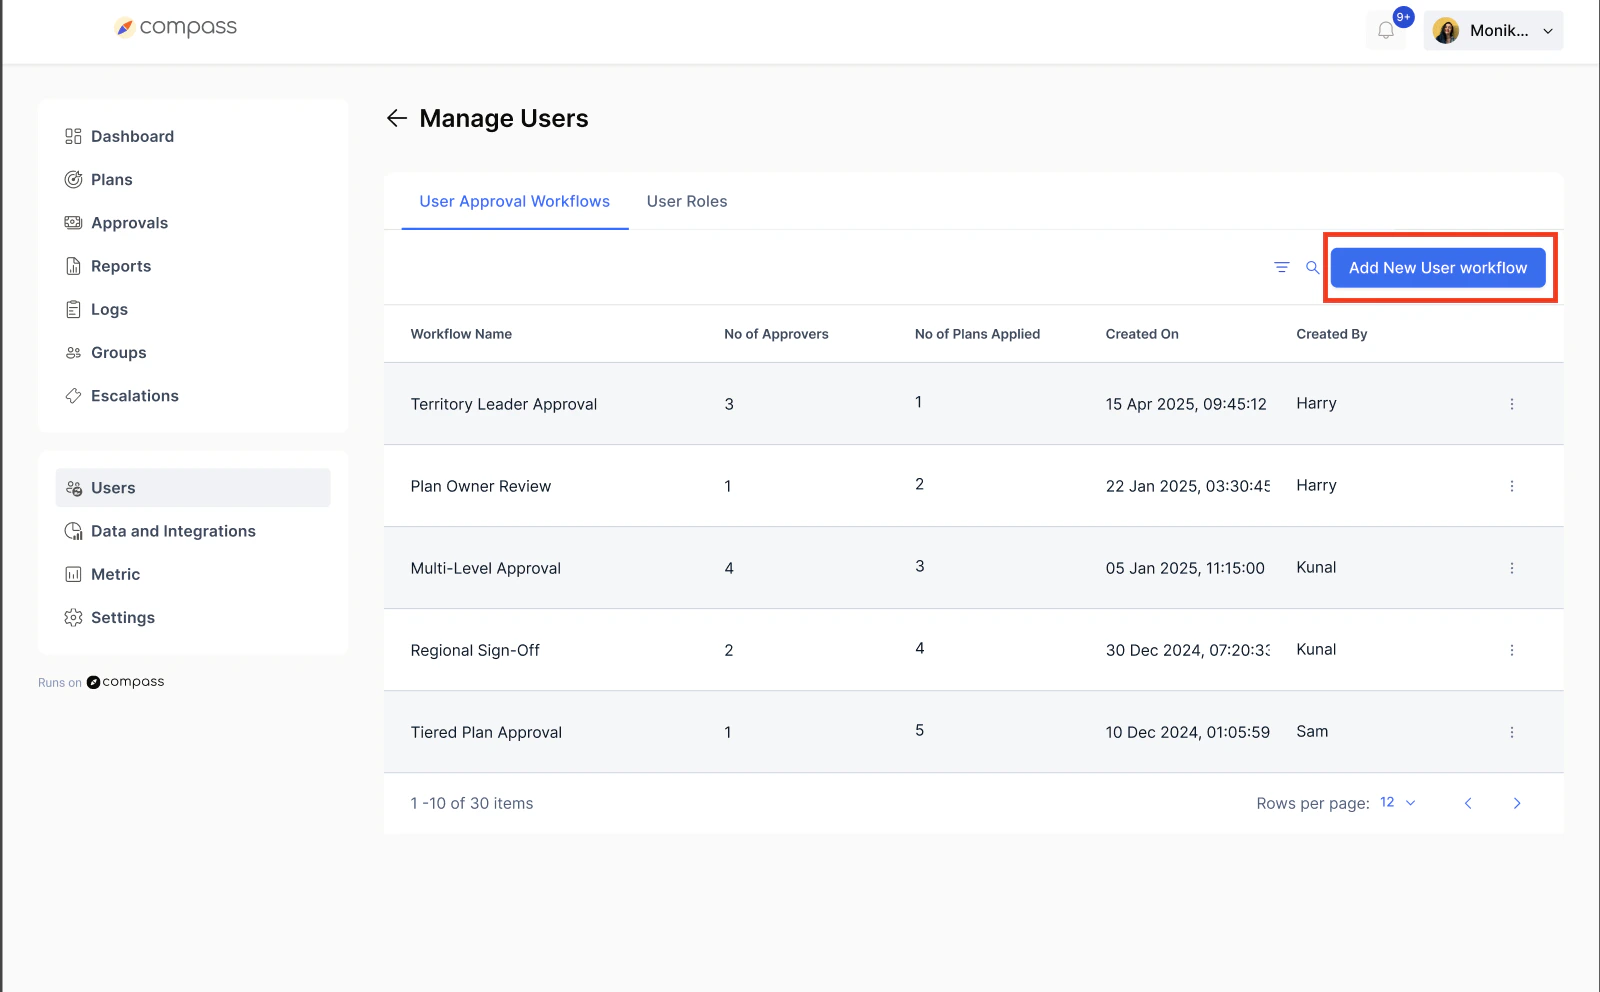 * Click **Add New Workflow** or **Edit** an existing one.
* Enter the **workflow name**.
* Add approvers (you can add multiple approvers by clicking the **“+” icon**).
* Click **Add New Workflow** or **Edit** an existing one.
* Enter the **workflow name**.
* Add approvers (you can add multiple approvers by clicking the **“+” icon**).
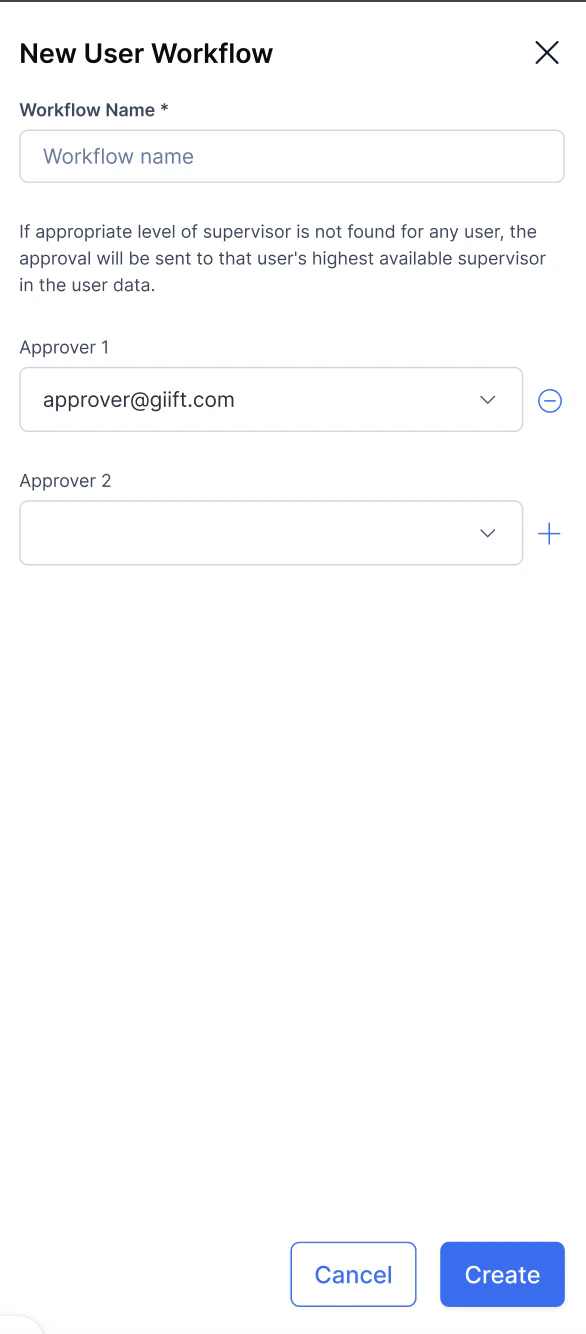 * Save the workflow.
You can reuse these workflows for different plans.
### 6.2 User Roles
As a **Super Admin**, you can control what Admins and Managers can access or edit.
### How to Assign Roles
* Go to **User Roles**.
* Toggle permissions **ON/OFF** for each module:
* **Earnings**
* **Groups**
* **Users**
* **Data & Integrations**
* **Transactions**
* You can specify:
* Who can **view**, **edit**, or **revoke** earnings.
* Who can **create groups**.
* Who can **add/edit users**.
* Who can **edit data sources**.
* Who can **view or download transactions**.
* Save the workflow.
You can reuse these workflows for different plans.
### 6.2 User Roles
As a **Super Admin**, you can control what Admins and Managers can access or edit.
### How to Assign Roles
* Go to **User Roles**.
* Toggle permissions **ON/OFF** for each module:
* **Earnings**
* **Groups**
* **Users**
* **Data & Integrations**
* **Transactions**
* You can specify:
* Who can **view**, **edit**, or **revoke** earnings.
* Who can **create groups**.
* Who can **add/edit users**.
* Who can **edit data sources**.
* Who can **view or download transactions**.
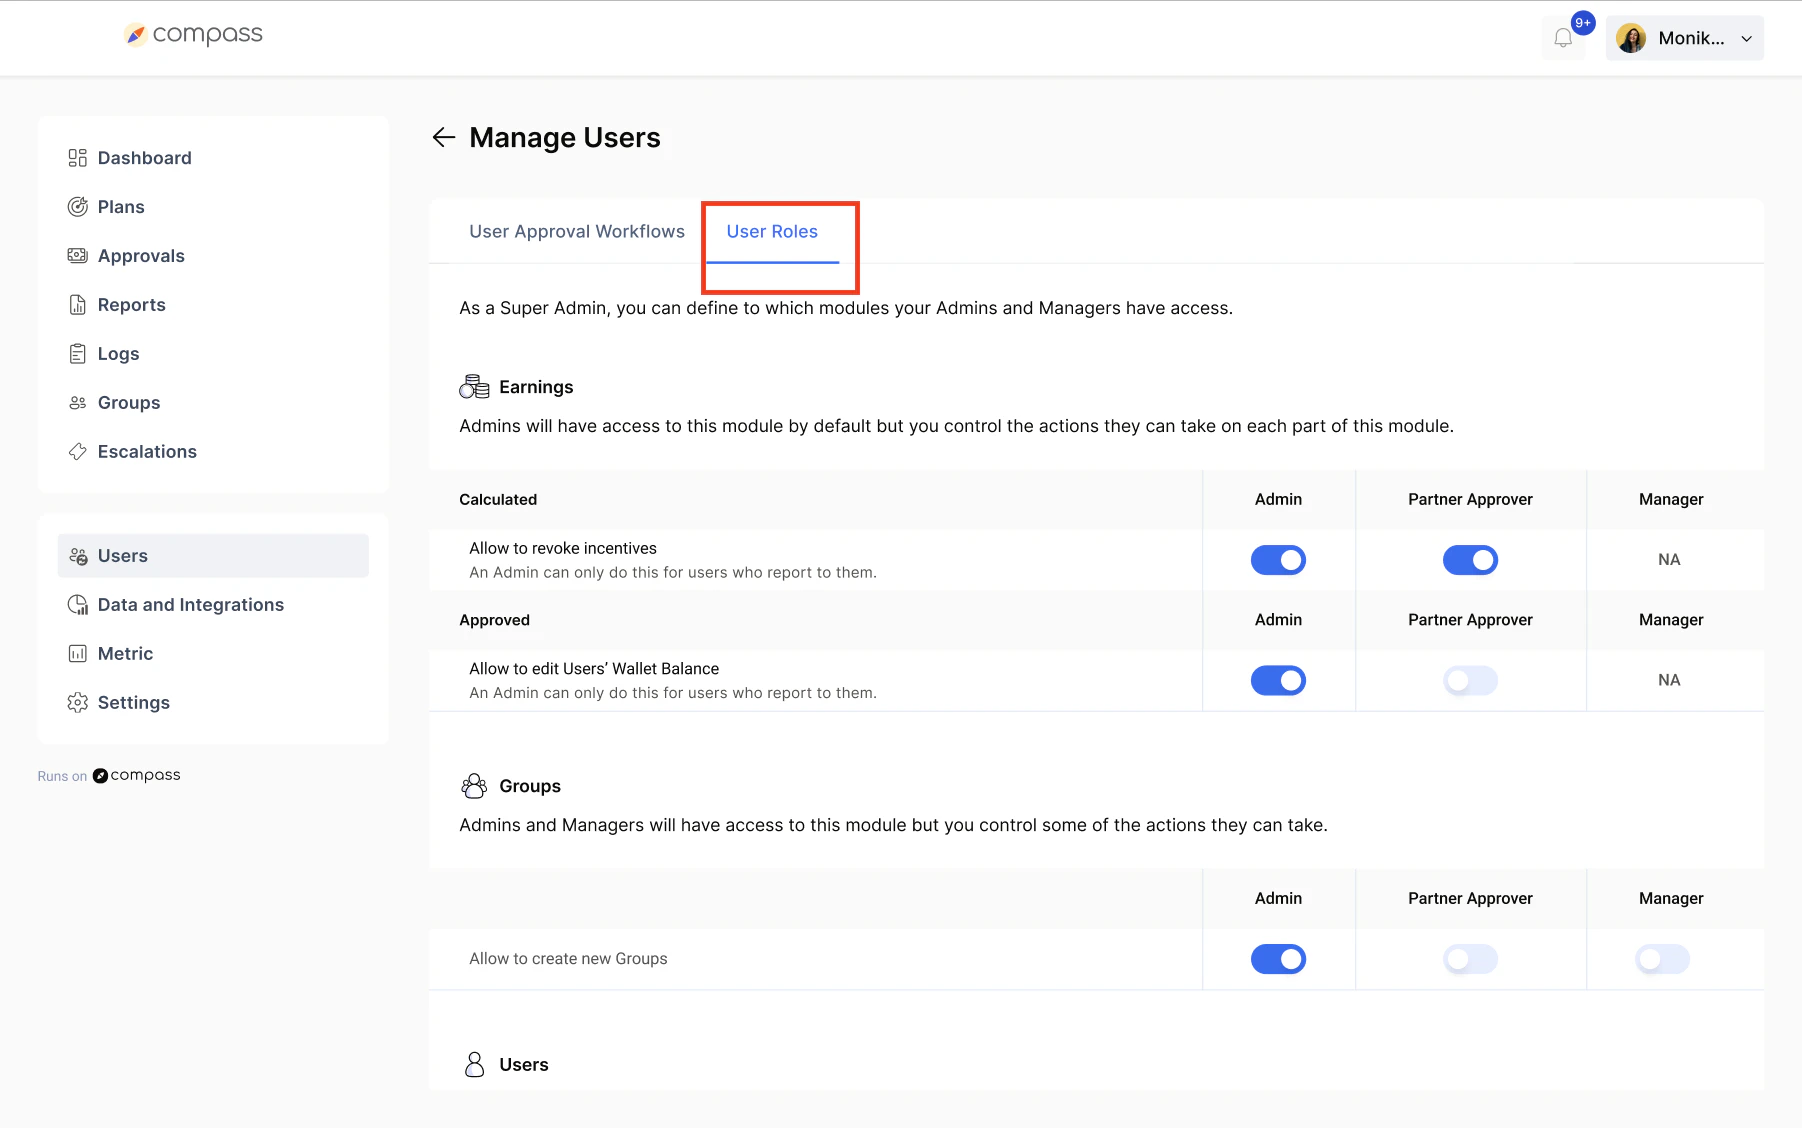 Example:
* Admin can revoke earnings for users reporting to them.
* Managers can view transactions but not download them.
* Only Admins can edit data sources.
**Tip:** Keep permissions limited to ensure better control and security.
## Summary of Key Actions
| | | |
| ---------------- | ---------------------------------------- | ------------------------------------------------ |
| **Action** | **Where to Find** | **What You Can Do** |
| Add Users | Data & Integrations → Users | Add manually or upload via CSV |
| Edit Users | User Details Page | Update details, roles, status, public attributes |
| Manage Workflows | Manage Users → Settings → User Workflows | Create or edit approval workflows |
| Manage Roles | Manage Users → Settings → User Roles | Control access for Admins and Managers |
| View User Groups | Users Page | Use dropdown to see group-wise user lists |
***
**Best Practices:**
* Keep workflows clear and descriptive for easy mapping.
* Assign roles carefully to avoid accidental access.
* Use bulk upload for faster onboarding of large teams.
* Set a primary public attribute for easy user identification.
Need help? Reach out to your support team or [cs@xoxoday.com](mailto:cs@xoxoday.com).
Example:
* Admin can revoke earnings for users reporting to them.
* Managers can view transactions but not download them.
* Only Admins can edit data sources.
**Tip:** Keep permissions limited to ensure better control and security.
## Summary of Key Actions
| | | |
| ---------------- | ---------------------------------------- | ------------------------------------------------ |
| **Action** | **Where to Find** | **What You Can Do** |
| Add Users | Data & Integrations → Users | Add manually or upload via CSV |
| Edit Users | User Details Page | Update details, roles, status, public attributes |
| Manage Workflows | Manage Users → Settings → User Workflows | Create or edit approval workflows |
| Manage Roles | Manage Users → Settings → User Roles | Control access for Admins and Managers |
| View User Groups | Users Page | Use dropdown to see group-wise user lists |
***
**Best Practices:**
* Keep workflows clear and descriptive for easy mapping.
* Assign roles carefully to avoid accidental access.
* Use bulk upload for faster onboarding of large teams.
* Set a primary public attribute for easy user identification.
Need help? Reach out to your support team or [cs@xoxoday.com](mailto:cs@xoxoday.com).