> ## Documentation Index
> Fetch the complete documentation index at: https://help-empuls.xoxoday.com/llms.txt
> Use this file to discover all available pages before exploring further.
# Amazon Marketplace integration with Empuls
> Learn all about Amazon integration with Empuls.
## Order on Amazon using Empuls Points – Employees Guide
Follow these simple steps to redeem your reward points for Amazon products:
##
## Step 1: Go to the Empuls Store
* Log in to your **Empuls account**.
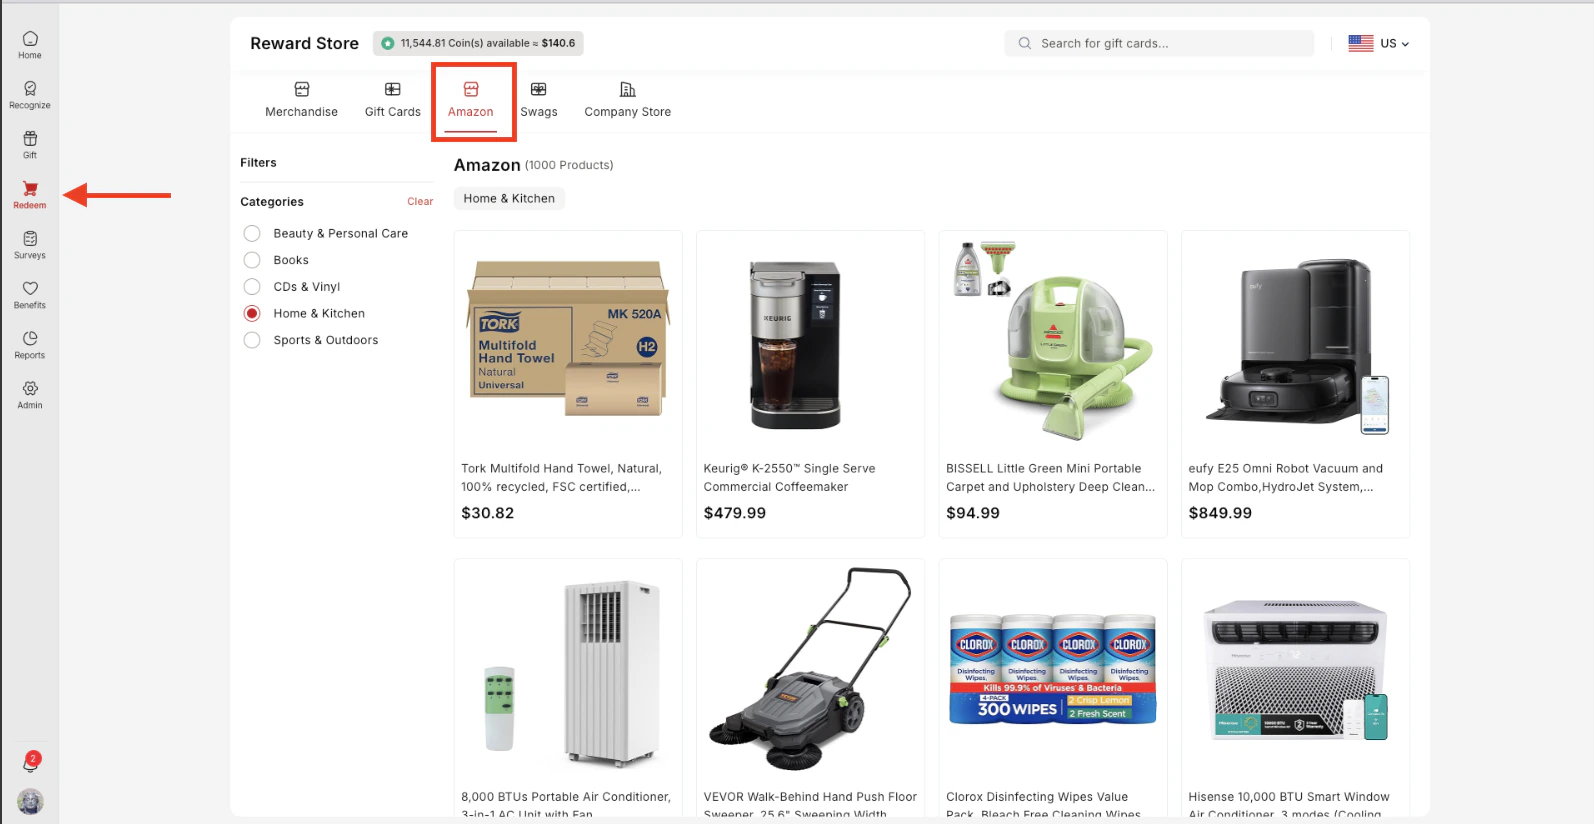
* From the main menu, navigate to the **“Shop”** section. You will be able to see Amazon option in the store. Make sure you see US region selected in the top right corner of the store page.
## Step 2: Select Amazon Product
* Click on the **“Amazon” tab**.
* Browse the list of available Amazon products.
* Click on the product you want to buy.
## Step 3: Checkout
* Follow the **checkout process** as prompted.
* Enter your **billing address** and any other required details.
* Review your order, then click **“Place Order”** to complete the redemption.
Your Empuls points will be deducted, and the order will be placed through Amazon.
 ## Setting Up the Amazon Store on Empuls - For Platform Administrators
Xoxoday Empuls offers seamless Amazon Marketplace integration for reward redemptions through two setup options:
* **1P (First-Party Model)** – This is a default option, no action needed.
* **3P (Third-Party Model)** – Integrate with your organization’s Amazon Business account
## Comparison between 1P and 3P set up
| **Feature** | **1P Setup** | **3P Setup** |
| ----------------------- | ---------------------------------------------------- | ----------------------------------------------------------- |
| Amazon Business Account | Not required | Required |
| Order Placement | Orders placed on Amazon via Empuls business account. | Orders placed on Amazon via the company's business account. |
| Product Catalog | Curated and managed by Xoxoday Empuls | Managed by client |
| Billing | Amazon invoices Xoxoday Empuls for all products. | Amazon invoices the client’s Amazon Business account |
| Settle Payments | Xoxoday Empuls settles payments with Amazon | Client settles payment directly with Amazon |
| Ideal For | Hands-off reward redemption | Companies that want control over their catalog and billing |
## Getting Started:
* **If you already have an Amazon Business account:**
Simply integrate it into the Xoxoday system.
* **If you don’t have an Amazon Business account:**
You can create one by following the steps below.
## How to Enable Amazon 3P Setup on Empuls
The Amazon 3P (Third-Party) setup gives you complete control over your catalog, orders, and billing through your own Amazon Business account. Follow the steps below to get started:
## Step 1: Create an Amazon Business Account
Before integrating with Empuls, make sure you have a valid Amazon Business account.
* **Already have an Amazon Business account?** Skip to **Step 2**.
* **Need to create one?** Follow the instructions below:
* Visit [Amazon Business](https://www.amazon.com/business).
* Click **“Create a Free Account.”**
* Fill in your **business name, address, and tax details**.
* Complete the **verification process** (email or phone).
* Once your account is approved, return to the Xoxoday dashboard to begin integration.
## Step 2: Configure Your Amazon Business Account for Empuls
Follow the steps below to set up and enable this feature on your Amazon Business account:
**2.1: Log In to Your Amazon Business Account**
* Go to [Amazon Business](https://www.amazon.com/business).
* Click **Sign In** and log in with your credentials.
**2.2: Navigate to the Members Tab**
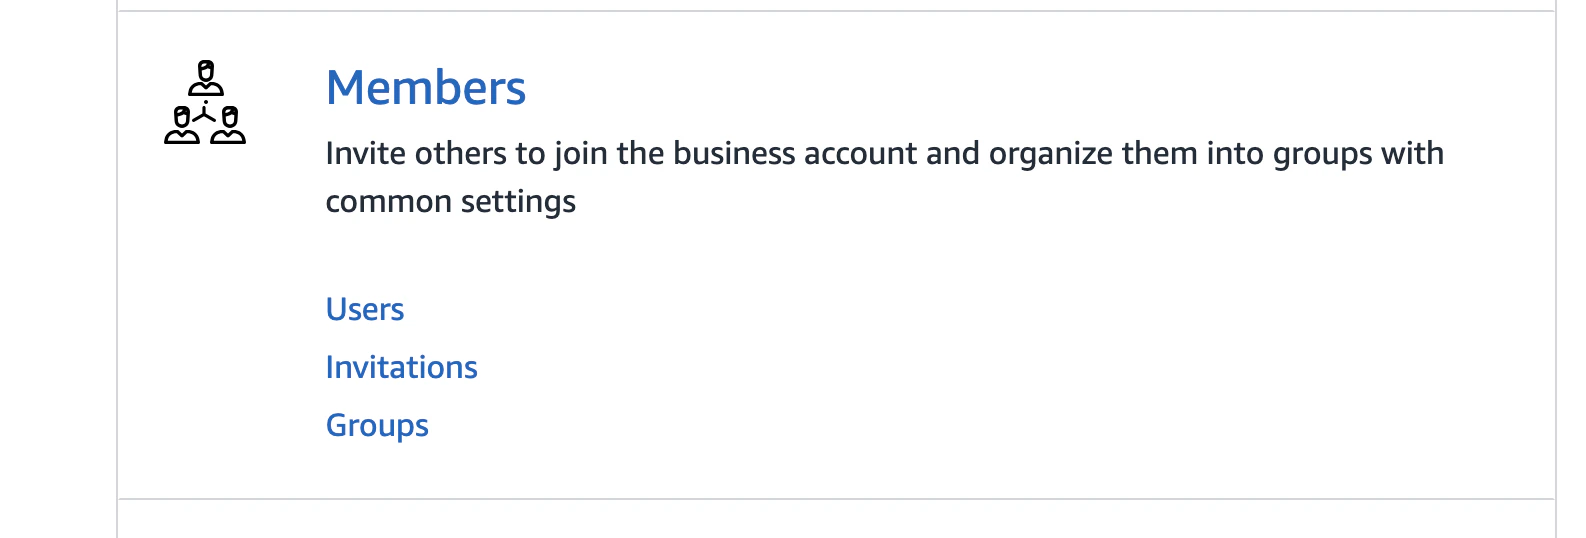
* From your dashboard, click on the **“Members”** tab.
## Setting Up the Amazon Store on Empuls - For Platform Administrators
Xoxoday Empuls offers seamless Amazon Marketplace integration for reward redemptions through two setup options:
* **1P (First-Party Model)** – This is a default option, no action needed.
* **3P (Third-Party Model)** – Integrate with your organization’s Amazon Business account
## Comparison between 1P and 3P set up
| **Feature** | **1P Setup** | **3P Setup** |
| ----------------------- | ---------------------------------------------------- | ----------------------------------------------------------- |
| Amazon Business Account | Not required | Required |
| Order Placement | Orders placed on Amazon via Empuls business account. | Orders placed on Amazon via the company's business account. |
| Product Catalog | Curated and managed by Xoxoday Empuls | Managed by client |
| Billing | Amazon invoices Xoxoday Empuls for all products. | Amazon invoices the client’s Amazon Business account |
| Settle Payments | Xoxoday Empuls settles payments with Amazon | Client settles payment directly with Amazon |
| Ideal For | Hands-off reward redemption | Companies that want control over their catalog and billing |
## Getting Started:
* **If you already have an Amazon Business account:**
Simply integrate it into the Xoxoday system.
* **If you don’t have an Amazon Business account:**
You can create one by following the steps below.
## How to Enable Amazon 3P Setup on Empuls
The Amazon 3P (Third-Party) setup gives you complete control over your catalog, orders, and billing through your own Amazon Business account. Follow the steps below to get started:
## Step 1: Create an Amazon Business Account
Before integrating with Empuls, make sure you have a valid Amazon Business account.
* **Already have an Amazon Business account?** Skip to **Step 2**.
* **Need to create one?** Follow the instructions below:
* Visit [Amazon Business](https://www.amazon.com/business).
* Click **“Create a Free Account.”**
* Fill in your **business name, address, and tax details**.
* Complete the **verification process** (email or phone).
* Once your account is approved, return to the Xoxoday dashboard to begin integration.
## Step 2: Configure Your Amazon Business Account for Empuls
Follow the steps below to set up and enable this feature on your Amazon Business account:
**2.1: Log In to Your Amazon Business Account**
* Go to [Amazon Business](https://www.amazon.com/business).
* Click **Sign In** and log in with your credentials.
**2.2: Navigate to the Members Tab**
* From your dashboard, click on the **“Members”** tab.
 **2.3: Create a Group**
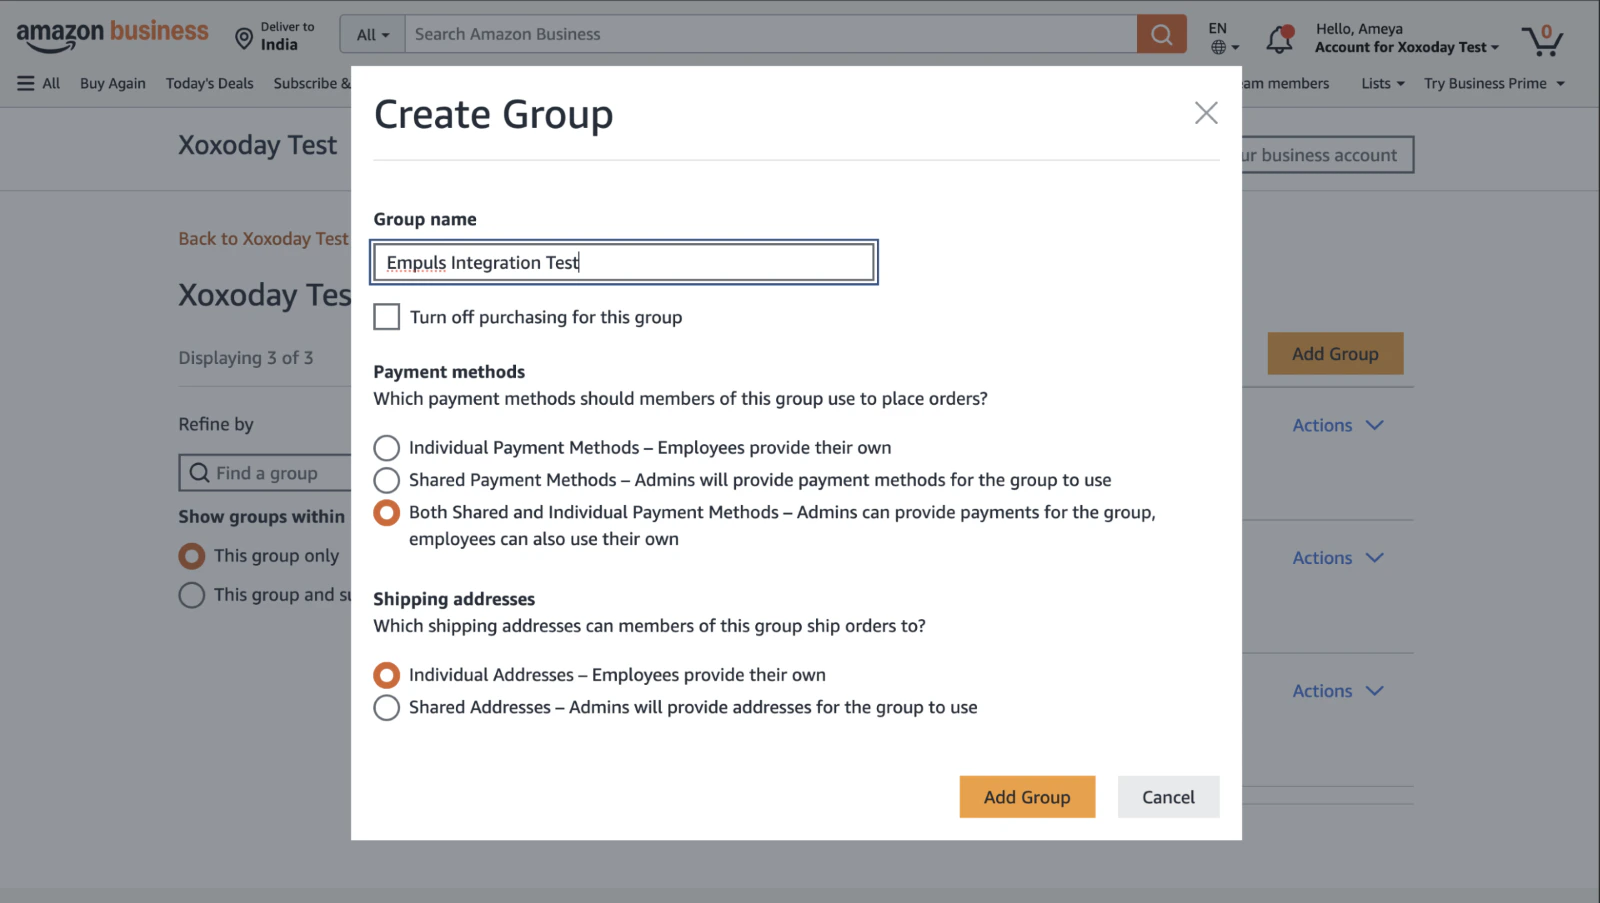
* Click **“Create Group.”**
* Enter a **Group Name** (e.g., "Empuls Orders").
* Choose a **payment method** and **shipping address**.
* Click **“Add Group”** to complete setup.
**2.3: Create a Group**
* Click **“Create Group.”**
* Enter a **Group Name** (e.g., "Empuls Orders").
* Choose a **payment method** and **shipping address**.
* Click **“Add Group”** to complete setup.
 **2.4: Add Users to the Group**
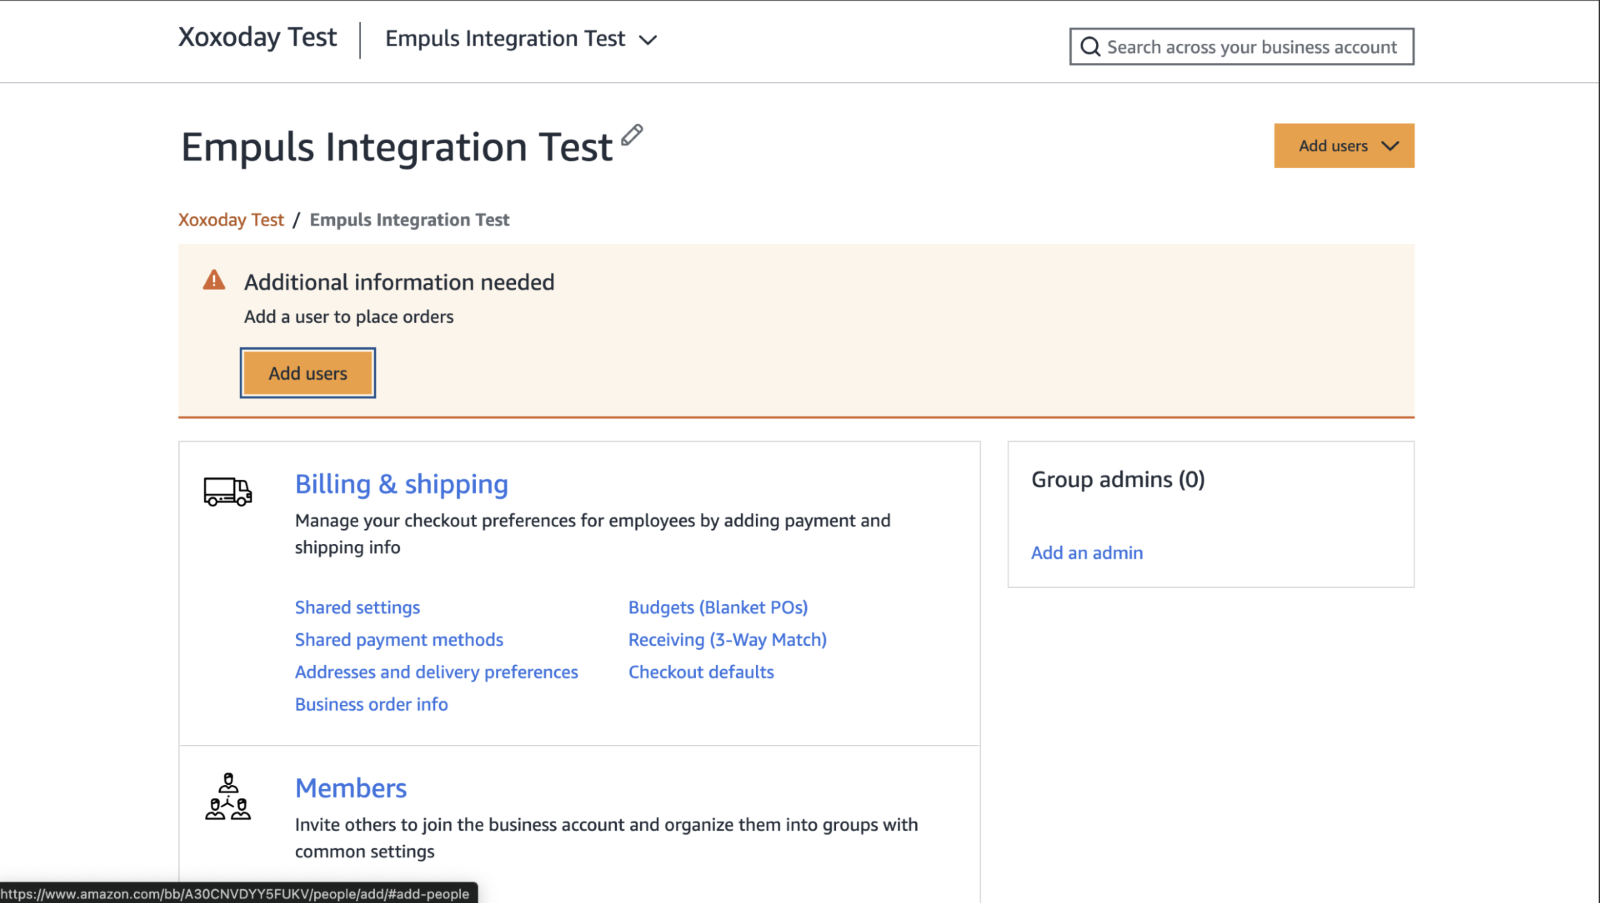
* Click **“Add Users”** within the group.
* A prompt will appear asking you to enter the email addresses of the admins you want to add. By default, the person creating the account is added automatically and can assign roles to other users. These users will be able to do things like making changes to catalog, manage payments, etc. Its recommended to add all reward program administrators to here.
* Assign appropriate **roles** (e.g., Admin).
* Save your changes.
**2.4: Add Users to the Group**
* Click **“Add Users”** within the group.
* A prompt will appear asking you to enter the email addresses of the admins you want to add. By default, the person creating the account is added automatically and can assign roles to other users. These users will be able to do things like making changes to catalog, manage payments, etc. Its recommended to add all reward program administrators to here.
* Assign appropriate **roles** (e.g., Admin).
* Save your changes.
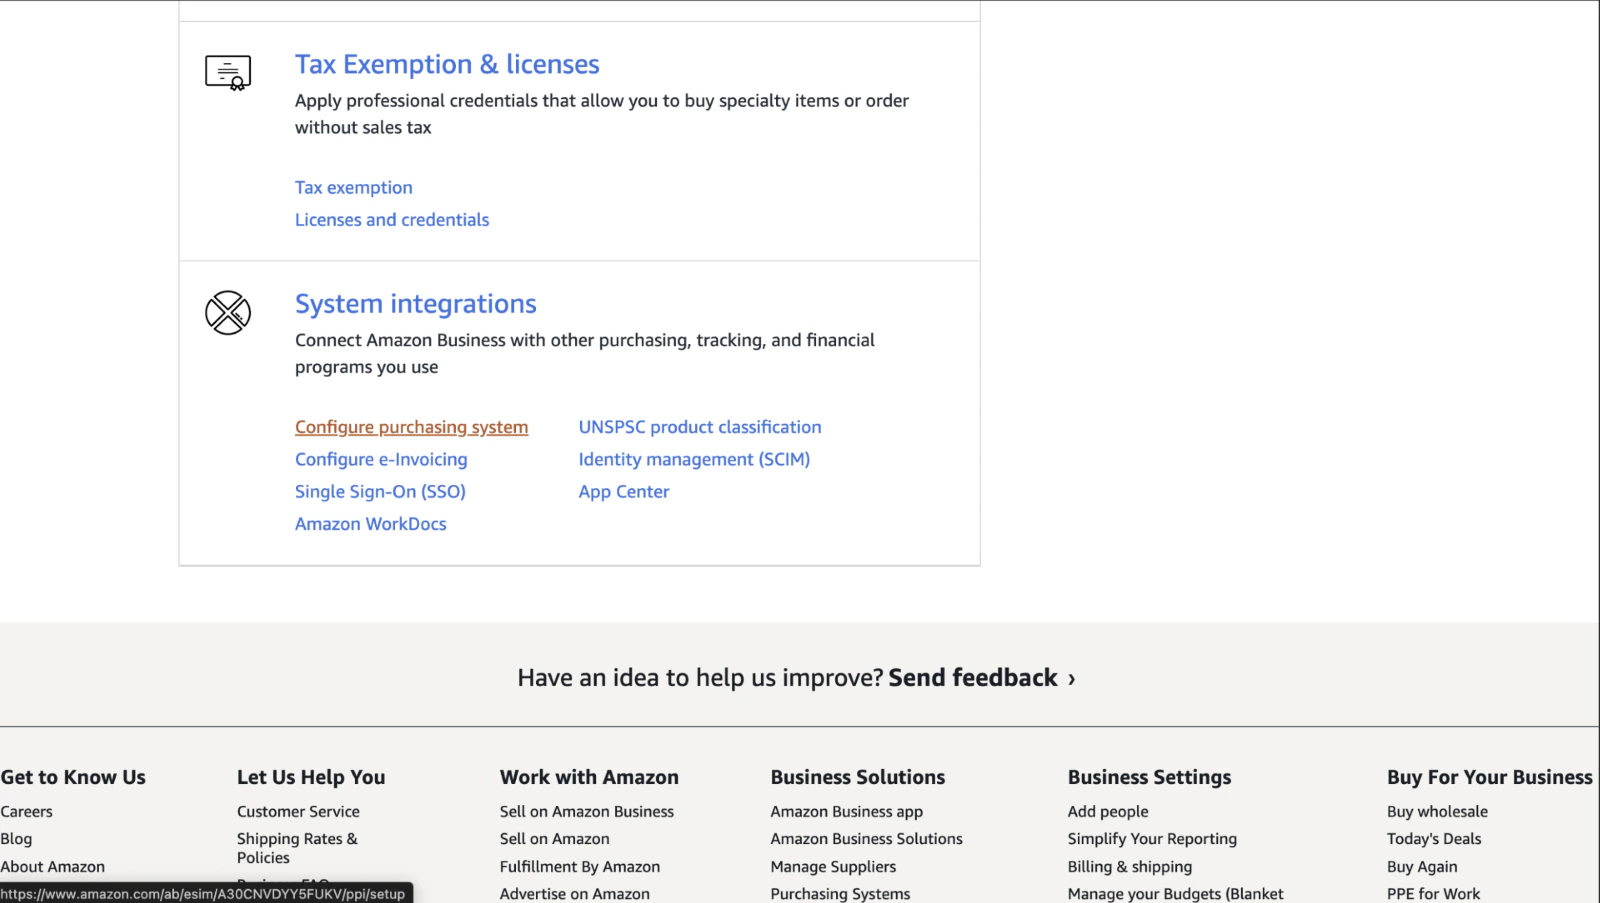
 **2.5: Configure Purchasing System**
* Navigate to **System Integrations** from your account settings.
* Click on **“Configure Purchasing System.”**
**2.5: Configure Purchasing System**
* Navigate to **System Integrations** from your account settings.
* Click on **“Configure Purchasing System.”**
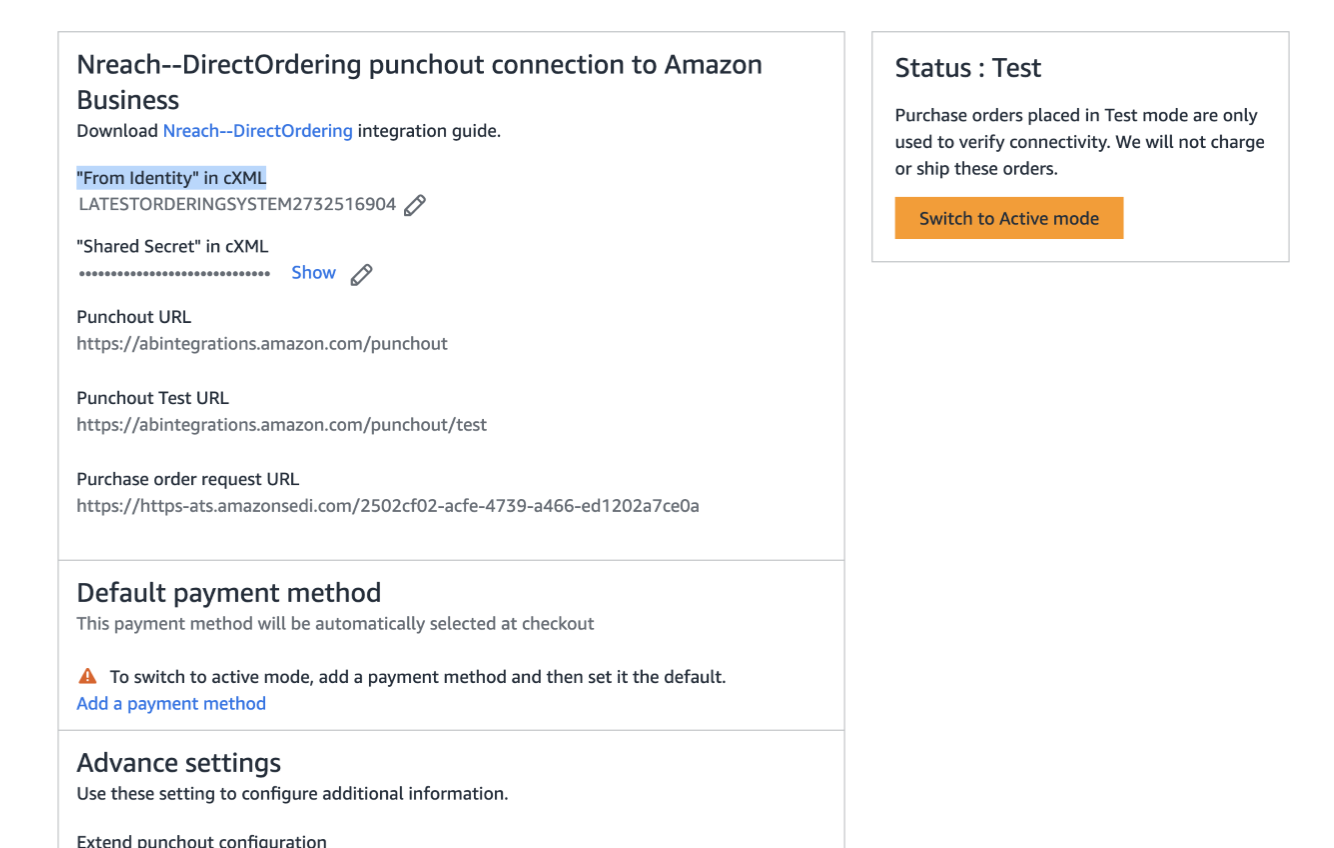
 **2.6: Enter Integration Details**
* Fill in the required **integration details** for your organization’s purchasing system.
* From the dropdown, select **“Nreach-DirectOrdering.”**
* Upon selection, the system login and password are automatically generated. You may update the system login and password if required. These credentials are also referred as “From Identity” and “Shared Secret” in step 3.3 while setting up Amazon 3P on Empuls web app.
* Click on save to successful setup, you will be able to see details below for your account. Keep these details handy as you will need this in next step of the setup.
**2.6: Enter Integration Details**
* Fill in the required **integration details** for your organization’s purchasing system.
* From the dropdown, select **“Nreach-DirectOrdering.”**
* Upon selection, the system login and password are automatically generated. You may update the system login and password if required. These credentials are also referred as “From Identity” and “Shared Secret” in step 3.3 while setting up Amazon 3P on Empuls web app.
* Click on save to successful setup, you will be able to see details below for your account. Keep these details handy as you will need this in next step of the setup.
 ## Step 3: Enable Amazon Business on Empuls
Follow these steps to integrate and enable your Amazon Business account within Empuls:
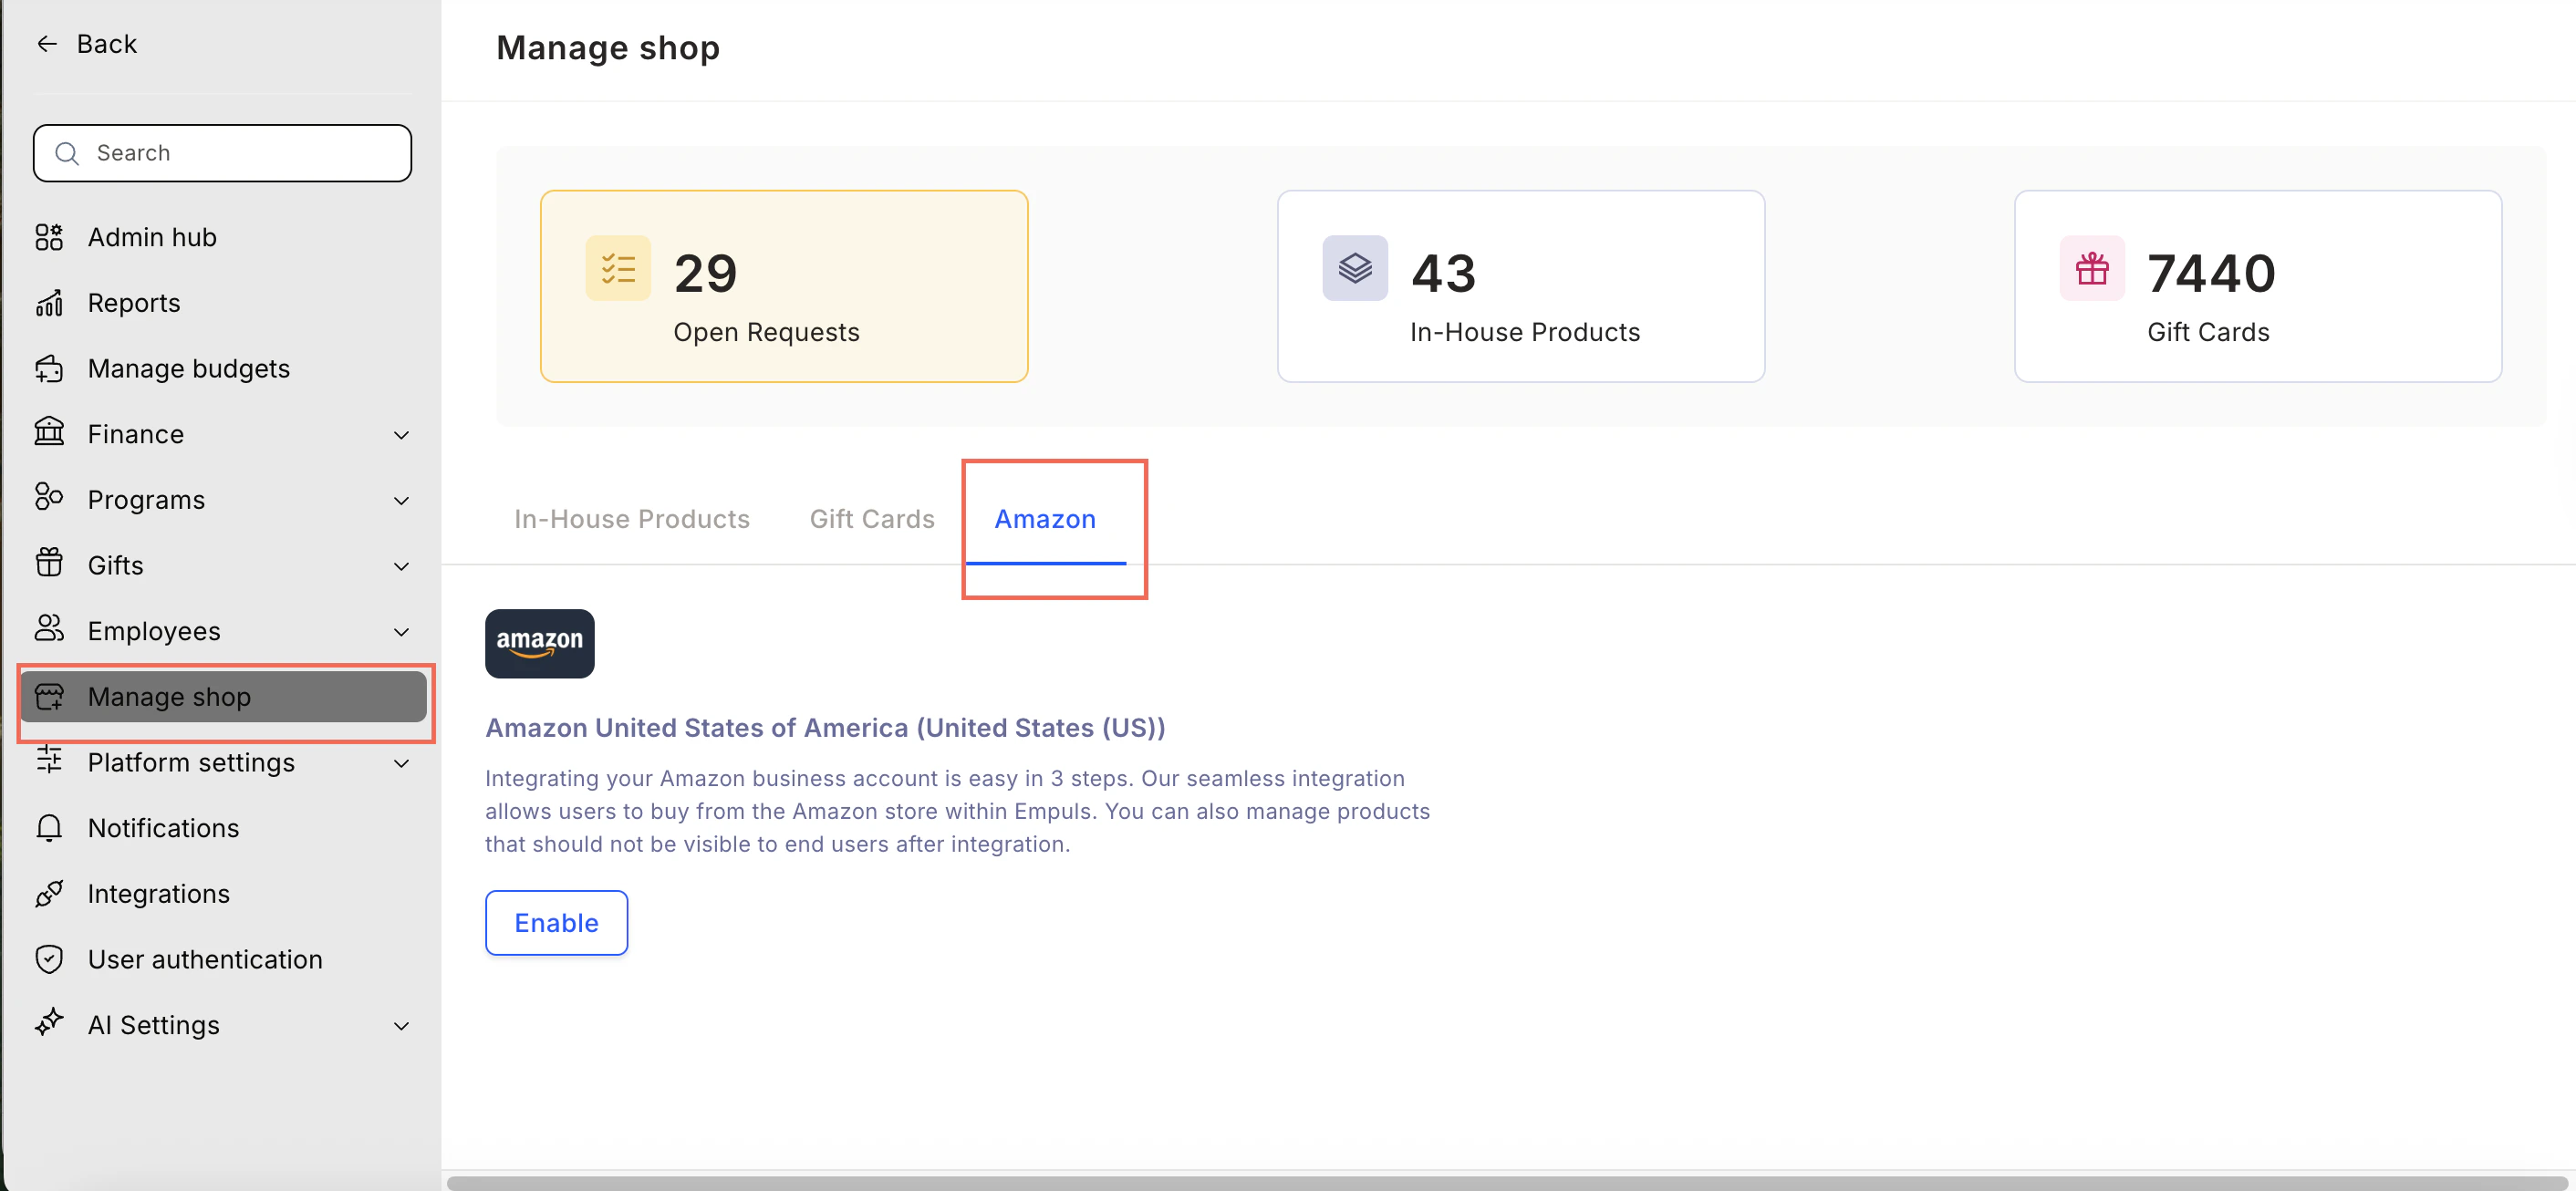
**3.1: Navigate to Manage Stores**
* Log in to your **Empuls Admin** **Dashboard**
* Go to **Manage Shop > Amazon**
## Step 3: Enable Amazon Business on Empuls
Follow these steps to integrate and enable your Amazon Business account within Empuls:
**3.1: Navigate to Manage Stores**
* Log in to your **Empuls Admin** **Dashboard**
* Go to **Manage Shop > Amazon**
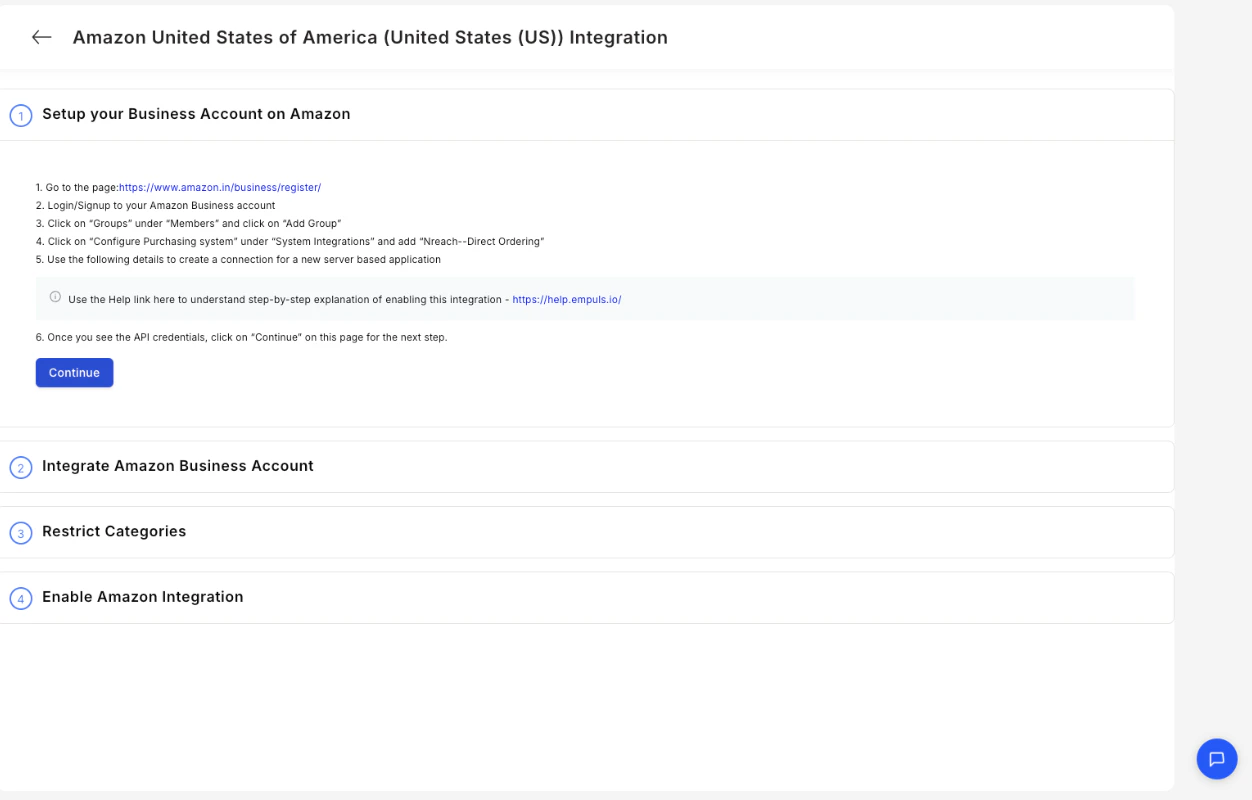
 **3.2: Set Up Amazon Business**
* In the Manage Stores section, find **Amazon Business**.
* Click **“Set up your Amazon Business Account.”**
**3.2: Set Up Amazon Business**
* In the Manage Stores section, find **Amazon Business**.
* Click **“Set up your Amazon Business Account.”**
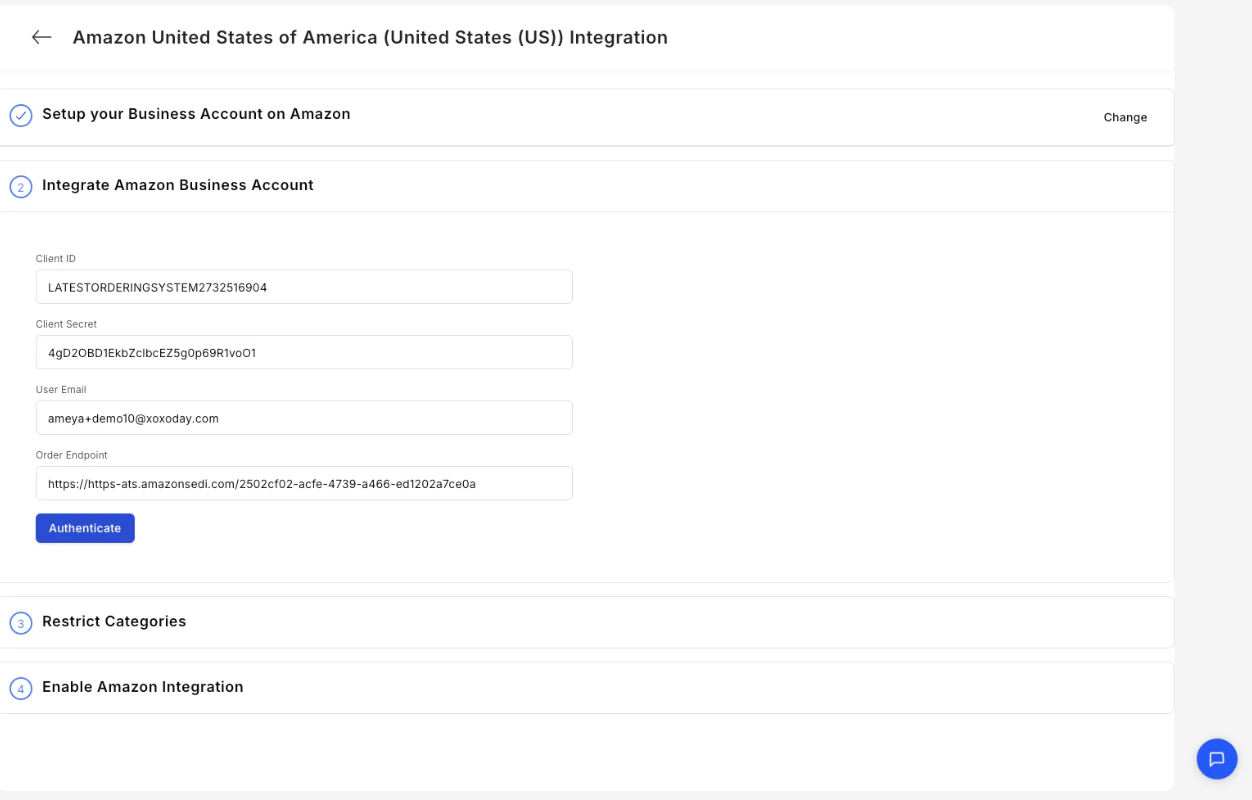
 **3.3: Integrate your Amazon Business**
* Click “Integrate Amazon Account.” Fetch the details from the group created for Empuls integration.
* Enter the following details. Refer details from step 2.6 above:
* Client ID: From identity in cxml
* Client Secret: Shared secret in cxml
* Super Admin Email: Email id of the Empuls super admin
* Order Endpoint URL: Purchase order request URL
* Click **“Authenticate.”**
**3.3: Integrate your Amazon Business**
* Click “Integrate Amazon Account.” Fetch the details from the group created for Empuls integration.
* Enter the following details. Refer details from step 2.6 above:
* Client ID: From identity in cxml
* Client Secret: Shared secret in cxml
* Super Admin Email: Email id of the Empuls super admin
* Order Endpoint URL: Purchase order request URL
* Click **“Authenticate.”**
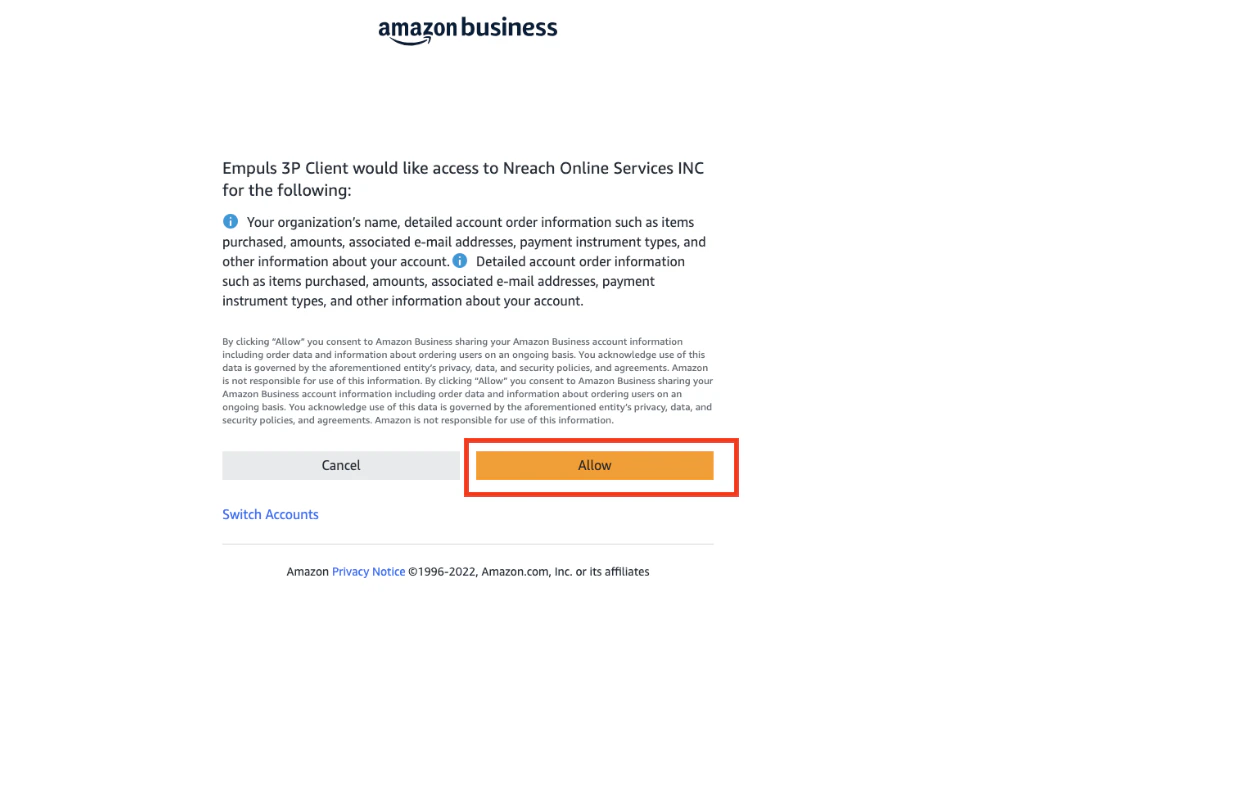
 * You’ll be redirected to Amazon's OAuth screen.
* Click **Allow** to grant Empuls permission to place orders on your organization's behalf.
* You’ll be redirected to Amazon's OAuth screen.
* Click **Allow** to grant Empuls permission to place orders on your organization's behalf.
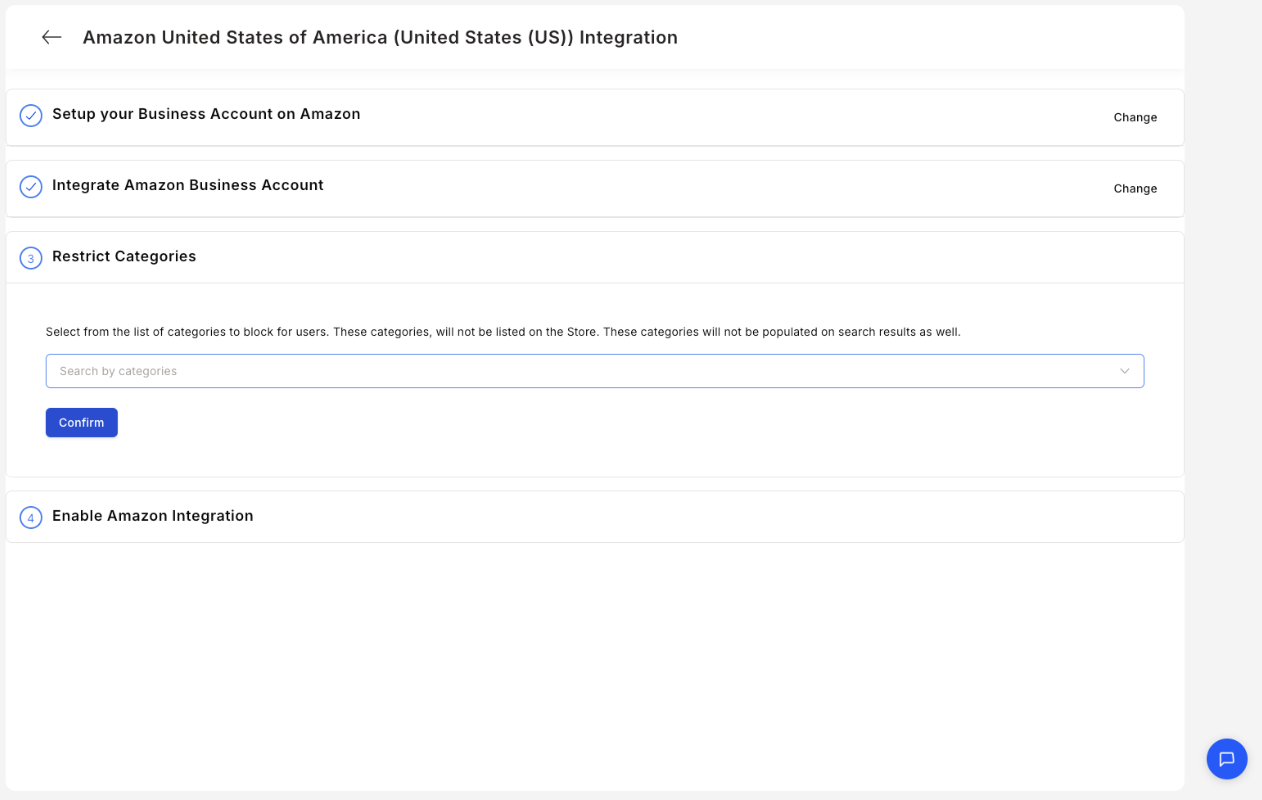
 **3.4: Restrict Categories (Optional)**
* You can choose which **product categories** to allow or restrict for your users.
* Once done, click **“Confirm.”**
**3.4: Restrict Categories (Optional)**
* You can choose which **product categories** to allow or restrict for your users.
* Once done, click **“Confirm.”**
 **3.5 Final Enablement**
* Back on the **Manage Stores** page, look for a green **“Enable”** button next to Amazon Business.
* Click **“Enable”** to activate the integration. Voila!, Your Amazon 3P setup is live.
## **Need Help?**
For support with Amazon integration or setup, reach out to your Xoxoday Customer Success Manager or email: **[cs@xoxoday.com](mailto:cs@xoxoday.com)**
**3.5 Final Enablement**
* Back on the **Manage Stores** page, look for a green **“Enable”** button next to Amazon Business.
* Click **“Enable”** to activate the integration. Voila!, Your Amazon 3P setup is live.
## **Need Help?**
For support with Amazon integration or setup, reach out to your Xoxoday Customer Success Manager or email: **[cs@xoxoday.com](mailto:cs@xoxoday.com)**