> ## Documentation Index
> Fetch the complete documentation index at: https://help-empuls.xoxoday.com/llms.txt
> Use this file to discover all available pages before exploring further.
# UKG Ready
> Learn how the UKG Ready and Empuls Integration works and helps automate Employee Engagement, Recognition & Rewards
# **Why this Integration?**
This integration automates user account management processes in Empuls based on employee data available in your UKG Ready account.
With this integration, you can:
* Add new employees to Empuls automatically when their UKG Ready profile is created.
* Edit existing employee data in Empuls simply by updating their UKG Ready profile.
* Remove exited employees from Empuls based on their exit date/status in UKG Ready.
Once this integration is enabled, the data will sync once every 24 hours between Empuls and your UKG Ready account.
# **How to set up this integration?**
Log in to your Empuls account.
Go to **Admin Dashboard** by clicking on "**Reports and Admin**".
Navigate to "**Integrations.**"
Navigate to the **HRMS Applications** section and click on the **UKG Ready app**.
Click on the "Add UKG Ready" button to start the integration.
Enter your UKG Ready account API credentials, which include the API username, password, key, and Company Short Name. Click on the "Test Connection & Proceed" button to verify your UKG Ready account connection.
Need help on getting this information on your UKG Ready account? Read UKG Ready help documentation below the article.
**Note:** We need the following permissions on the UKG Service account. All the permissions are "View" only.
1. Employee Information
2. Account/Personal Information
3. Primary Email
4. Name
5. Account status
The *permissions mentioned above are mandatory. The client can allow more permissions with Account/Personal Information according to their needs.*
6. Reports
7. Export Reports (CSV/text)
This step allows you to select the data to be uploaded to your Empuls account.
Data can be mapped for multiple fields like
1. First name
2. Last name
3. Official email
4. Employee code/ID
5. Grade
6. Department
7. Designation
8. Date of birth
9. Date of Joining
10. Mobile number
11. Business Unit
12. Cost center
13. Location
14. Contact/Mobile number, and many more
* Select the data fields to be imported into Empuls.
* Map the data fields on your UKG Ready account to the correct fields on Empuls to configure the platform according to your needs.
* Select the date format for the **Date of Joining** and **Date of Birth** fields to ensure that dates are updated correctly on Empuls.
Admins can download employee data in CSV format before uploading to Empuls to validate that the data fields are mapped and no record is repeated.
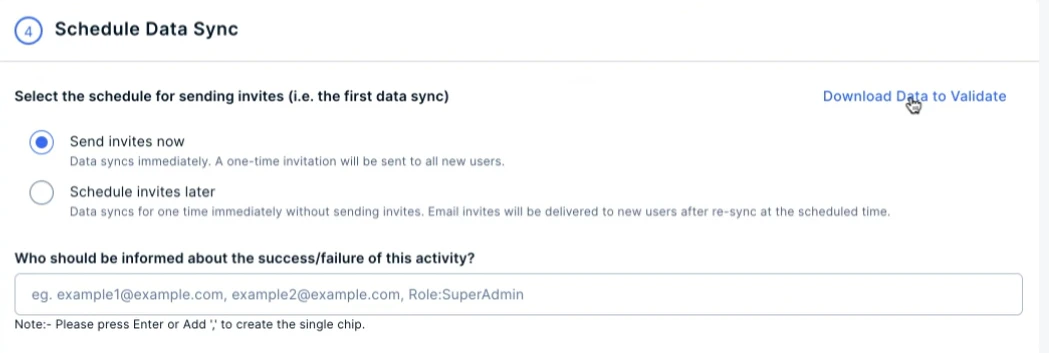 In this step, you can choose between two data sync options:
* Run Date Sync Once Now: Select this option to launch Empuls platform and create accounts for all employees and send invites immediately.
* Schedule First Data Sync for Later: Select this option to schedule employee account creation to a later date and time. This option will help you plan and execute employee account creation on Empuls to coincide with your internal launch announcements.
Click on\*\* Save & Finish\*\* to complete your integration setup.
## How to stop data sync with your UKG Ready account?
Based on the period you wish the data sync to be stopped, there are two ways to achieve this. Refer to the Temporary and permanent changes below.
## \*\*1. \*\*Temporarily Disable Data Sync with UKG Ready
Log in to your Empuls account.
Go to **Admin Dashboard** by clicking on "**Reports and Settings**".
Navigate to "**Integrations.**"
Navigate to the \*\*Active Integrations \*\*section and click on **the UKG Ready app**.
Scroll down to see the ellipses (i.e., three dots) icon. Click on the icon to get the option to **Disable UKG Ready** to turn off your data sync with UKG Ready.
## \*\*2. \*\*Permanently Disable Data Sync with UKG Ready
Log in to your Empuls account.
Go to **Admin Dashboard** by clicking on "**Reports and Settings**".
Navigate to "**Integrations.**"
Navigate to the \*\*Active Integrations \*\*section and click on **the UKG Ready app**.
Scroll down to see the button **Remove UKG Ready**. Click this button to turn off your data sync with UKG Ready permanently.
You can re-enable your data sync by following the instructions in "**How to set up this integration?**"
In this step, you can choose between two data sync options:
* Run Date Sync Once Now: Select this option to launch Empuls platform and create accounts for all employees and send invites immediately.
* Schedule First Data Sync for Later: Select this option to schedule employee account creation to a later date and time. This option will help you plan and execute employee account creation on Empuls to coincide with your internal launch announcements.
Click on\*\* Save & Finish\*\* to complete your integration setup.
## How to stop data sync with your UKG Ready account?
Based on the period you wish the data sync to be stopped, there are two ways to achieve this. Refer to the Temporary and permanent changes below.
## \*\*1. \*\*Temporarily Disable Data Sync with UKG Ready
Log in to your Empuls account.
Go to **Admin Dashboard** by clicking on "**Reports and Settings**".
Navigate to "**Integrations.**"
Navigate to the \*\*Active Integrations \*\*section and click on **the UKG Ready app**.
Scroll down to see the ellipses (i.e., three dots) icon. Click on the icon to get the option to **Disable UKG Ready** to turn off your data sync with UKG Ready.
## \*\*2. \*\*Permanently Disable Data Sync with UKG Ready
Log in to your Empuls account.
Go to **Admin Dashboard** by clicking on "**Reports and Settings**".
Navigate to "**Integrations.**"
Navigate to the \*\*Active Integrations \*\*section and click on **the UKG Ready app**.
Scroll down to see the button **Remove UKG Ready**. Click this button to turn off your data sync with UKG Ready permanently.
You can re-enable your data sync by following the instructions in "**How to set up this integration?**"