> ## Documentation Index
> Fetch the complete documentation index at: https://help-empuls.xoxoday.com/llms.txt
> Use this file to discover all available pages before exploring further.
# BambooHR
> Learn how the BambooHR and Empuls Integration works and helps automate Employee Engagement, Recognition & Rewards
Seamlessly integrate BambooHR with Empuls for swifter and automated user data management.
## Before You Begin
Ensure you have admin access to both Empuls and BambooHR accounts. You'll need BambooHR API credentials and your company's BambooHR domain information.
## Why This Integration?
Integrating BambooHR with your Empuls account helps you seamlessly sync data. All real-time employee data changes on your BambooHR account reflect automatically on your Empuls account through this integration, bolstering your efforts to appreciate and recognise your team members.
With this integration, you can:
* Add new employees to Empuls automatically as soon as their BambooHR profile is created.
* Edit existing employee data in Empuls simply by updating their BambooHR profile.
* Remove exited employees from Empuls based on their exit date in BambooHR.
* Import employee birth dates and start dates so you can celebrate these special days with automated greetings and gifts.
Once this integration is enabled, the data will sync between Empuls and your BambooHR account once every 24 hours.
## Integration set up
### Step 1: Configure custom report
Create a new report in your BambooHR account, which captures the below user data.
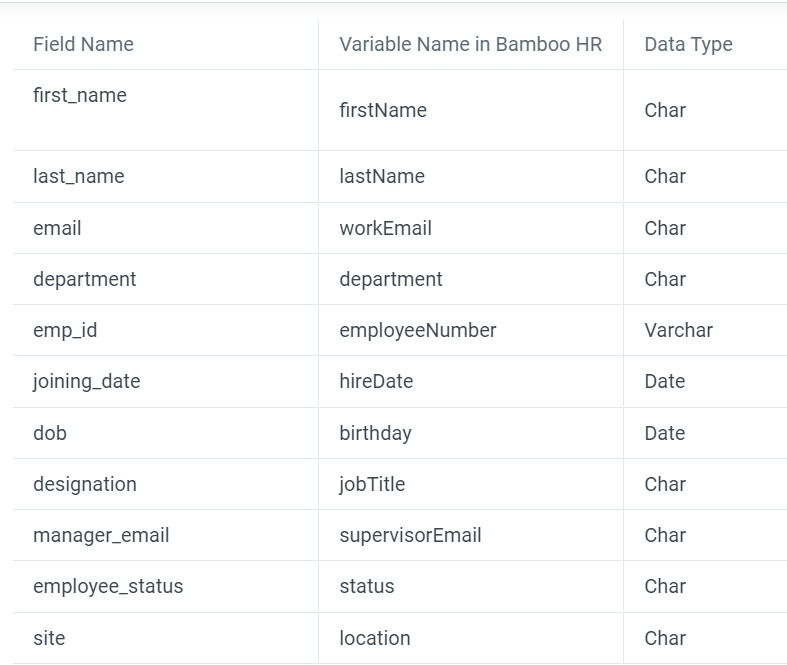 [Documentation Link: How to create a custom report in Bamboo HR](https://www.bamboohr.com/blog/custom-hr-reports-hints-tips/)
### Step 2: Create system user
Create a new user for Empuls in your BambooHR account. This user should be a non-employee system user and should have access to the report created in the previous step.
[Documentation Link: How to create a new user in Bamboo HR and generate the API key](https://help.quantumworkplace.com/creating-a-bamboohr-api-key-for-integration)
### Step 3: Provide your BambooHR credentials
Feed in your \*\*BambooHR Domain \*\*name and click on **Continue BambooHR setup.**
[Documentation Link: How to create a custom report in Bamboo HR](https://www.bamboohr.com/blog/custom-hr-reports-hints-tips/)
### Step 2: Create system user
Create a new user for Empuls in your BambooHR account. This user should be a non-employee system user and should have access to the report created in the previous step.
[Documentation Link: How to create a new user in Bamboo HR and generate the API key](https://help.quantumworkplace.com/creating-a-bamboohr-api-key-for-integration)
### Step 3: Provide your BambooHR credentials
Feed in your \*\*BambooHR Domain \*\*name and click on **Continue BambooHR setup.**
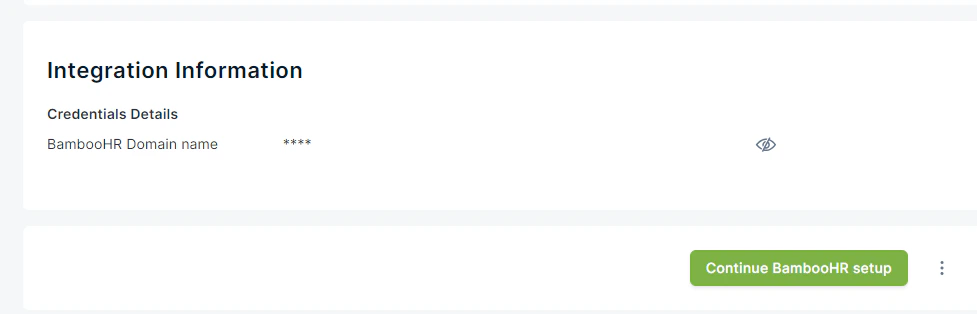 We need the following details to configure the integration between BambooHR and Empuls.
* **BambooHR Tenant ID** - This is the domain / tenant name that you use to access BambooHR.
* **Base64 Encoded API Key** - API Key would be created by Base64 encoding the username and API key. `Base64(:)` ex. `Base64("iuqhedieahrdyr9823y:abcd@domain.com")`. Use this [tool](https://www.base64encode.org/) to encode.
* **Report Input XML** - This will contain the field names that you have used for creating the custom report. ex:
```xml theme={null}
hrms
```
This step concludes credentials are validated. You will be redirected to the next step towards this integration.
### Step 4: Map Data Fields
This step allows you to select and map data fields to be uploaded to your Empuls account. You can do the following in step 3. The data that you receive will depend on the permissions you have granted in the custom report.
### Step 5: Schedule or Run Now
Finally, you can choose to schedule the integration to start from a future date/time or run immediately. Once enabled, the integration will automatically run daily to sync data from BambooHR into Empuls.
### Step 6: Download data to validate
Admins can download employee data in CSV format before uploading to Empuls to validate that the data fields are mapped and no record is repeated.
## FAQs
The integration syncs automatically every 24 hours, ensuring your Empuls data stays current with BambooHR.
When an employee's status changes to "Exit" or an exit date is reached, the system automatically removes them from active sync in Empuls.
Only standard BambooHR fields are supported in the base integration. Contact support for custom field mapping options.
## Troubleshooting
1. Sync failed to complete Verify your API key is correctly encoded in Base64 and the BambooHR domain is accurate
2. Duplicate employee records Check for duplicate entries in BambooHR and run a data cleanup
3. Missing field values Ensure those fields are populated in BambooHR and included in your field mapping configuration
## Next Steps
After integration is live, monitor the first sync cycle in the integration logs. Verify employee counts match between BambooHR and Empuls. Test the auto-add feature by creating a test employee in BambooHR.
Questions, feedback or need support? Email [cs@xoxoday.com](mailto:cs@xoxoday.com)
We need the following details to configure the integration between BambooHR and Empuls.
* **BambooHR Tenant ID** - This is the domain / tenant name that you use to access BambooHR.
* **Base64 Encoded API Key** - API Key would be created by Base64 encoding the username and API key. `Base64(:)` ex. `Base64("iuqhedieahrdyr9823y:abcd@domain.com")`. Use this [tool](https://www.base64encode.org/) to encode.
* **Report Input XML** - This will contain the field names that you have used for creating the custom report. ex:
```xml theme={null}
hrms
```
This step concludes credentials are validated. You will be redirected to the next step towards this integration.
### Step 4: Map Data Fields
This step allows you to select and map data fields to be uploaded to your Empuls account. You can do the following in step 3. The data that you receive will depend on the permissions you have granted in the custom report.
### Step 5: Schedule or Run Now
Finally, you can choose to schedule the integration to start from a future date/time or run immediately. Once enabled, the integration will automatically run daily to sync data from BambooHR into Empuls.
### Step 6: Download data to validate
Admins can download employee data in CSV format before uploading to Empuls to validate that the data fields are mapped and no record is repeated.
## FAQs
The integration syncs automatically every 24 hours, ensuring your Empuls data stays current with BambooHR.
When an employee's status changes to "Exit" or an exit date is reached, the system automatically removes them from active sync in Empuls.
Only standard BambooHR fields are supported in the base integration. Contact support for custom field mapping options.
## Troubleshooting
1. Sync failed to complete Verify your API key is correctly encoded in Base64 and the BambooHR domain is accurate
2. Duplicate employee records Check for duplicate entries in BambooHR and run a data cleanup
3. Missing field values Ensure those fields are populated in BambooHR and included in your field mapping configuration
## Next Steps
After integration is live, monitor the first sync cycle in the integration logs. Verify employee counts match between BambooHR and Empuls. Test the auto-add feature by creating a test employee in BambooHR.
Questions, feedback or need support? Email [cs@xoxoday.com](mailto:cs@xoxoday.com)